
DIY Bottle Opener: Rustic Wall-Mounted Project
Originally published on [June 1, 2021. Updated on March 15, 2026
A DIY bottle opener is one of the easiest woodworking projects you can make, but it also happens to be one of the most practical. Whether you’re building a backyard bar, upgrading a patio, or creating a thoughtful handmade gift, a wall-mounted bottle opener adds both function and personality to your space.
This simple DIY project can be completed in an afternoon using basic materials such as scrap wood, screws, and a mounted bottle opener. Many DIYers even add a cap catcher or magnet so bottle caps don’t end up all over the floor.
In this tutorial, I’ll show you how to make a rustic DIY bottle opener, along with tips to customize it for your home decor style.

This post contains affiliate links. If you make a purchase through one of my links, I may earn a small commission at no extra cost to you. As an Amazon Associate I earn from qualifying purchases.
Why Make a DIY Bottle Opener?
A handmade bottle opener is a small project with a big impact. It works well in many spaces:
• Outdoor entertaining areas
• Garages or workshops
• Home bars or kitchens
• Patio and deck spaces
Because the project is simple and affordable, it’s also perfect for beginner DIYers or anyone looking for a quick weekend project.
Another bonus is that bottle openers make fantastic gifts. Handmade versions are popular for:
• Father’s Day gifts
• Housewarming presents
• Wedding gifts
• Holiday gifts
Many DIY bottle openers include reclaimed wood or pallet boards, which gives them a rustic farmhouse feel that fits perfectly with modern home decor trends.
Supplies needed for your Bottle Opener
- Pallet wood, or a piece of scrap wood, or buy precut
- Handsander
- Sandpaper pads 60/120 grit
- Metal bottle opener
- paint- acrylic or interior paint
- paint brush
- stencil- see below!
- Contact paper
- or 12×12 mylar sheets with spray adhesive
- Polycrylic matte clear coat
- Sponge brush
- Screws and anchors- Size will be determined by the thickness and surface you are attaching your bottle opener to.
- Screwgun
The simplicity of this project is what makes it so appealing. With just a few tools and basic woodworking skills, you can create a functional decor piece for your home. Or you can buy a precut piece of wood and bypass this step altogether.
How to Make a Wall-Mounted Bottle Opener
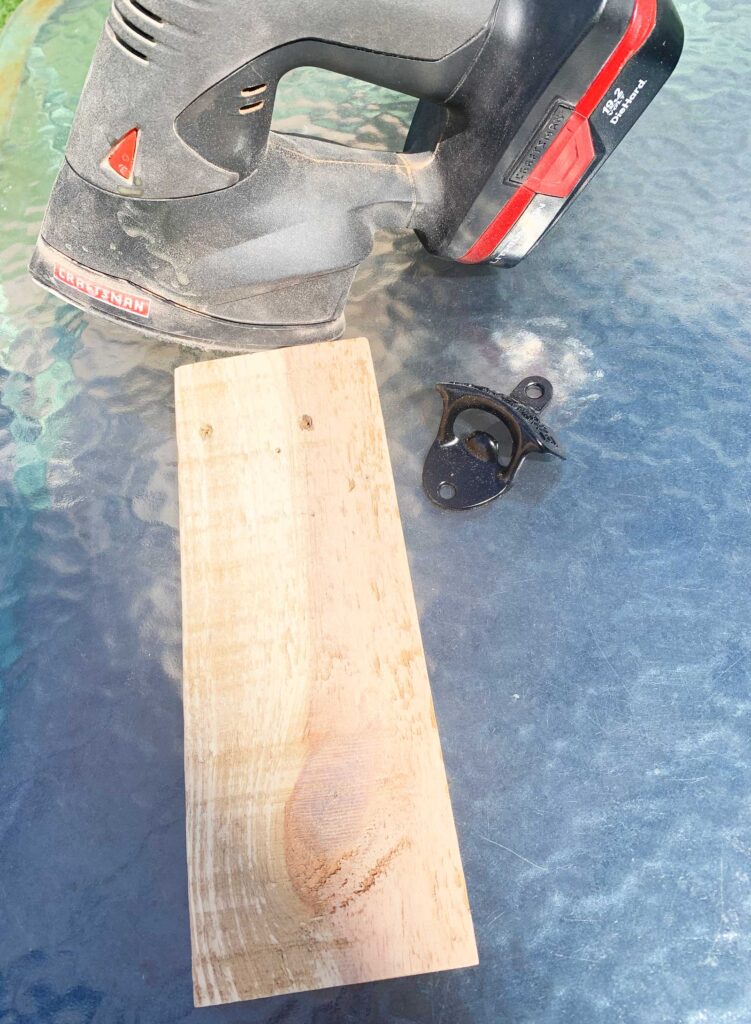
I always prefer pallet wood; it’s easy to come by and easy to cut. I am fortunate enough to have my neighbor, who uses a lot of pallet wood, so he had these pre-cut pieces of 3 1/2″x 10″ perfect for my bottle opener DIY! You can check out these 3 custom-painted pallet signs I made using pallet wood.
The first step was to use my Craftsman hand sander. First, using a rough sand paper grit of 60, then the final sanding using a finer grit of 120.
1. Choose and Prep Your Wood
Start by selecting a wooden board for the base. Reclaimed wood works beautifully for a rustic look, but any solid wood board will work.
Sand the board lightly to remove rough spots and splinters. Sanding before assembly helps create a smoother finish and better stain or paint coverage.
If you prefer a distressed look, leave some imperfections in the wood for character.
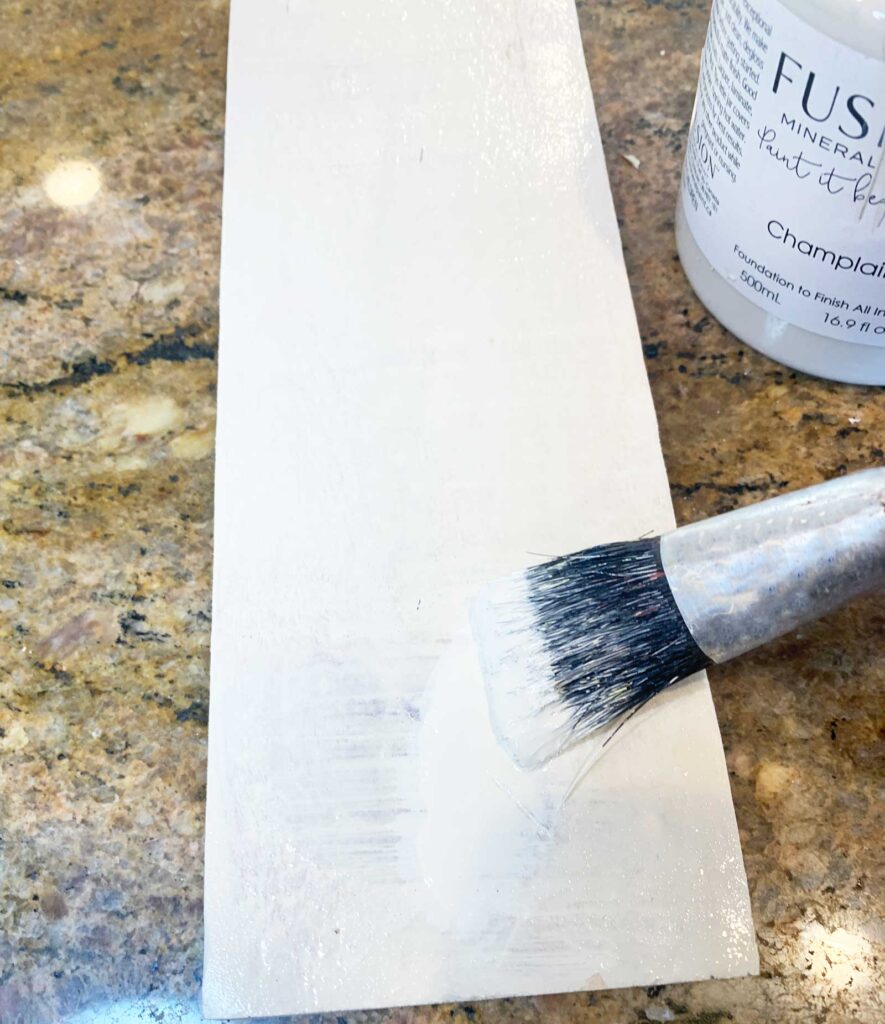
2. Paint or Stain the Wood
Next, apply paint or wood stain depending on the style you want.
Popular DIY styles include:
• Rustic farmhouse stain
• Whitewashed wood
• Dark walnut stain
• Painted farmhouse signs
Allow the finish to dry completely before moving to the next step.
3. Attach the Bottle Opener Hardware
Position the metal bottle opener near the top of the board.
Using screws, secure the opener firmly to the wood. Make sure the screws are tight because opening bottles will create downward pressure on the hardware.
Some DIYers test the placement with a bottle first to ensure there is enough clearance for removing caps easily.
4. Add a Cap Catcher (Optional)
Adding a cap catcher makes the project even more practical.
Some easy options include:
• A small wire basket
• A mason jar attached with hose clamps
• A wooden catch box
• A hidden magnet behind the board
Magnetic catchers are especially popular because they allow bottle caps to stick to the board as they fall.
5. Mount the Bottle Opener
Finally, mount your DIY bottle opener on a wall, fence, or bar area.
For best results:
• Mount into a wall stud when possible
• Use heavy-duty screws or anchors if mounting to drywall
• Place it at a comfortable height for opening bottles
Once mounted, your DIY bottle opener is ready to use.
Creative Ways to Customize Your Bottle Opener
One of the best parts of this project is how easy it is to personalize.
Here are a few creative ideas:
• Add a stencil with your family name
• Use reclaimed barn wood for a rustic look
• Burn a design into the wood using wood-burning tools
• Add a sports team logo
• Install it on a custom bar sign
This turns a simple project into a unique piece of functional wall decor.
Pro Tips for a Better DIY Bottle Opener
Here are a few tips that will make your project last longer:
Seal outdoor projects
Use an exterior polyurethane if the opener will be mounted outdoors.
Use longer screws
Short screws that come with hardware are often too small for long-term durability.
Test bottle clearance
Make sure there is enough space below the opener for bottles to tilt properly.
Choose sturdy wood
Hardwoods or reclaimed lumber provide better durability than thin boards.
Why This DIY Project Is So Popular
Wall-mounted bottle openers remain one of the most popular beginner woodworking projects because they are:
• inexpensive
• practical
• customizable
• quick to build
They also add a small but meaningful touch to entertaining spaces, especially outdoor patios and home bars.
With just a little creativity, you can turn a simple bottle opener into a handmade statement piece.
How to prevent stencil bleeding
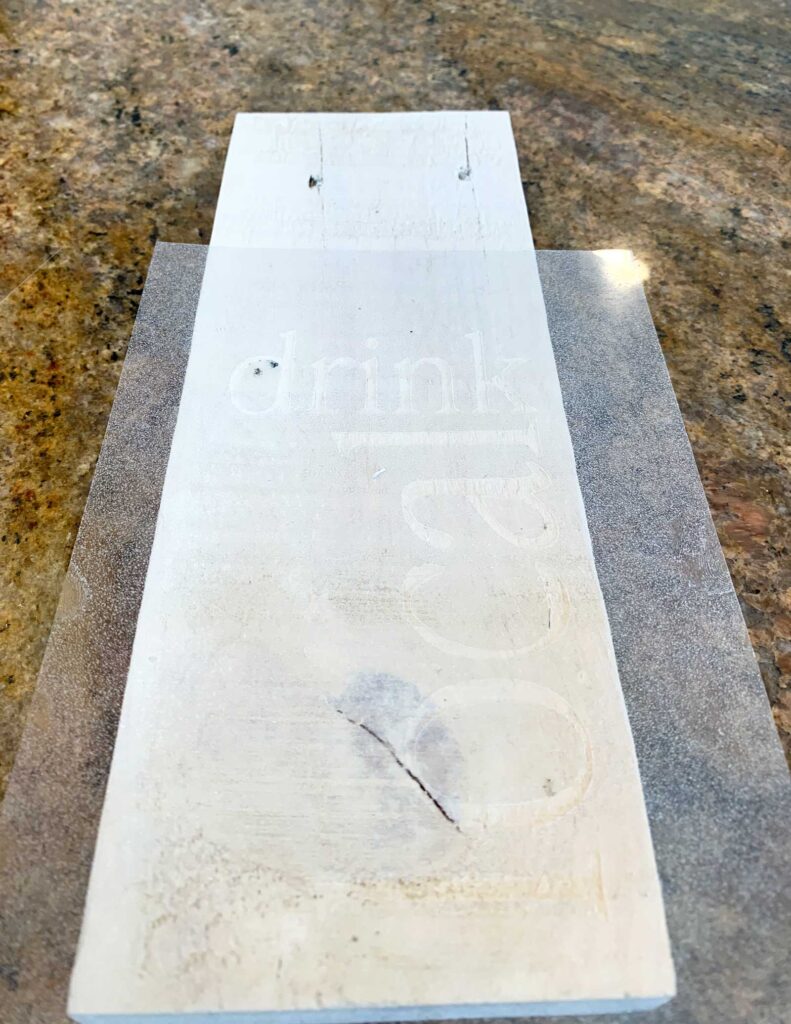
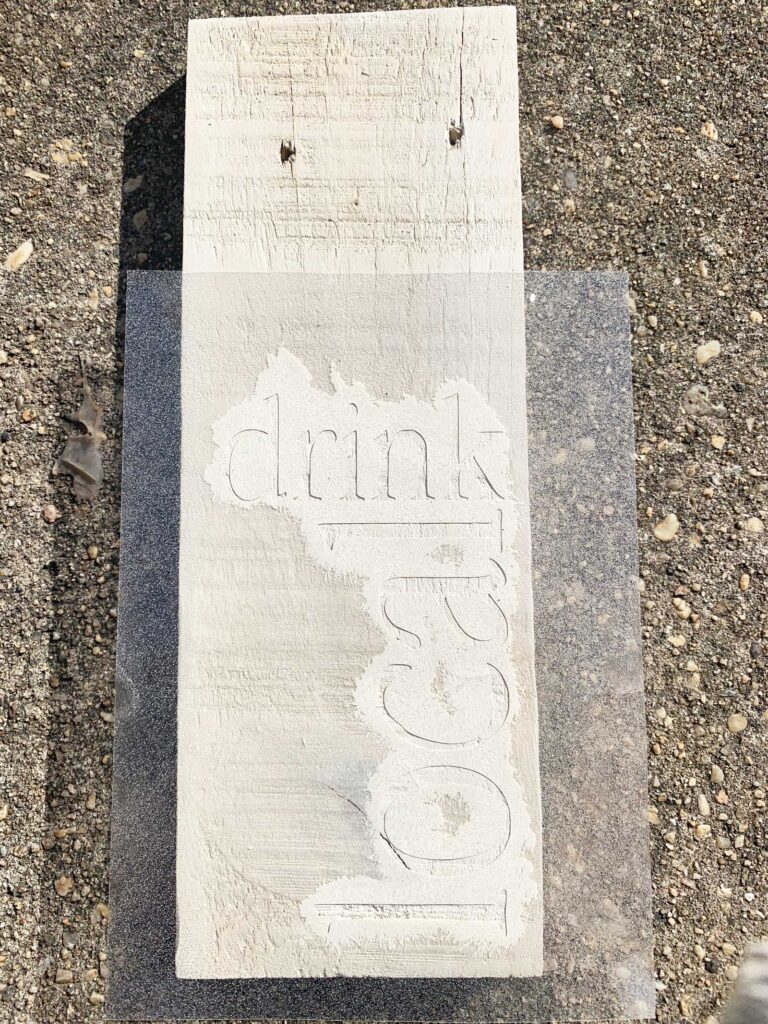
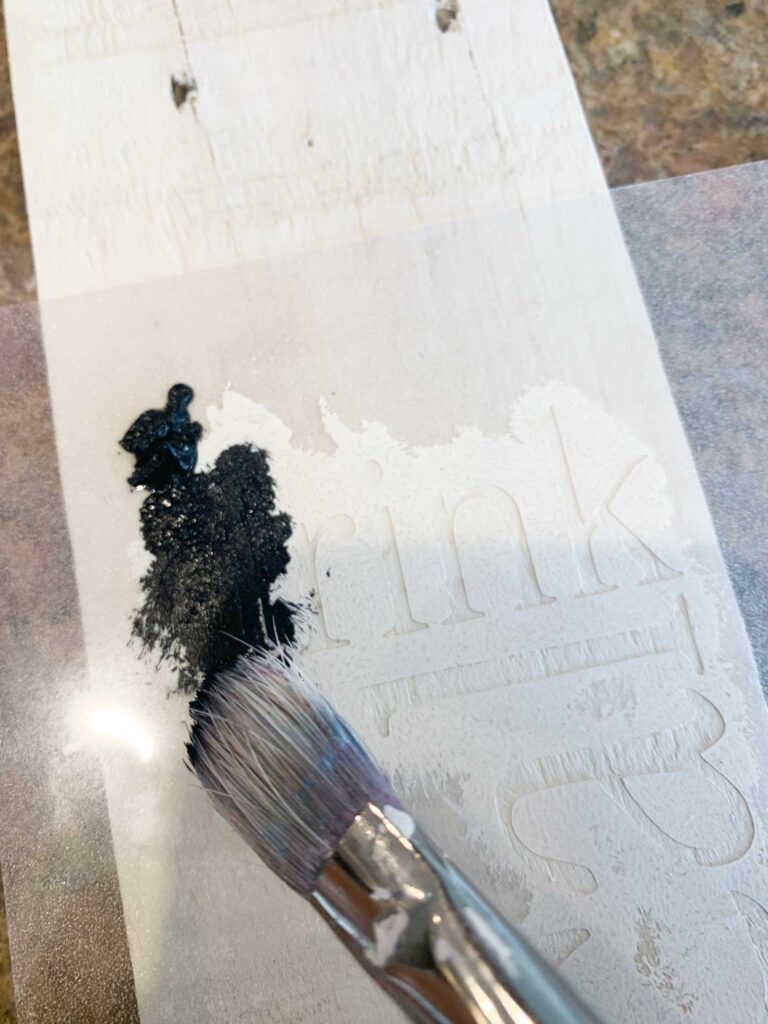
This can really ruin a project! I have a few pointers below to prevent this. The step I used below is once the stencil is in place, use the same color paint as the background, let it dry, then use the desired paint for the stencil. Because this is pallet wood, there will be an uneven surface, and some bleed-through occurred, I then used a fine brush and hand-painted some edges to clean it up.
Another hack I have not tried yet, but will on my next project, is to use Mod Podge in either a sponge brush or on your finger and coat a light layer around the edges of the stencil to seal it, let it dry, then paint your stencil.
For my black stenciled letters, I used a black acrylic paint. You can easily purchase a Benjamin Moore tester in a black color for these letters as well.
How to seal your pallet wood bottle opener
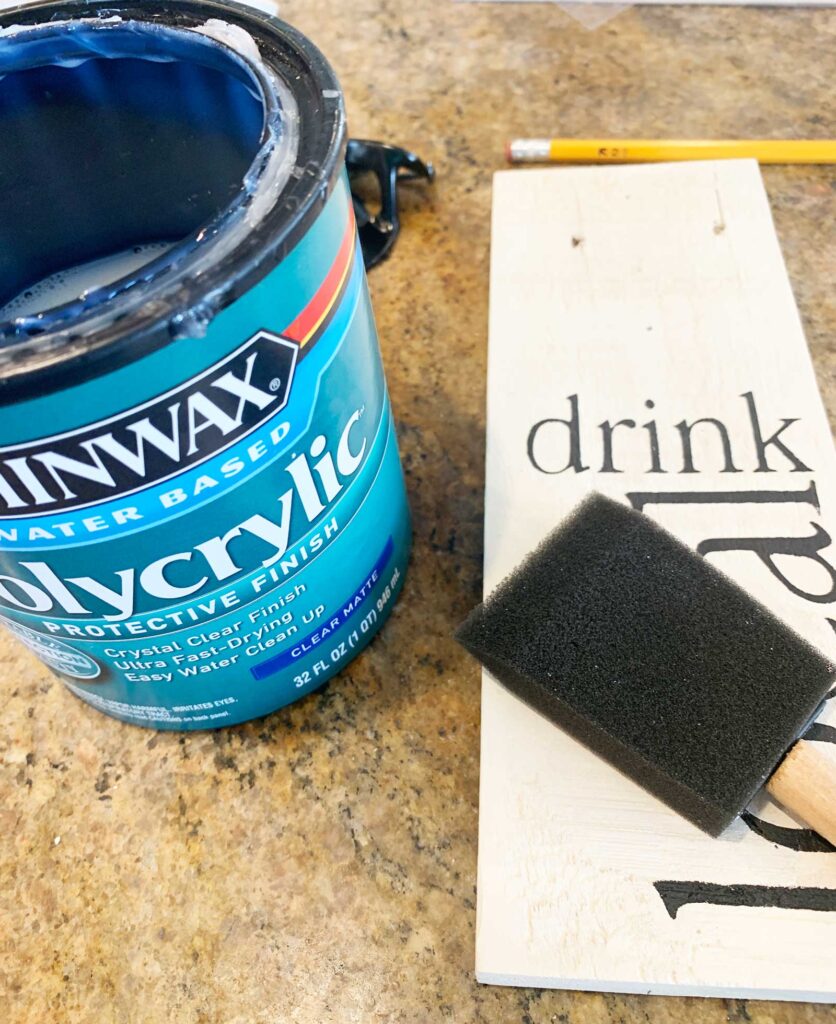
Since this bottle opener is going to be used outside its important to seal the wood. I sealed it with Minwax Polycrylic clear matte. Use a sponge brush and apply it in the same direction as the grain. Let dry and add a second coat to make sure that you have sealed all the surfaces of the wood on the front, back, and sides. Now all you need to do is hang your bottle opener.
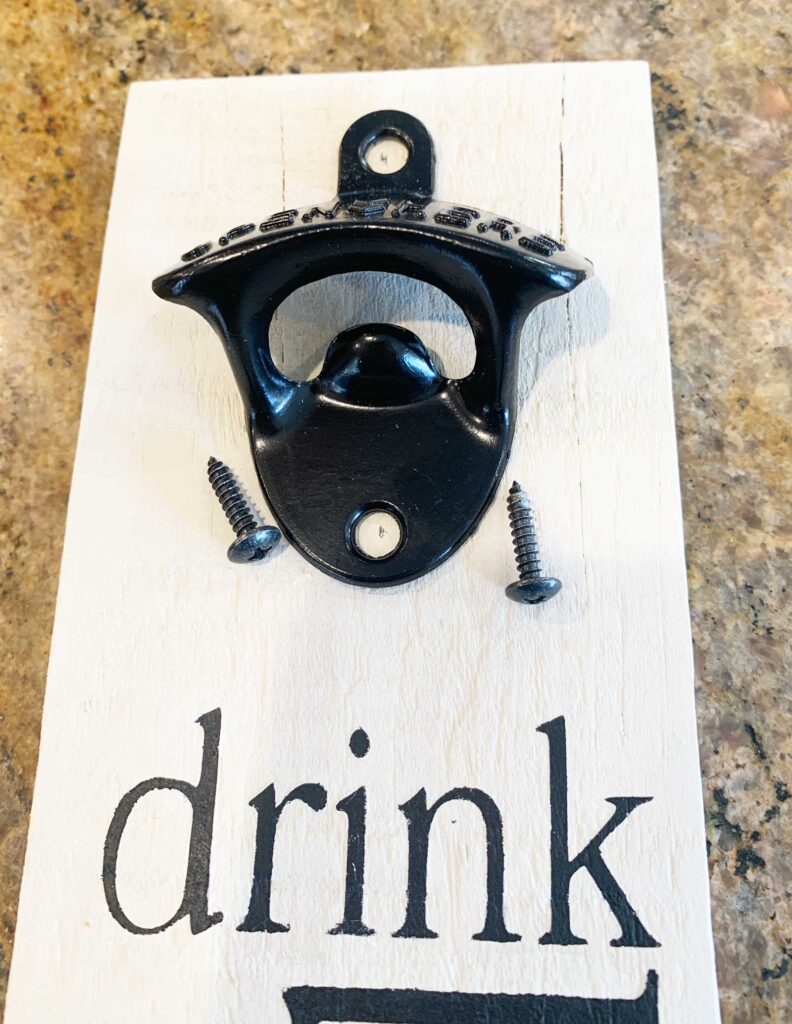
Hardware for a bottle opener DIY
I purchased these black metal bottle openers from Amazon. You can purchase other metal finishes; it just depends on the look you are going for! These metal bottle openers came with screws and wall anchors, which I didn’t use. I used shorter black screws that worked with the width of my board to screw in my metal bottle opener. Then I will use additional anchors and longer screws to attach to the brick on the outside of the house,
Loved how this quick, easy bottle opener diy using pallet wood came out! The cream and black color scheme gives it a timeless look and will be a great addition next to my husband’s outside BBQ. This whole project took around two hours to do, so simple and easy!
Share with me your bottle opener DIY projects below! Hope that the stencil came in handy.

Related posts using pallet wood
Check out the posts below on some cool additional projects that I worked on, using pallet wood.
- How to Repurpose a Sewing Machine Base
- DIY Metallic Furniture Makeover
- How to Paint Wicker Furniture
Thanks for stopping by!

This post is all about DIY bottle openers.
