

How to Add Legs to Furniture and Completely Transform It
Originally published on June 24, 2025. Updated on November 4, 2026].
Learning how to add legs to furniture is one of my favorite ways to completely change the look of an older piece. New furniture legs can add height, improve the proportions, and take a dresser, cabinet, or table from dated to completely updated.
I have added furniture legs to several of my DIY furniture makeovers, and each project required me to look at the piece a little differently. Sometimes adding legs is as simple as screwing them into the bottom of the furniture. Other times, as I discovered with my repurposed china cabinet, you need to make a few adjustments before the legs can be attached.
Below, I’m sharing how I added legs to my own furniture projects, what I look for before choosing furniture legs, and some of the things you should consider before starting your own makeover.

My blog periodically contains affiliate links, meaning that if you make a purchase, I might make a small commission at no extra charge to you. Purchases made through them are greatly appreciated.
Why Add Legs to Furniture?
Sometimes a piece of furniture has good bones but feels heavy, dated, or too low to the floor. Adding new legs can completely change its proportions without replacing the entire piece.
I have used furniture legs to give an older cabinet more height, update a traditional dresser with acrylic details, and turn an old door into a dining table with metal legs.
The style of the legs can also change the personality of the furniture. Tapered wood legs can give a piece a mid-century feel, acrylic legs can make a dresser feel lighter and more modern, and metal legs can work beautifully when you want a cleaner or more industrial look.
Before buying anything, however, I always start by looking at the furniture itself.
How to Add Legs to Furniture
The first thing I do when adding legs to furniture is turn the piece over, or look underneath it, and determine exactly what I have to work with.
- The first thing I do when adding legs to furniture is turn the piece over, or look underneath it, and determine exactly what I have to work with.
- Ask yourself a few questions before ordering your furniture legs.
- Is there a solid area where the legs can be attached?
- Does the furniture already have holes or mounting hardware?
- Will the new legs interfere with existing hardware underneath the piece?
- How much additional height do you want?
- Are the legs designed to support the weight of the furniture?
- Will the piece require additional support?
These questions matter because not every furniture makeover uses the same installation method.
My china cabinet is a perfect example. These questions are important because not every furniture makeover will use the same installation method.
My china cabinet is a perfect example.
How I Added Legs to My China Cabinet
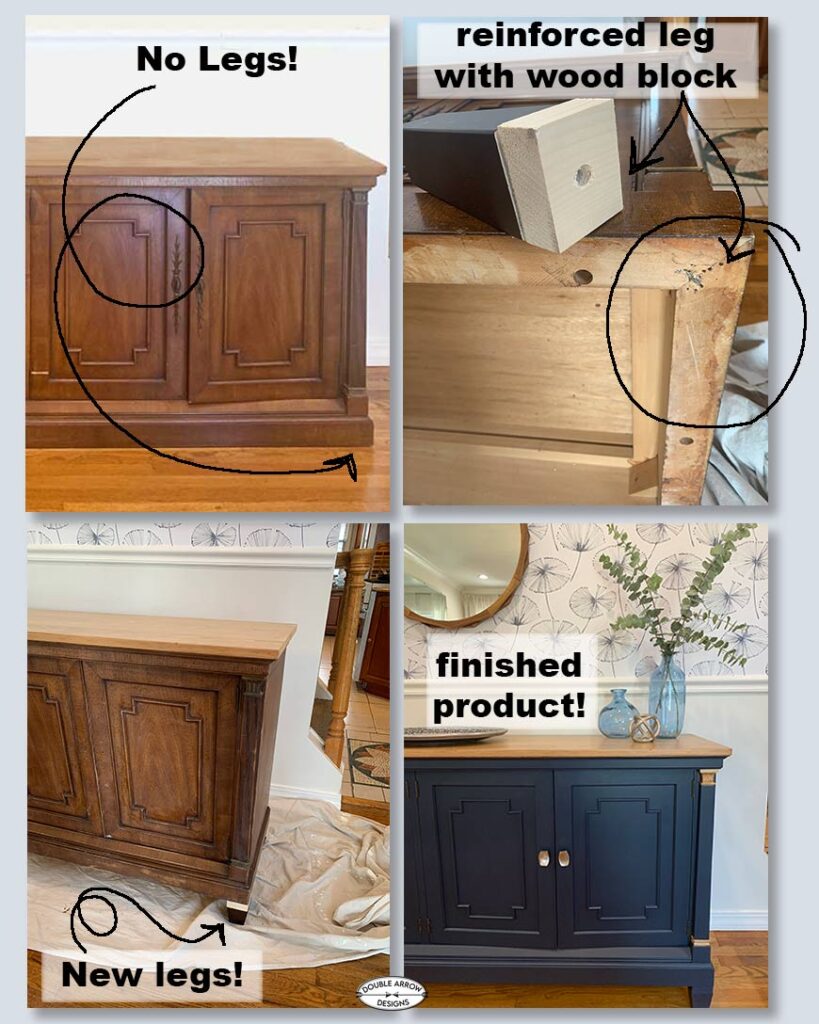
When I repurposed my old china cabinet, I wanted to lift it off the floor and give it a more updated look. I chose 3 inch wood furniture legs because the clean shape worked well with the cabinet, and the additional height helped me create the proportions I wanted for the finished piece.
There was just one problem. When I looked underneath the cabinet, existing metal hardware prevented me from screwing the new legs directly into the bottom. Instead of abandoning the idea, I created a solid area where the legs could be attached.
What I Did
I purchased a 2×4 piece of lumber and cut it into individual blocks to match the dimensions of the tops of my furniture legs. I then drilled a hole in the center of each block, making sure it aligned with the threaded screw on the furniture leg.

Each wood block was attached to the bottom of the cabinet on the three sides where I was able to add nails. The blocks covered the existing metal pieces that had prevented me from attaching the legs directly to the cabinet.
Once the blocks were secure, I screwed the furniture legs into them.
I filled the spaces between the wood blocks and the furniture feet with wood filler. After it dried, I sanded the area and painted everything to match the cabinet so the new supports blended into the finished piece.
The 3-inch furniture legs combined with the 1-inch wood blocks gave me a total of 4 inches of added height.
Once everything was finished, the blocks disappeared visually, and the new legs looked like they had always been part of the cabinet.

This extra step was specific to my cabinet. Your furniture may already have a suitable base for attaching legs and may not require additional wood blocks at all. This is why I recommend examining the bottom of your furniture before purchasing the legs.
How to Choose the Right Furniture Legs
Once you know how the legs will attach, you can start thinking about style, height and material.
I like to look at the overall shape of the furniture first. The goal is for the new legs to feel intentional rather than something that was simply added afterward.
Adding Metal Legs to a DIY Table
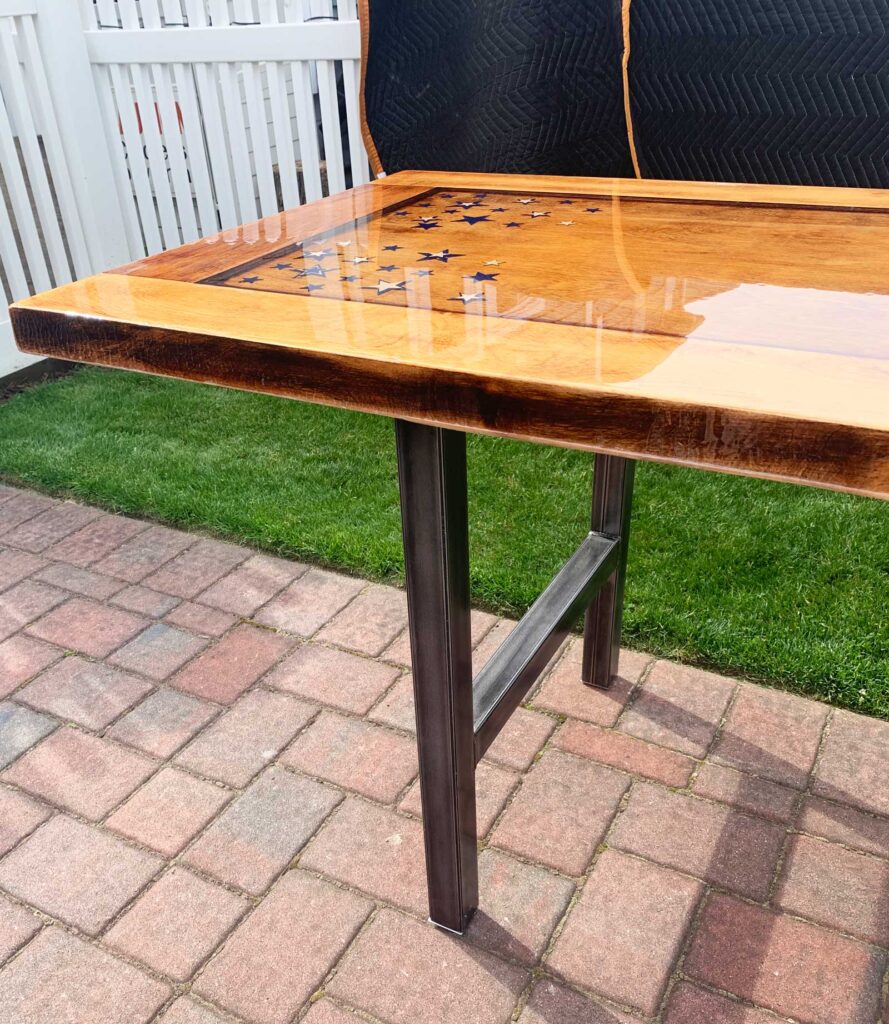
Another furniture project required a completely different type of leg.
My neighbor and I repurposed an old door into a dining table. After finishing the top with epoxy, we added metal framed furniture legs.
For this project, the finished table height was especially important because the table needed to work properly with dining chairs. The metal legs provided the height we needed while also working with the style of the finished tabletop.
This is a good example of why I don’t choose furniture legs based on appearance alone. The style matters, but the finished dimensions and function of the furniture matter just as much.
Old Door Dining Table-From Salvage to Statement
What to Check Before Adding Legs to Furniture
Before you drill or attach anything, take a few minutes to check the entire project.
Make sure you know where each leg will be positioned and that the placement is consistent from corner to corner.
Check the manufacturer’s information for the legs you are using so you know whether they are appropriate for the weight and type of furniture.
Look underneath the furniture for hardware, thin areas or anything else that could interfere with installation.
If you are working with a large or heavy piece, determine whether additional support is necessary for that particular piece before installing the legs.
And don’t forget about your flooring. I add felt furniture pads to the bottoms of my furniture legs to help protect the floor underneath.

Common Mistakes to Avoid When Adding Furniture Legs
One of the easiest mistakes is ordering furniture legs before examining the bottom of the piece. I could have easily done that with my china cabinet and discovered afterward that the existing metal hardware was in the way.
Another mistake is choosing legs based only on how they look. Height, attachment method and the construction of the furniture all need to be considered along with style.
It’s also worth thinking about the final proportions before making a decision. A leg can look beautiful online but still be too tall, too short, or visually too heavy for the furniture you are updating.
Most importantly, don’t assume that because one attachment method worked for one piece of furniture it will work for another. My dresser, cabinet and dining table all required different considerations.
Shop Furniture Legs for Your Next Makeover
If you’re ready to try this on one of your own furniture pieces, here are some of the styles I like for different types of makeovers.

- Wood Furniture Legs, 5 Inch Unfinished Oak Sofa Legs Set
- 4 inch / 10cm Wooden Furniture Legs, Pack of 4
- Wood Square Sofa Legs
- Base Unfinished Furniture Leg, Pack of 4
- Beachwood furniture legs
- Lily Fluted Bun Foot with Hanger Bolt – 4 in
- Reeded Tulip furniture Legs
- Beech Wood Furniture Leg
Is Adding Legs to Furniture Worth It?
For the right piece, absolutely.
Adding furniture legs can be a relatively small detail that makes a surprisingly big difference. I’ve used them to change the height of a cabinet, modernize a dresser, and complete a repurposed dining table.
The key is to look at the furniture first and choose the legs second.
Consider how the legs will attach, how much height you want, the style of the piece, and how the finished furniture will be used. Once those pieces come together, new legs can make an older piece look completely different without replacing the furniture itself.
And that is always one of my favorite parts of a furniture makeover: taking something that already exists and finding a way to make it work beautifully again.
style Leg type Works well with
Adding Acrylic Legs to a Dresser
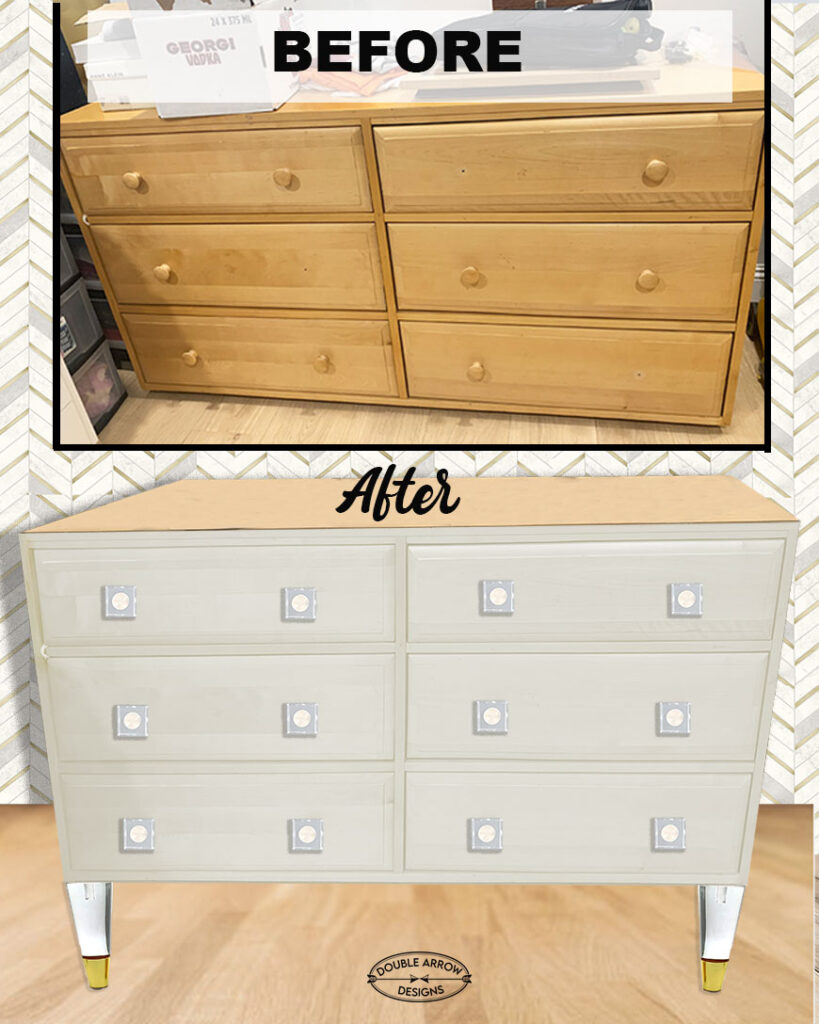
I had this project from a client. It was this old wood dresser. We decided to update it with some paint, acrylic knobs, and feet. Check out the transformation below. These were easy screw-in acrylic furniture legs. Check out the full post, Old Dresser Makeover, that you will love!
I matched these acrylic legs with Acrylic knobs. So take a look at this post where I researched acrylic knobs to coordinate in 24 Acrylic Knobs And Pulls That Will Transform any Furniture.
Shop Furniture Legs for Your Next Makeover
Below is a selection of furniture legs for easy installation. Each leg kit comes with its own hardware for easy installation. However, each project can be different, so research what you want before you purchase. Below is a guide on how to go about finding the right furniture leg match.
- Screw-In Legs
- These are the easiest to work with and often come with mounting hardware. Great for DIYers and beginners.Mounting Plates
- Use these when your furniture doesn’t have pre-drilled holes. Just screw them into the base and attach your legs.Direct Screw-In
- Some legs come with pre-installed hardware—just measure, mark, and screw them in.

- Deux Wood Furniture Leg (Set of 4)– This comes in 3″, 6″, and 8″ furniture leg heights, depending on the height you want.
- Codey-Lee Steel Table Leg (Set of 2) High-quality Material, easy to install, comes in gold & White, Easy to clean. DIY Fun!
- Acrylic Dresser Legs– Made from crystal-clear acrylic material with eye-catching gold caps. For all types of furniture in your home, a set of 4 is excellent for couches, chairs, desks, end tables, dressers, ottomans, cabinets, nightstands, and more.
- Georgianna Hairpin Table Leg (Set of 4)– These hairpin metal legs are heavy-duty proofed and will add both stability and mid-century modern style to any furniture project.
- Contemporary metal furniture leg– comes in three heights.
- Mid Century Ash Wood– Furniture Legs With Gold Caps- Set of 4, and comes in multiple sizes depending on your project.
- Sofa Feet Cabinet Modern Clear– Similar to what I used in the above dresser project.
How to install furniture Legs
No products found.
Watch My DIY China Cabinet Makeover
Want to see how this transformation came together? Watch my TikTok video to see how I repurposed an old china cabinet into a beautiful updated piece. From its original wood finish to the final makeover with new furniture legs, navy paint, and a refreshed look, this project shows just how much potential an older piece of furniture can have.
RELATED POSTS
Take a look at some additional DIY furniture projects that I worked on with the above post. Do not just stop at new or adding furniture legs. By adding new dresser pulls or knobs, you can take your transformation one step further! It’s like adding a piece of jewelry to your new furniture piece!
They can be as simple as tying in the acrylic legs with acrylic pulls or adding a metal detail. What’s fun is that you get to choose.
- Old Dresser Makeover that you will love!
- Dresser Refresh With Novelty Knobs
- 24 Acrylic Knobs and Pulls That Will Transform Any Furniture
Thanks for stopping by!

Let me know if this is helpful! Visit or join my mailing list for updated projects in the future.
In this post, I’m sharing how to add legs to furniture, choose the right style and height, and use this simple update to completely transform an older piece.
Last update on 2026-11-16 / Affiliate links / Images from Amazon Product Advertising API