Old Dresser Makeover: How to Transform a Dated Dresser
Original post from May 9, 2022, updated on February 28, 2026
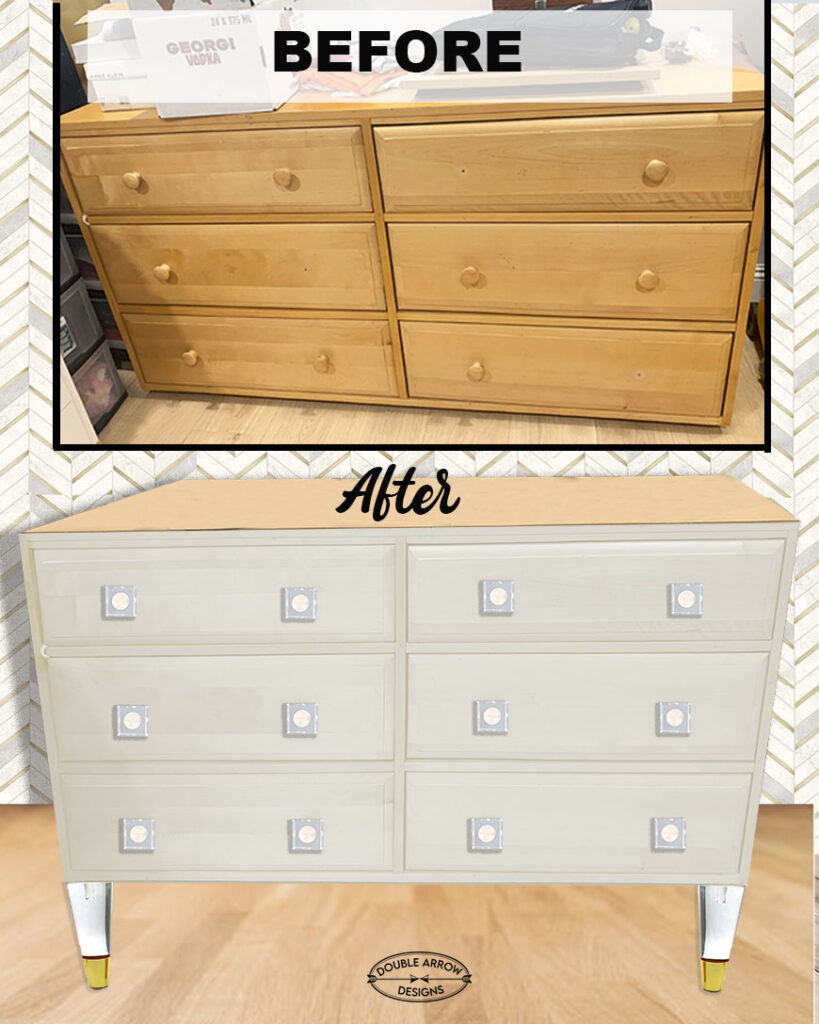
I have a client who had her son’s old wood dresser. It was being stored in a room and just sitting there looking for something fabulous to happen to it! She wanted to make this old dresser makeover so that she could use it in her master bedroom. So we started talking about ideas for this.

My blog periodically contains affiliate links meaning that if you make a purchase, I might make a small commission at no extra charge to you. Purchases made through them are greatly appreciated.
DIY dresser makeover ideas
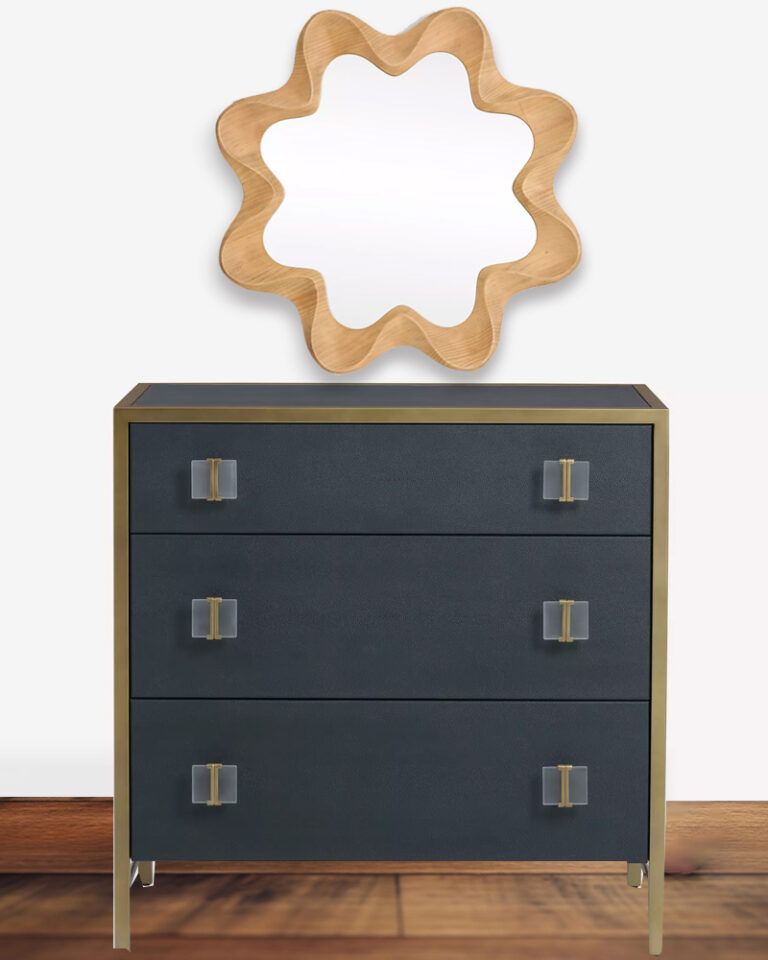
Giving an old dresser a makeover is one of the easiest ways to breathe new life into tired furniture—and it’s way cheaper than buying new! For this DIY dresser makeover, we started by taking photos of the dresser and creating digital mockups so my client could visualize different color options before committing to paint.
Using Adobe Photoshop, I tested three different paint colors from the Fusion Mineral Paint color palette:
- Ash
- Little Lamb
- Lamp White
This step is a game-changer. It helps avoid costly mistakes and lets you see how paint colors will look with your room lighting and décor before picking up a brush.
You can find Fusion paint through local resellers by visiting FusionMineralPaint.com and entering your zip code. My closest reseller is about an hour away, so I always call ahead to make sure they have the colors I need. You can also purchase through Amazon, but keep in mind that shipping costs can be higher. See what I need. You can also buy on Amazon, just be aware of the high shipping costs.

Modern dresser makeover
We took this plain old wood dresser and decided that with a little paint and some accessories it would make this a modern dresser. Just the color alone updates the yellow wood to a neutral clean surface transforming this. So now by adding the modern acrylic knobs and legs it becomes such a different dresser all together.
Prepping Your Old Dresser for a Makeover (Don’t Skip This Step!)
I say this in all my furniture redo posts because it’s THAT important:
Clean your furniture—twice.
Flip the dresser over and vacuum underneath and inside the drawers. Then wipe every surface with a warm, sudsy cloth. Painted dust and grime will ruin your finish fast.
Next, remove all hardware with a simple screwdriver. Store everything in a zip-top bag or container—tiny screws disappear like magic if you don’t.
How to Clean Old Dresser Hardware
If you’re reusing the original hardware, clean it up before reinstalling. Two methods that work great:
- Bar Keepers Friend – Put a small amount on a paper towel and wipe. It works wonders on tarnished metal.
- Vinegar soak method – Soak hardware overnight in equal parts vinegar and warm water. The next day, wash with Dawn, rinse, and dry.
I prefer the vinegar method for detailed or decorative hardware since it gets into all the crevices more easily.
- Bar keepers friend– This works amazingly! a little on a paper towel and wipe away! This worked really well on the hardware from my Sewing Machine Cabinet Repurposed post. The original hardware came out amazing!
- Equal parts vinegar and warm water, and let sit overnight. Then transfer to a bowl of water with some Dawn dish soap. Wash your hardware, then wipe it clean with a rag.
Both methods are good; however, I like the second one, when you have more decorative hardware, and hard to get into all the crevices with just the Barkeepers friend.
How to Paint an Old Dresser (Beginner-Friendly Method)
Because this dresser is a light wood and I’m using Fusion paint, I skipped the primer. Two reasons:
- The light wood won’t show through the darker paint.
- Fusion is designed for furniture makeovers and usually doesn’t require primer.
Important:
The only time I use primer with Fusion is when painting dark wood with a light paint color. Tannins can bleed through and cause ugly brown stains.
For other paint brands like Benjamin Moore or Sherwin-Williams, I always use primer first. For single furniture projects, a tester-size can of paint is often enough—at least in my experience.
Primer for Wood Furniture (When You Need It)
For very dark or old furniture, a shellac-based primer works best. Just know:
- It dries FAST
- Use smooth strokes
- Don’t paint over drying areas
- Clean brushes with an ammonia-water mix afterward
This prevents bleed-through and saves you from repainting later.
No products found.Best Brushes & Tools for Painting Furniture
Your brush matters more than you think! I use a high-quality brush from Purdy (2” and 1.5”). They cost more but last for years with proper cleaning.
No products found.Chalk Wax Paint Brush 4PC Set. This is helpful to have a range of sizes depending on the surfaces you are painting.
No products found.Other tools to paint furniture
I have not used either of the below; however, two other techniques are:
Please note that the above are examples, and I have not tested out either of these methods.
Sealing Your Painted Dresser for Long-Lasting Results
Fusion claims it has a built-in top coat, but for high-traffic furniture like dressers, I still recommend sealing. If the dresser won’t be used much, sealing is optional.
My go-to is Minwax Polycrylic Topcoat in clear matte. It protects without adding shine. Satin and gloss are great options too if you like a sheen.
For the dresser top, I lightly sand the wood, then seal it to protect the natural finish.
No products found.Supplies for this old dresser makeover
See below for all the supplies that I used for this makeover.
Replacing knobs is a great way to update and refresh a piece of furniture easily. I used these square acrylic ones to complement the furniture legs on this project; both are from Amazon.
No products found.Another easy transformation on this dresser was to lift it off the floor and add furniture legs. I used these Acrylic Furniture Legs with gold accents to complement the dresser knobs.
No products found.To complete the look, I used this peel-and-stick wallpaper also from Amazon. Super easy to install ( I do recommend two people for this project to help line up and adhere to the wall)
No products found.Finishing touches on a painted furniture piece
If your piece has legs, whether the original or you are installing new ones, I would say to use felt tabs under the legs. This helps prevent marking or damaging your floor underneath.
Wallpaper for your painted dresser
Another fun detail is using peel-and-stick wallpaper inside the bottom of the drawers. This can be coordinated with the wallpaper you may be using on a wall to tie it all together. I did this on one of my projects, where I used the same wallpaper that I used on the wall behind the piece, then used the same wallpaper on the insides of the doors. You can check that out on my Repurposed China Cabinet.
Take a look at this post, 9 Peel And Stick Wallpaper Ideas, to find some creative ways to use peel-and-stick wallpaper with your next furniture project.
Accessories used for my dresser makeover
This is the fun part! Once the old dresser makeover is done, we get to accessorize to complete the look. Check below for what I used for this old dresser makeover.

- White fluted vase-Keep fresh or faux plants to add a splash of color to this neutral look.
- Bubble Glass Scalloped Shade Table Lamp– Sleek and polished with a beautiful scalloped shade
- Modern Geometric Sculpture Knot – Made of high-quality resin with a smooth gold coating on the surface. This accessory complements the gold used on the knobs and legs.
- Keepsake Storage Boxes and Bedroom Vanity Organizer- in cream and gold to coordinate with the theme
- Decorative Round Mirror– hand-carved wood wall mirror is ornamented with dozens of small wooden balls.
- Capri Blue Volcano Mercury Glass Jar Candle– Candles are a must for any dresser!
- Golden and White Striped 5×7 Picture Frame -Pop in a photo, and this frame is the perfect accessory for any tabletop.
Final Thoughts on DIY Dresser Makeovers
An old dresser makeover is one of the most satisfying DIY furniture projects you can tackle. With the right prep, paint, and sealant, your dresser can look like a custom piece—without the custom price tag.
If you’re on the fence about starting, trust me: once you finish your first furniture makeover, you’ll start eyeing every thrift store dresser like a blank canvas.
RELATED POSTS
Like what you are reading? Check out the posts below for some additional related posts that may interest you!
Hope this post was helpful! Please email me if you have any questions about any of my projects. Remember that I am not an expert and write about my process by trying different techniques.
Thanks for stopping by!

This post is all about an old dress makeover.
Last update on 2026-07-04 / Affiliate links / Images from Amazon Product Advertising API