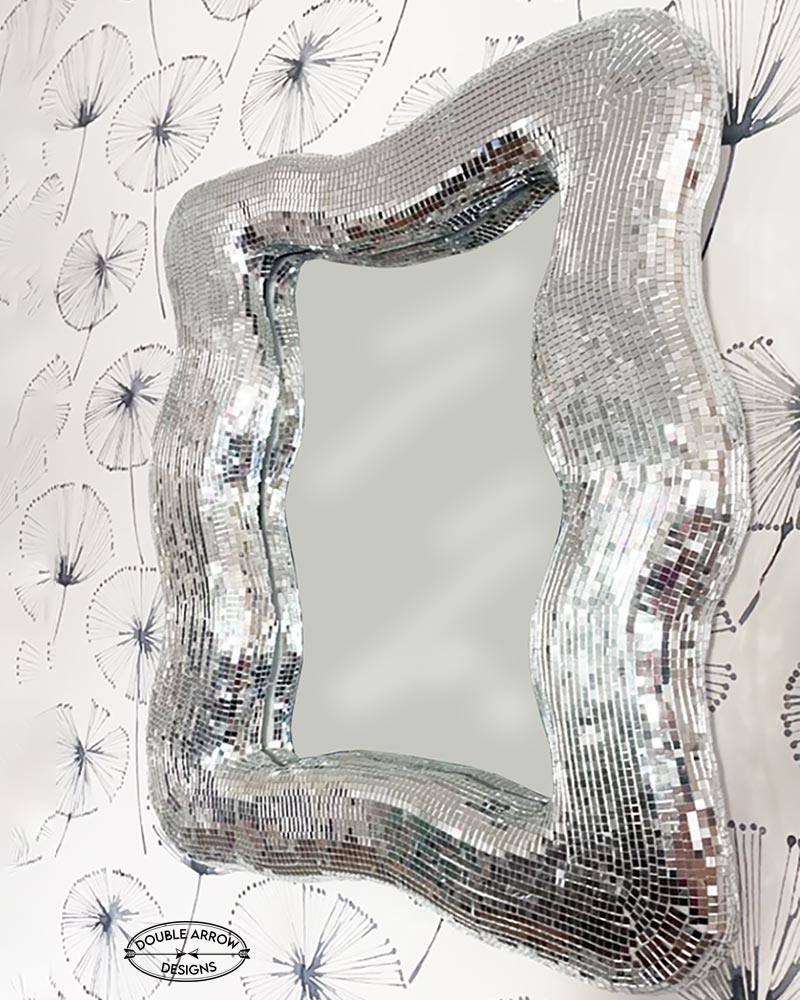
How To Make A Fun Disco Ball Mirror!
Disco Ball Mirror
Getting Emma ready for her first off-campus apartment! Certain must-have for a 20-year-old is this disco ball mirror. In this post, I will show you step by step how to make a fun disco mirror that will brighten up any interior!
She used additional wall art to make a unique gallery wall for her apartment bedroom wall that is unique and fun.
My blog periodically contains affiliate links meaning that if you make a purchase, I might make a small commission at no extra charge to you. Purchases made through them are greatly appreciated.
Disco ball mirror
These fun eclectic disco ball mirrors add a whole new dimension to any space. You can make any freeform shape you want or keep very linear. We loved the idea of a wavy surface so that the light will catch the mosaic mirror tiles from every angle.
Depending on what look you are going for, you can create any shape you want. You can also use the flat surface of a framed mirror and cover this for a quick and easy DIY project. Also this can be used on any photo frame for an even quicker project that can be an instant winning gift.
Mirror tiles
When making your disco ball mirror you have to keep in mind what disco ball tiles to use. These mirror tiles sheets come in a variety of sizes. We chose to use the smaller mirror tiles for crafts that we bought on amazon so that it would wrap easier around the sheets of the carved styrofoam sheets we used.
Disco mirror DIY
We saw these Disco Mirrors being sold on Etsy, however on Emma’s first apartment budget, we needed to make a diy disco mirror so that we could continue furnish her whole apartment.
Supplies for a disco ball mirror
Supplies that we used for making this DIY disco mirror are the following:
- Mirror– We used a 16×20″ mirror, you can use any size yo have or buy. This specific mirror is on Amazon, but shop around. There are so many choices.
- Styrofoam sheets– We bought 12″x 28″ .5 thick sheets from michaels, but you can buy the same on Amazon. We used a few layers and glued them together, however you can also buy thicker foam sheets for less construction.
- Mirror tile sheets– These 5x5m tiles have an adhesive back that worked great on the styrofoam.
- Epoxy 2 part glue– since our styrofoam sheets were not as thick as we wanted we glued 3 sheets together. We originally tried using craft glue but this was unsuccessful!
- Sheetrock knife – We used this first to cut out the shape we wanted, then used the blades on their own to carve the curved surfaces.
- styrofoam cutter– If you are going to make more than one, I would advise buying a styrofoam cutter. This kit comes with many options so you can achieve the shape you are looking for.
- Sheetrock blades– We used these on their own so that we could easily carve the styrofoam- be careful! Emma nicked up her finger using these on their own. So you can use some tape and wrap te top of the blade for protection.
- Painters tape– This helped to hold the sheets in place while they were drying.
Mirror tile sheets for crafts, come in 2 sizes. We used the smaller size 5×5 mm so that we could manipulate around the curves. They come with an adhesive backing. Using an xacto or sheetrock knife to score and pull off backing. We used double rows, singles, a few at a time. So it will all depended on the specific surface we were covering on our mirror.
No products found.I found them to be the cheapest and easier to just stack them. However you can find these in a thicker version and not glue them together.
No products found.This was the least expensive I found on Amazon we found our mirror at the Family Dollar for $10. You can also find one used, or use one you have in your home for a whole refresh.
Steps in making this disco mirror

Below are the steps we followed in making our specific disco ball mirror. You can try other variations, this is just what worked for us.
- Choose your Mirror, whether it is an existing one or new. We bought our 16×20 mirror at Family Dollar for $10.00. Above I do have a link for an Amazon mirror, however shop around. Having the frame was helpful so that we could build the styrofoam frame on top of this.
- We then bought these styrofoam sheets at Michaels craft store , because they were not as thick as we wanted we layered three together to give us the height needed to carve a rounded styrofoam frame.
- We then measured how wide we wanted our frame on all sides. Keep in mind that the frame will become less wide when carving so take this into account!
- We taped the glued sheets on the frame, turned it over and put books on the back to weight it and let it sit for a day- well it was more like a week by the time we got back to our project!
- With a pencil we drew the shape we wanted the overall frame to have
- Using a sheetrock blade we cut the shape out. Make sure that you replace your blade frequently because the foa will dull blades quickly. when you. do not get a sharp edge use a new blade
- Once the desired shape is achieved we started to carve the foam. using a slanted direction and carving at a 45 degree angle to give it the curved edges we were looking for. Again make sure that you use a sharp blade for an even surface on your styrofoam. This is important so that the mirror tiles will have a smooth surface to stick to.
- Start sticking your disco mirror tiles down! Because we had a curved surface we did this in stripes of 2 at a time so that the mirror tiles curved with the shape of the foam.
- A few white spaces- yes we ended up with these because we had a curved surface and square mirror tiles. We left them because unless you are looking for them the reflection of the mirror tiles helped to hide this. Note* You can paint the styrofoam metallic silver so that you will avoid any white areas.

Completed disco ball mirror
This will not be on my wall as shown! So we will be bringing this down to Emma’s apartment where her boho style will be a great backdrop for this disco ball mirror.
Mirrored tile accessories for the non DIY’ers
No time or desire to DIY this disco mirror? No worries! Because you can buy one on Etsy. See below for some listings where you can purchase one already made.

If you are looking for less curve and more sleek lines. Below is a disco mirror from AMCLUBShop. Using a similar process but achieving a whole different look!

Fun Disco Mirror accessories for the home or as a gift
Check out all these fun Disco mirror Items from Urban Outfitters. These are from Sofiest and Urban Outfitters has a huge collection. I gathered them here in one location for you to view & purchase.
If you are looking for related disco fun, check out this cool melting disco ball is a great conversation starter for any living space. Each creation is handcrafted and is, therefore, a unique item.


These mushrooms are made of Styrofoam and feature mirrored glass tiles that are individually glued in the shape of mushrooms.They also come in a variety of colors. They are shipped in two pieces,some assembly is required.
TikTok of Disco ball mirror
This was such a successful project! Check out the TikTok video below where we documented our process step by step in this quick video. Hope you enjoy it!
Cost breakdown for this Disco Mirror
As fun as this project was, it’s always good to see what the total cost of our project was. Below is the breakdown- please note that I am only showing cost of items we bought for this project. Some supplies I already had so not adding to the cost of the tape, sheetrock knife or blades.
| Mirror $10.00 | |
| Mirror tiles $52.20 (4 boxes, 2 sheets in each box with some leftover) | |
| Styrofoam sheets. $26.08 (used 4 in total) | |
| epoxy glue $26.70 (we used 2) | |
| TOTAL $114.98 |
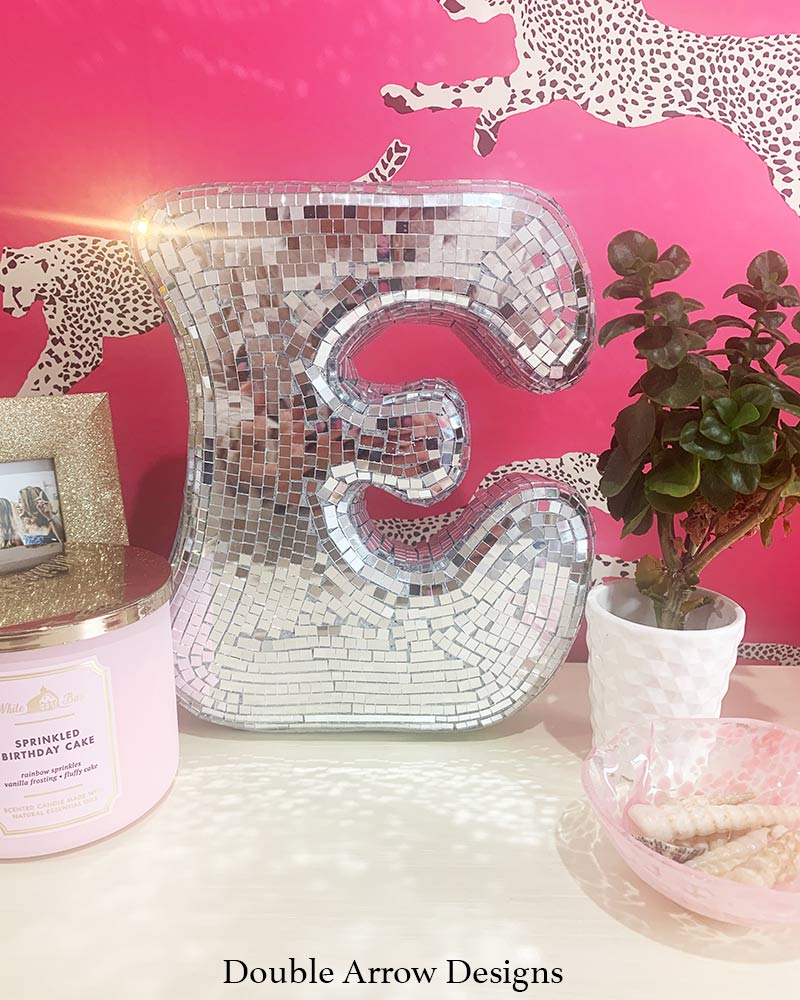
Next disco mirror tile project
Because we had leftover styrofoam panels and mirror tile sheets, we made a funky letter “E” for Emma. Check out how we did this below in related posts.
Where to buy disco letters
Not into the whole DIY for this project? No problem, got you covered! See below for places to order these fun disco mirror letters.

Photo by ExotikWoodAtelier. These come in a variety of colors as well as numbers.
RELATED POSTS
like these DIY projects? check below for some additional ones that you may like. You can also go to my home page on DoubleArrowDesigns for all my DIY and printable projects.
- Disco Letters That Will Make Your Room Dazzle
- Wood Dowel Mirror Frame- DIY
- No Sew Halloween Toga Costumes You Can DIY In 5 Easy Steps
Thanks for stopping by!
This post is all about a disco ball mirror.
Last update on 2026-07-30 / Affiliate links / Images from Amazon Product Advertising API