Adding Legs To Furniture for a Total Transformation!
Adding legs to furniture
I added legs to a few DIY furniture projects. See below for how I added legs to each piece, transforming them into updated looks. This is an easy project that can be done fairly simply.
My blog periodically contains affiliate links meaning that if you make a purchase, I might make a small commission at no extra charge to you. Purchases made through them are greatly appreciated.
Why Furniture Legs Matter
(adsbygoogle = window.adsbygoogle || []).push({});
Function + Style = Transformation
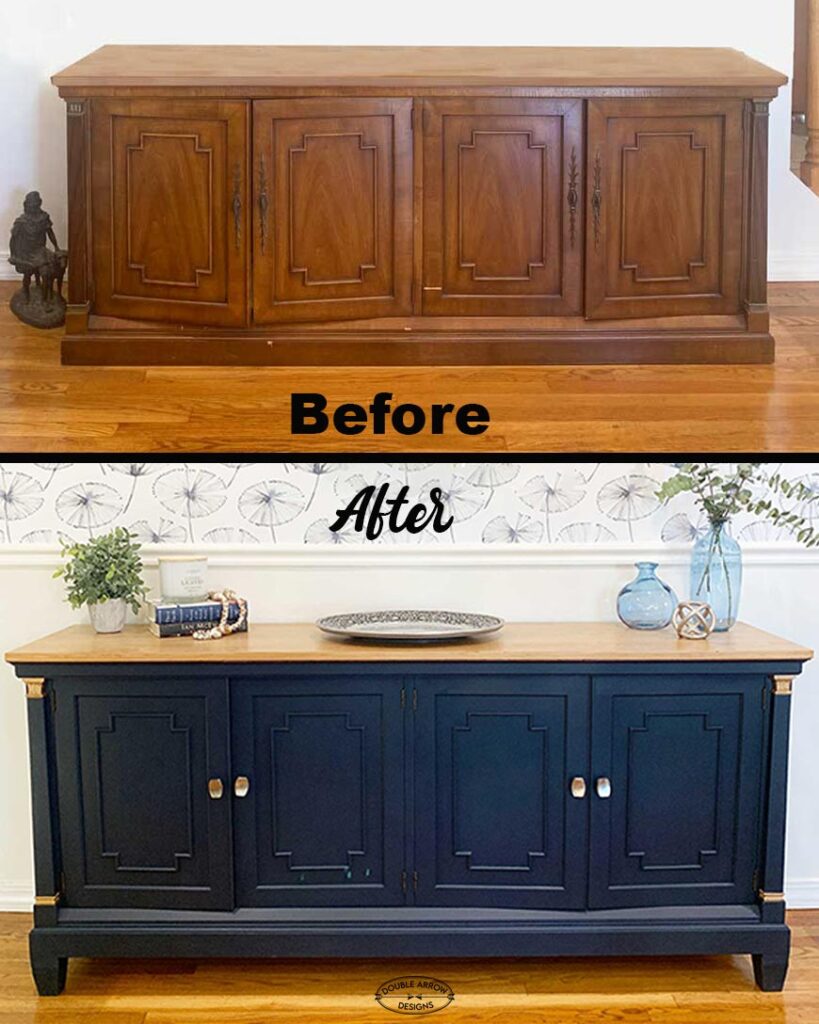
Changing or adding furniture legs can instantly shift the entire feel and usability of a piece. Whether you’re lifting a low-sitting cabinet to clean underneath, modernizing an outdated dresser, or building a custom piece from scratch, the legs elevate the furniture, both visually and practically. See below one of my projects where I lifted this cabinet off the floor by installing legs.
Function First: The Practical Side of Furniture Legs
- Add Height for Better Ergonomics – Lifting a dresser or cabinet makes it more functional, accessible, and easier to clean around.
- Mobility with Castors – Add wheels to heavy pieces like coffee tables, kitchen islands, or storage cabinets to make rearranging a breeze.
- Structural Support – For larger pieces, the right leg choice (and placement) ensures long-term durability and safety.
- Floor Protection – Felt pads or rubber feet can prevent scratches and reduce noise.
Style Upgrade: How Legs Define the Look
Furniture legs aren’t just functional—they style the entire piece. Here’s a quick cheat sheet:
style Leg type Best for
Dresser Legs
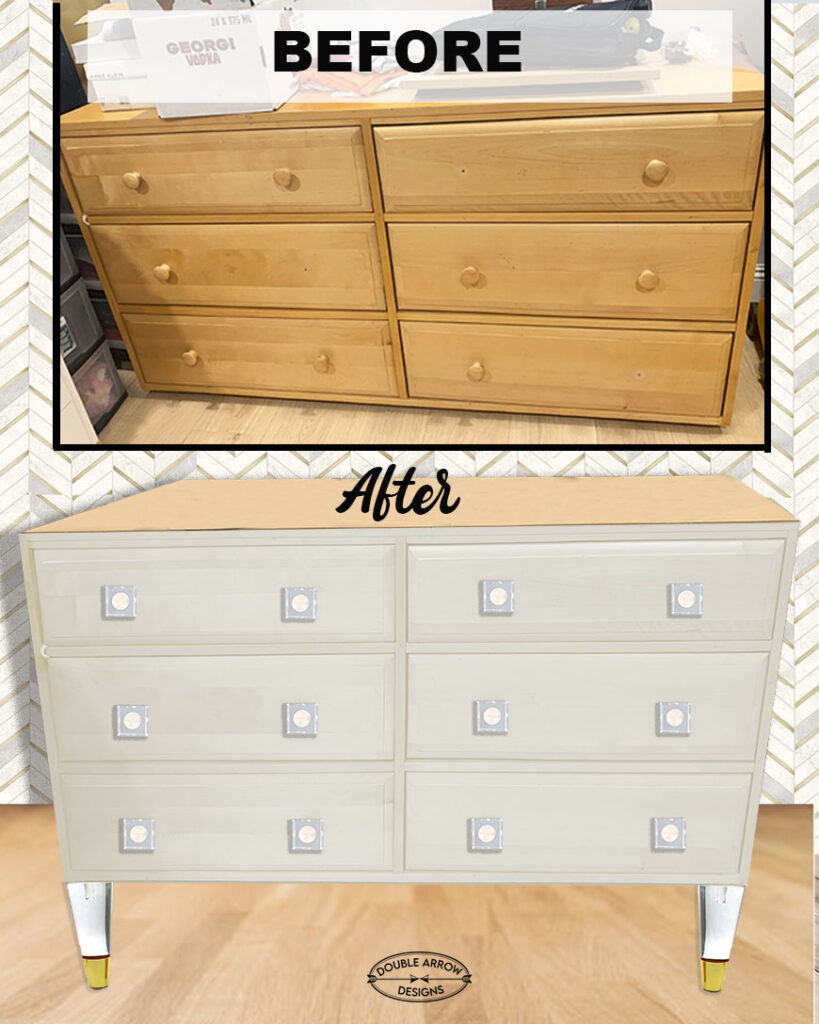
I had this project from a client. It was this old wood dresser. We decided to update it with some paint, acrylic knobs and feet. Check out the transformation below. These were easy screw in acrylic furniture legs. Check out the full post, Old Dresser Makeover, that you will love!
I matched these acrylic legs with Acrylic knobs. So take a look at this post where I researched acrylic knobs to coordinate in 24 Acrylic Knobs And Pulls That Will Transform any Furniture.
Types of Furniture Legs + How to Install
Below is a selection of furniture legs for easy installation. Each leg kit comes with its own hardware for easy installation. However, each project can be different, so research what you want before you purchase. Below is a guide on how to go about finding the right furniture leg match.
- Screw-In Legs
- These are the easiest to work with and often come with mounting hardware. Great for DIYers and beginners.Mounting Plates
- Use these when your furniture doesn’t have pre-drilled holes. Just screw them into the base and attach your legs.Direct Screw-In
- Some legs come with pre-installed hardware—just measure, mark, and screw them in.

- Deux Wood Furniture Leg (Set of 4)– This comes in 3″, 6″ and 8″ furniture leg heights- depending on the height you want.
- Codey-Lee Steel Table Leg (Set of 2) High-quality Material, easy to install, comes in gold & White,Easy to Clean. DIY Fun!
- Acrylic Dresser Legs– Made from crystal clear acrylic material with eye catching gold caps. For all types of furniture in your home, a set of 4 is excellent for couches, chairs, desks, end tables, dressers, ottomans, cabinets, nightstands, and more.
- Georgianna Hairpin Table Leg (Set of 4)– These hairpin metal legs are heavy-duty proofed and will add both stability and mid-century modern style to any furniture project.
- Contemporary metal furniture leg– comes in three heights.
- Mid Century Ash Wood– Furniture Legs With Gold Caps- Set of 4, and comes in multiple sizes depending on your project.
- Sofa Feet Cabinet Modern Clear– Similar to what I used in above dresser project.
Choosing the Right Leg for Your Project
Here’s a quick checklist to guide your readers:
✅ What’s the style of the piece?
✅ What height do you need for function or aesthetics?
✅ What material matches your home décor—wood, acrylic, metal?
✅ How heavy is the furniture? Do you need middle supports?
✅ Does the piece have existing hardware? If not, what mount do you need?
✅ Will you need adjustable legs or casters?
Picking the right leg for your furniture redo
Picking the right leg for your furniture redo can be overwhelming. I always recommend going on Pinterest and researching here. This is an amazing resource. Then follow the steps below to help you decide what legs are best. Take into consideration the following points to make the right decision.
Research– Take a look online, at your favorite furniture site, and be interested in seeing different styles that you can replicate with your furniture piece.
Style and Aesthetic: The furniture legs significantly influence the style of the piece. Here are some styles to consider:
Rustic or Farmhouse: Thick, chunky wood legs with distressed finishes for a more homey and warm aesthetic.
Mid-Century Modern: Features tapered legs, often made of wood with a natural finish. These legs give a sleek, minimalist look and are perfect for modern or vintage furniture.
Traditional or Victorian: Look for intricately carved wooden legs, like cabriole or claw-foot styles. These are ideal for more ornate furniture pieces.
Industrial: Metal or steel legs with clean lines, often paired with rustic or reclaimed wood. These legs are perfect for loft-style or contemporary furniture.
Scandinavian: Typically features simple, natural wooden legs, often in light tones, giving a clean, airy feel.
Height and Proportions
The height of the legs will impact the functionality and look of your furniture:
- Chair and Sofa Legs: These typically range from 4 to 12 inches, depending on the overall height of the furniture. Low-profile legs can give a more grounded, modern feel, while taller legs offer a more traditional look.
- Table Legs: Dining table legs generally measure between 28-30 inches, while coffee table legs are around 16-18 inches in height. Choose heights that maintain a proportional balance with the surface or top of the furniture.
- Adjustable Legs: For furniture that may need versatility or customization in height, like desks or tables, adjustable legs can be an excellent choice.
- Replacement– Replacing existing legs. Make sure that when you are doing this the replacement legs can adapt to the existing legs. You may have to modify the screw holes if the placement isn’t the same.
- Weight of the furniture piece. Research what weight your new legs can support. You may have to add a middle brace to help distribute the weight better. Or pick legs that are sturdy enough to carry the weight.
How to install furniture Legs
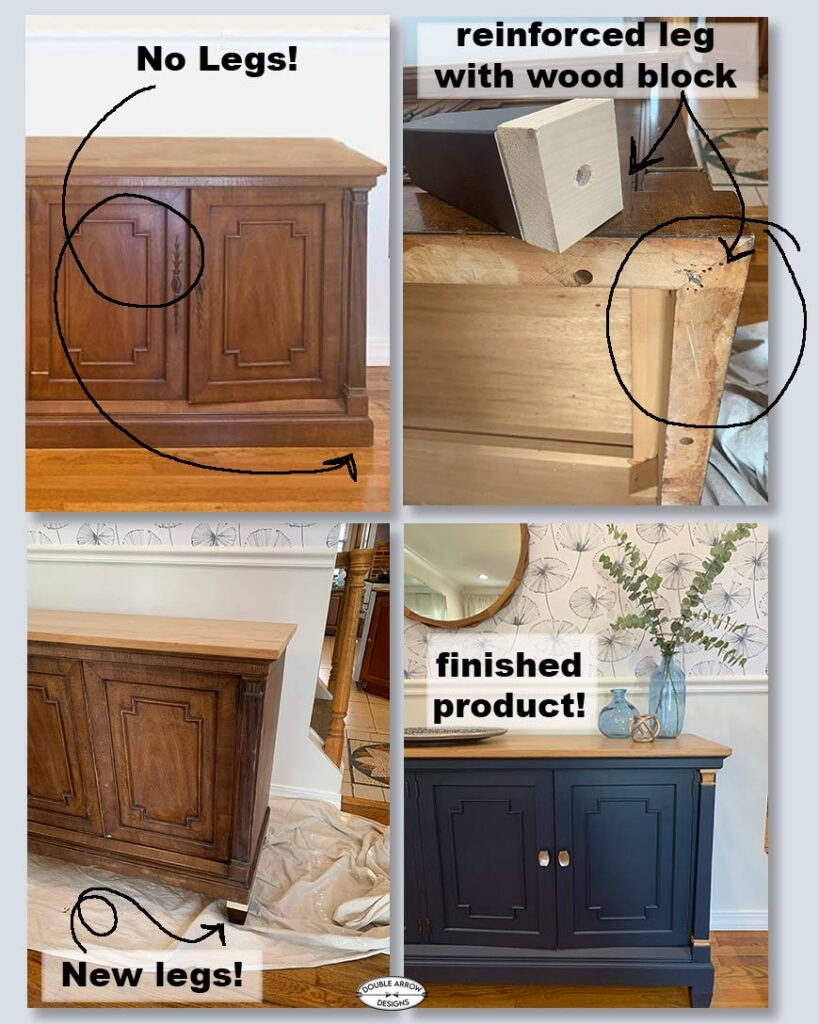
The first thing is to look at the bottom of your piece and decide if there is enough space to screw your leg in. In the case of my china cabinet, I did not because there was metal hardware that would not let me screw in my legs.
- I bought a 2×4 piece of wood and cut this down into blocks measuring the same dimensions as the top of my legs.
- Pre-drilled hole to align with the middle of the leg (SEE IMAGE WHERE I MADE SURE IT WOULD SCREW IN CORRECTLY), where the screw would screw into.
- Attached is the block to the bottom of the cabinet, on the three sides that I could add nails to.
- Then I screwed the legs into an added block, which covered the metal piece that originally prohibited me from screwing the legs directly into the bottom of the cabinet.
- Once this was complete, I used wood filler to fill in any spaces between the wood block and my furniture foot
- Once dry, I sanded and then painted it the color I was using for my cabinet.
- I always add felt furniture pads to the bottom of all furniture legs! This helps to protect your flooring underneath your furniture.
I used 3″ furniture legs with a 1″ block, which gave me a total of 4″ furniture legs that were added to my cabinet. VOILÀ! Now I had a seamless look from the bottom of the cabinet to the furniture legs!
Not all projects will need this extra step. This will all depend on the bottom of your dresser, cabinet or furniture piece. Before purchasing your legs, take a look and decide what you will need.
Wood legs were added to the above project.
I bought these on Amazon. They come in multiple sizes. I chose these wood legs for a few reasons:
- They went with the clean lines of my cabinet. So this worked perfectly.
- The correct height was offered to make my cabinet. So this was the perfect buffet height for my dining room
- Solid wood and sturdy which would hold the weight of my cabinet. Because this is a very important point to make sure of when adding legs to any furniture.
No products found.
These legs came with the hardware needed for easy installation… Well, it would have been easy if I hadn’t had that metal clip in the way!
They also come in additional heights, see below. Because I needed a certain height, I went with the above 3″ furniture legs.
(adsbygoogle = window.adsbygoogle || []).push({});
Step-by-step guide for installing furniture legs:
Installing furniture legs is a simple yet transformative part of a furniture redo project. Determine Placement
- Mark the Spots: Before drilling, place the legs on the furniture to determine the best positioning. Use a measuring tape to ensure they’re evenly spaced and aligned. Most furniture legs are attached to the four corners, but depending on the furniture’s design (e.g., a bench or long table), you may need to install additional legs for support in the middle.
- Leg Spacing: On tables or benches, legs should be inset by about 1 to 2 inches from the edges to provide balance and stability.
Select the Mounting Type
The method for attaching the legs depends on the mounting hardware provided with the legs or the furniture:
- Pre-Drilled Holes: Some furniture already has pre-drilled holes, making it easier to screw in new legs. Measure these to ensure compatibility with your new legs.
- Mounting Plates: If the furniture doesn’t have pre-drilled holes, you can install mounting plates. These are small metal plates that screw into the furniture’s underside, providing a place to attach the legs. Mounting plates are common for screw-in legs.
- Direct Screw-in: Some legs come with pre-installed screws or dowels that can be directly screw into furniture without mounting plates.
- Check Stability: Once the legs are attached, stand the furniture upright and test for stability. If there’s any wobble, try adjusting the screws or adding felt pads underneath the legs to level them out.
- Add Protective Pads or Felt: If you’re placing the furniture on a hardwood or delicate floor, consider adding rubber or felt pads to the bottoms of the legs to protect the flooring and reduce noise when moving the furniture.
- Castors: if you have a large or heavy piece of furniture, consider using castors, which are wheels on the bottom of your legs. You can then easily move your furniture without having to enlist people to help you. Again, check for the correct castors for your project.
Where to Source Furniture Legs
You can create a resource section that links to:
- Favorite Amazon finds
- Etsy leg kits
- Local salvage stores
- Specialty leg makers (like PrettyPegs, Osborne Wood, or Home Depot collections)
Diy table legs metal
In this last project that I worked on with my neighbor, an old door was repurposed, epoxying the top, and then adding metal legs to this. You can see the full post Old Door Dining Table-check this out! I used the metal-framed furniture legs below. These had the height needed, and once added, the door table top was the standard table height. This is very important so that the chairs will be the correct height with the table.

Acrylic furniture legs
These are the legs that I added to the above dresser project. Acrylic furniture legs are trending this moment for a modern sleek look that pairs so nicely with a painted wood furniture project.

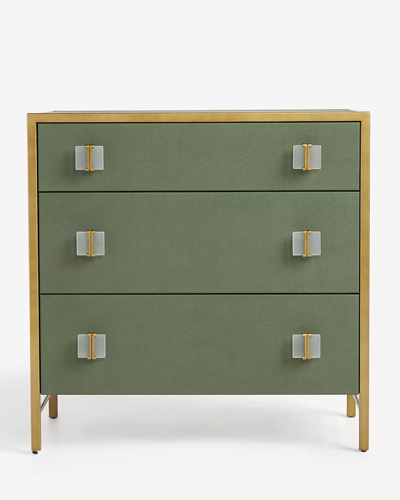
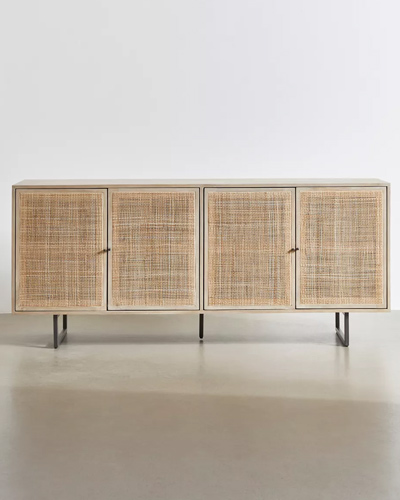
Not a DIY’er? Then check out these pieces that have furniture legs.
Then check out some of these pieces with furniture leg options! These will make for an instant transformation.
Shop The Look


By adding legs, or swapping out for new ones. You can take an old piece of furniture and breath new life into this like I did on my old China cabinet. See below for the video on how this piece of furniture went from blah to wow!
Add Finishing Touches
Adding or replacing furniture legs is a practical and stylish way to refresh and transform your furniture. Whether you’re aiming to enhance stability, update a piece’s aesthetic, or improve functionality, choosing the right legs plays a crucial role. From selecting a style that complements your decor to ensuring proper installation for stability and longevity, paying attention to the details can make a significant difference. With the right materials, tools, and methods, this simple DIY upgrade can breathe new life into old furniture, making it look more modern, personalized, or even more functional for your space.
RELATED POSTS
Take a look at some additional DIY furniture projects that I worked on with the above post. Do not just stop at new or adding furniture legs. By adding new dresser pulls or knobs, you can take your transformation one step further! It’s like adding a piece of jewelry to your new furniture piece!
They can be as simple as tying in the acrylic legs with acrylic pulls or adding a metal detail. What’s fun is that you get to choose.
- Old Dresser Makeover that you will love!
- Dresser Refresh With Novelty Knobs
- 24 Acrylic Knobs and Pulls That Will Transform Any Furniture
Thanks for stopping by!

Let me know if this is helpful! Visit or join my mailing list for updated projects in the future.
This post is all about adding furniture legs
Last update on 2026-07-04 / Affiliate links / Images from Amazon Product Advertising API