Turn Fall Postage Stamps Into Adorable DIY Polymer Clay Magnets
Fall is that perfect time of year when the air feels crisp, the candles come out, and we crave all things cozy, creative, and handmade. If you love simple seasonal DIYs, this project is going to be your new favorite. In just a few easy steps, you can turn fall postage stamps into adorable polymer clay magnets that look straight out of a boutique gift shop.
This is one of those crafts that’s both relaxing and rewarding, the kind you can do with a glass of wine, some good company, and your favorite playlist on repeat. Whether you’re decorating your fridge, creating a seasonal display board, or styling one of my printable calendars (available in my Etsy shop), these little magnets bring a warm, nostalgic touch to your fall décor.
Let’s dive in and make something beautiful!

Skill Level- This project is rated Easy, great for beginners, older kids (supervised), or anyone looking for a quick creative fix. It requires minimal supplies and makes a great craft night activity or quick gift.
SUPPLIES YOU’LL NEED
Before we begin, gather your materials. You don’t need much, just a few simple craft staples and your printable stamps.
- Polymer clay (I use Sculpey)
- Rolling pin or acrylic roller
- Cornstarch (to prevent sticking)
- My Printable Fall Postage Stamps (available on Etsy)
- Small stencil or stamp cutter– I used the 1″
- Mod Podge (matte or gloss, depending on preference)
- Magnets (flat, round, or square). I used these specifically because they came with adhesive
- Craft glue or E6000 for magnet attachment– if you aren’t using the ones I bought
- Baking sheet and parchment paper
- Small paintbrush for sealing– I use these foam brushes for projects like these
No products found.
No products found.
Optional but helpful:
- Silicone mat or wax paper for your workspace
- Craft knife for precise trimming
- Metallic paint or gold leaf pen for added detail
Pro tip: Have everything laid out and ready before you start — it makes the process smooth and mess-free!

STEP-BY-STEP INSTRUCTIONS
Prepare and Roll Out Your Clay
- Soften your polymer clay with your hands until it’s pliable.
- Use a rolling pin to roll it out evenly to your desired thickness (about 1/8 inch works well).
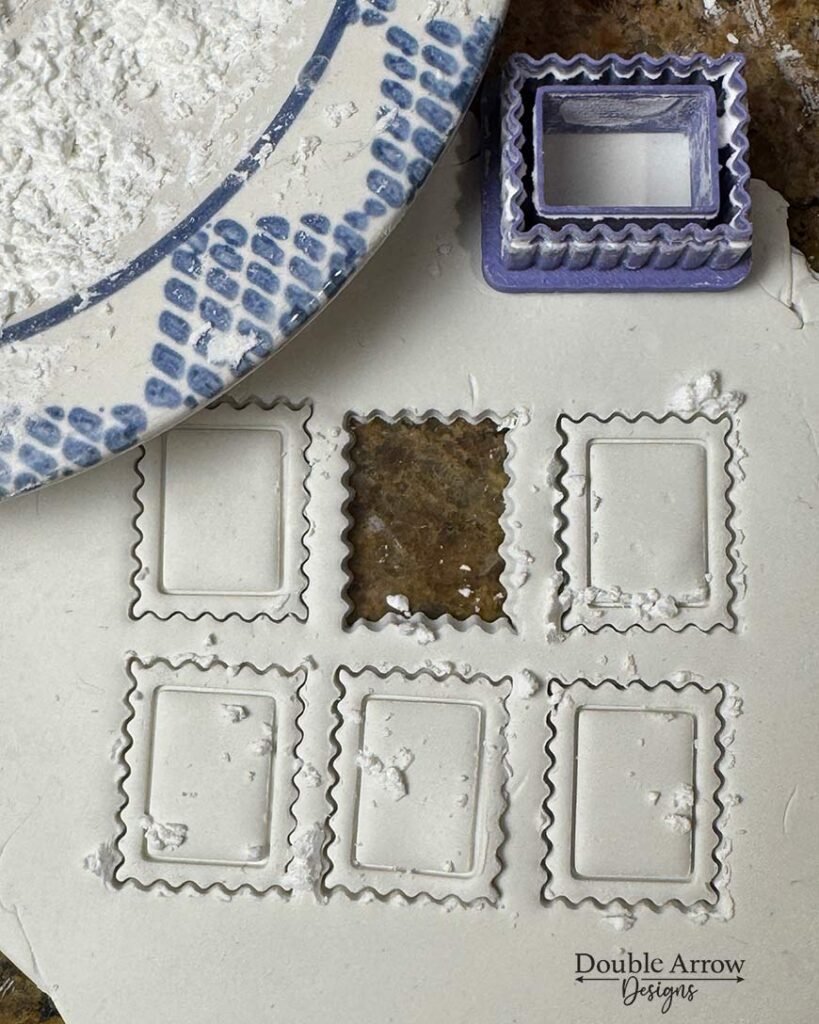
- Sprinkle a light dusting of cornstarch on your stencil or stamp cutter. This prevents sticking and gives clean, crisp edges.
Cut and Shape Your Clay Pieces
- Use your stencil or stamp-shaped cutter to cut out your clay shapes.
- Gently lift each piece with a flat tool or blade to avoid distortion.
- Place your pieces on a parchment-lined baking sheet.
Bake and Cure
- Preheat your oven to 275°F (135°C).
- Bake your pieces for 15 minutes per ¼ inch of thickness.
- Remove and allow to cure for one hour. This helps the clay harden completely before sealing.
Prepare Your Printable Fall Stamps
- While the clay cools, print out your printable fall postage stamps on high-quality paper.
- Cut out each design carefully using small scissors or a craft knife for clean edges.
- This is a fun step to customize; choose stamps that fit your mood, aesthetic, or calendar theme.
Mod Podge the Surface
- Once your clay pieces are fully cooled, brush a thin coat of Mod Podge over the top surface.
- Gently press a printed stamp onto the clay.
- Smooth it with your fingers or a soft cloth to remove any bubbles.
- Brush another light coat of Mod Podge over the top to seal.
- Allow it to dry for about one hour, then apply a second coat for durability and a glossy finish.
- Optional: add a third coat if you want extra shine.
Add the Magnets
- Once your top coat is dry, flip each piece over and attach a magnet to the back using craft glue or E6000. Or use the ones I recommend in the supply list.
- Allow the glue to fully set, about 30 minutes to an hour, depending on your adhesive.

Step 7: Style and Display
- Once cured, these make adorable accents for your fridge, office board, or as decorative pieces on your printable calendars.
- Their vintage stamp looks perfect with fall decor and cozy seasonal setups.
PROJECT NOTES & TIPS

Customization Ideas: Try metallic paint accents around the edges, or mix neutral clays with marbled textures.Alternative Finishes: You can also use resin instead of Mod Podge for a high-gloss professional finish.Storage Tip: Keep magnets away from heat and direct sunlight to prevent discoloration.Cleanup: Baby wipes or rubbing alcohol work well to clean tools before the clay residue hardens.
TikTok Video for a quick view
It’s a perfect activity for:
- A girls’ night in with wine and cozy vibes
- A fall crafting afternoon with friends
- Teens learning beginner polymer clay techniques
- Small handmade gifts or teacher appreciation ideas
Design Made Easy: Your Vision, My DIY Touch. You don’t need to be a pro crafter; just a little creativity and the right tools can turn your ideas into something beautiful.
HOW TO USE + STYLE THEM
- Showcase them on your printable calendars from Etsy.
- Use them to hold photos, notes, or recipes on the fridge.
- Create themed sets to gift or sell.
- Mix with other DIY magnets to build a personalized collection.
These DIY polymer clay postage stamp magnets are the perfect mix of creativity, nostalgia, and practicality. They add charm to your home while giving you a satisfying project you can complete in an afternoon. Whether you craft solo or with friends, you’ll love how each magnet turns out, unique and full of fall character
- Download your Printable Fall Postage Stamps from Etsy.
- Pair them with your Printable Calendars for a coordinated seasonal setup.
- Share their results and tag you on social media.
There’s something special about crafting your own décor, especially when it blends creativity, nostalgia, and practicality. These DIY polymer clay Autumn postage stamp magnets are proof that simple projects can make the biggest impact.
They’re easy to make, fun to customize, and the perfect way to spend a cozy afternoon with friends. Pair them with my printable fall calendars from Etsy for a complete seasonal setup that’s both functional and beautiful.
So grab your clay, print out those adorable stamps, and start creating. I promise, once you see how cute they turn out, you’ll be making a set for every season. If you try this project, tag me or share your results. I’d love to see your fall stamp magnet creations!
Buy on Etsy
Both my mini printable fall stamps and my printable calendar can be purchased; however, please enjoy this 20% discount for being one of my readers! Use code SAVE20
Related Posts
Check out some of these other fun polymer clay and decoupage DIY projects that you may be interested in!
- Turn Plain Into WOW: DIY Polymer Clay Light Switch Covers
- Personalized Champagne Bottles That Will Have Everyone Wanting Them!
- Decoupage Pumpkins: DIY Non-Carving Decorative Styles for Fall
Thanks for stopping by!

This post is all about fall postage stamps diy using polymer clay
Last update on 2026-07-30 / Affiliate links / Images from Amazon Product Advertising API