Turn Plain Into WOW: DIY Polymer Clay Light Switch Covers
Are you ready to turn something as ordinary as a plain light switch into a statement piece for your home? With a little creativity and polymer clay, you can transform boring switch plates into decorative light switch covers that are completely custom, stylish, and full of personality. The best part? You don’t need advanced skills or expensive supplies—just some clay, a few simple tools, and a little bit of imagination.
In this tutorial, I’ll walk you through the entire process step by step, from conditioning and shaping the clay to baking, sanding, and finishing your design with Mod Podge and decorative prints. Whether you’re a seasoned DIYer or brand new to polymer clay, you’ll find this project easy to follow and incredibly rewarding. By the end, you’ll have your very own handmade switch covers that brighten up any room and showcase your personal style.
So grab your clay, roll up your sleeves, and let’s get started!.
Decorative Switch Covers DIY
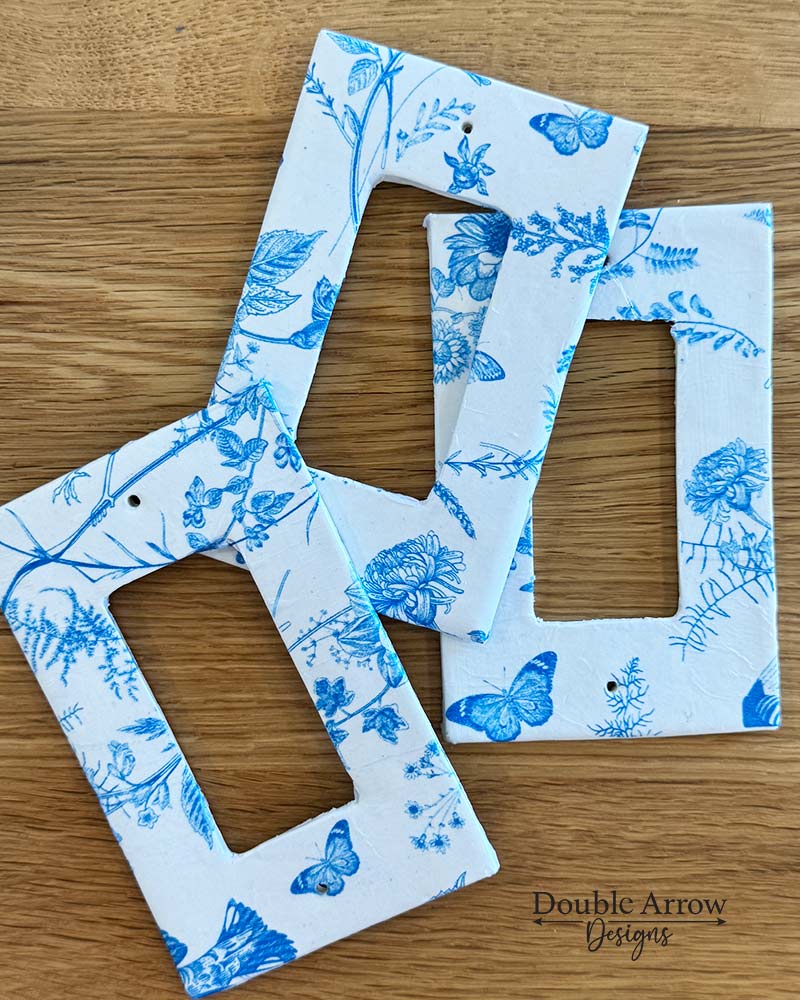
I decided for these specific ones to do a decoupage. I have been loving this process on champagne bottles and thought this would look really pretty on these DIY decor projects.
Supplies for my polymer clay light switch covers
For this polymer clay art, I removed one of my existing plastic switchplates to use as a stencil. This way it would give me the exact location of the lights and the screws to place back on the wall. I wanted to elevate the odiary cheap looking obes for something fun, original and that worked well with my decor.

- Polymer Clay– used Sculpey brand polymer clay, which is easy to condition and bakes beautifully in a standard home oven. It’s durable once cured and comes in a variety of colors, so you can either start with a solid base color or paint/decorate it afterward. Polymer clay is the foundation of this project—it becomes the actual light switch cover you’ll design.
- light switch– A standard plastic light switch plate works perfectly as a sizing guide. You’ll use it as a mold to press into the clay, giving you the exact outline, center opening, and screw hole placements. This ensures your finished clay cover will fit snugly on the wall and line up with the screws.
- parchment paper, or tin foil- You’ll need a non-stick surface to bake your polymer clay on. I recommend parchment paper because it prevents sticking and makes transferring the clay onto a baking tray much easier without distorting the shape. Tin foil can work in a pinch, but parchment paper helps keep edges cleaner and smoother.
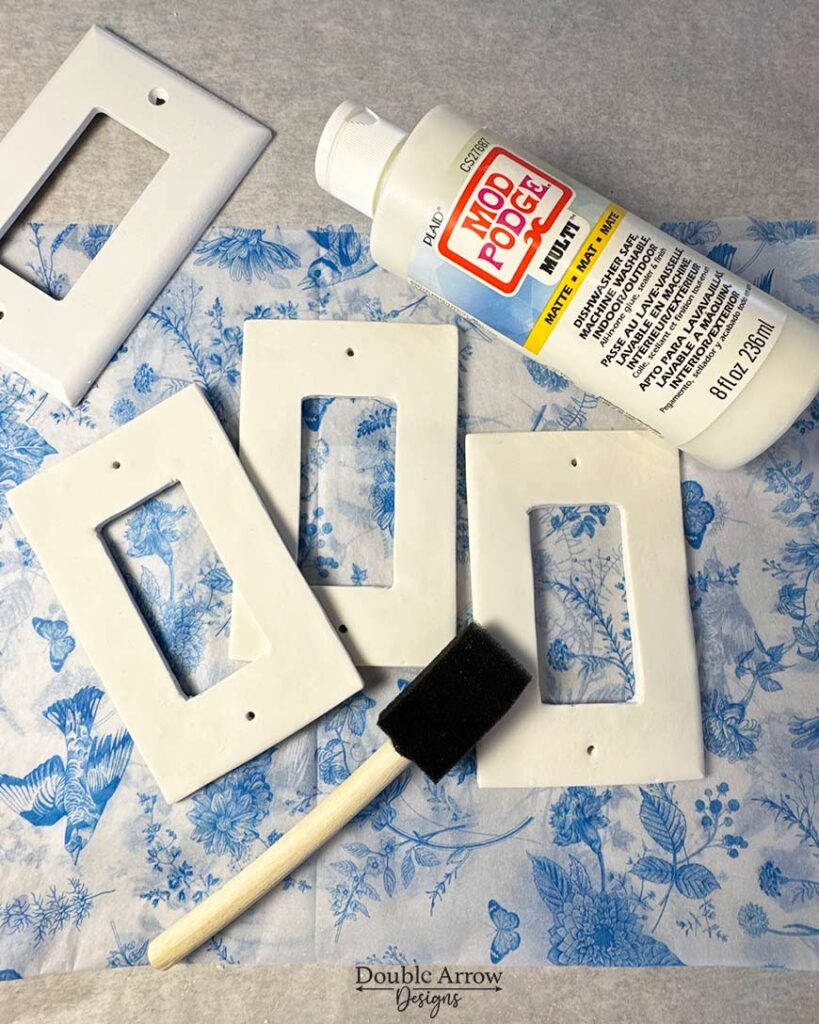
- Mod Podge– This is your finishing and sealing product. Mod Podge comes in several finishes—matte, gloss, and satin—so you can choose the look you want. Gloss gives a shiny, polished feel, while matte provides a softer, handcrafted look. Aside from sealing, Mod Podge also helps adhere thin decorative papers, napkins, or tissue designs to the clay surface.
- Foam Brushes– Foam brushes are ideal for applying Mod Podge smoothly without leaving bristle marks. They allow you to spread thin, even coats and are easy to clean or replace. They’re especially useful when layering sealant to get a professional finish on your decorative light switch cover.
- Printed Tissue Paper– used a decorative printed tissue paper similar to the one linked. This material is thin enough to bond well with Mod Podge without bubbling or peeling. Tissue paper designs let you completely customize the look of your switch plate—floral, modern, whimsical, or seasonal patterns can all work beautifully.
- Craft Knife or Blade
A sharp craft knife (like an X-Acto knife or clay blade) is essential for clean, precise cuts around the switch plate outline and the center opening. A dull knife can drag or tear the clay, so make sure your blade is sharp for a crisp, professional result.
No products found.
No products found.
No products found.
No products found.
No products found.
No products found.
No products found.
Steps in Making my lightswitches
1. Roll it out!
Start with the amount of polymer clay you’ll need for your light switch cover. Cut a chunk from the block and knead it between your hands until it becomes soft and pliable. This step is important—warm, conditioned clay is easier to shape and won’t crack.
2. Form the clay into a ball
After softening, roll the clay into a smooth ball. This helps eliminate air bubbles and makes it easier to flatten evenly.
3. Flatten it
Grab a rolling pin (or any smooth cylinder, like an acrylic or plastic canister) and roll the clay to your desired thickness—about ¼ inch is ideal. Rolling evenly ensures your light switch cover cures properly in the oven.
4. Create the switch plate outline
Set a standard plastic light switch plate on top of the flattened clay. Press lightly so the clay captures the outline, including edges, the center cut-out, and screw hole markings.
5. Cut out the shape
With a sharp craft knife, carefully trim around the outer edges and center opening. Taking your time here gives you clean, professional-looking cuts.
6. Mark the screw holes
A small straw, skewer, or chopstick works perfectly to poke through the clay where the screws will go. For accuracy, you can even use the screws from the plastic plate to size the holes correctly.
7. Prep your baking tray
Line a baking sheet with parchment paper (or use a glass Pyrex dish). For best results, shape the clay directly on the parchment, then transfer the parchment onto the tray. This way, your piece keeps its form.
8. Bake the polymer clay
Heat the oven to 275°F and bake for 15 minutes. Always double-check your clay’s instructions, since times may vary. Avoid overbaking, which can lead to discoloration.
9. Allow to cool
After baking, set the plate aside to cool for 30–60 minutes. This step ensures the clay cures fully.
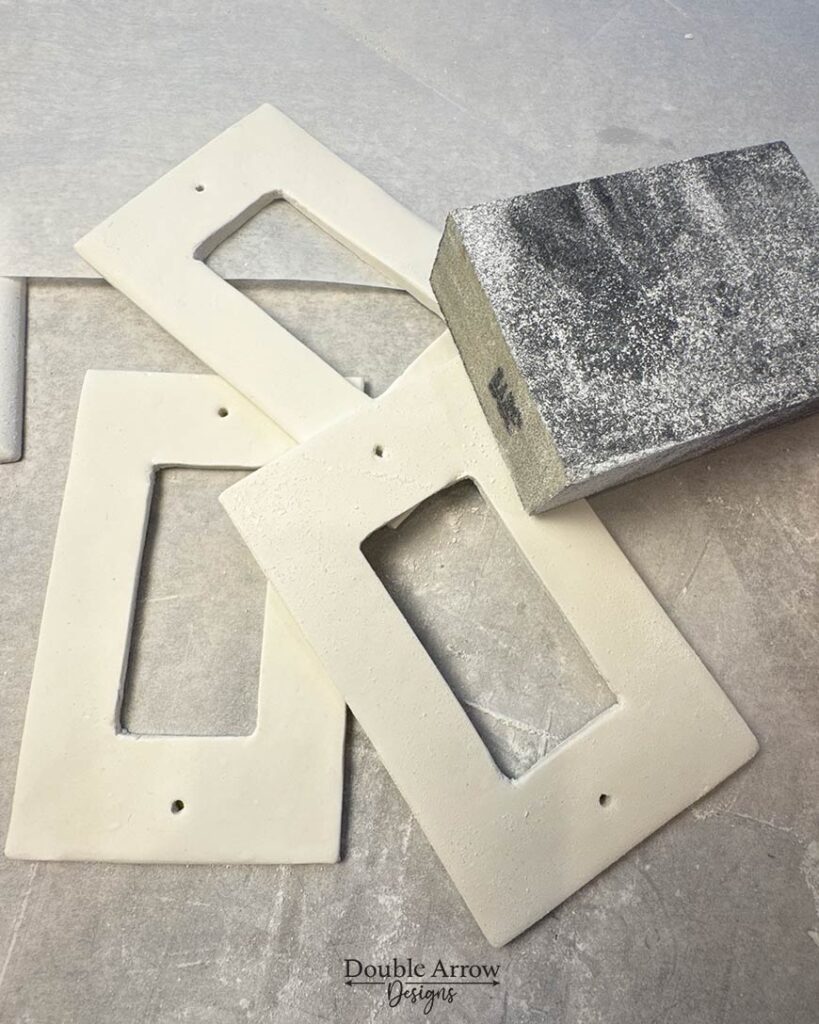
10. Smooth the edges
When cool, use fine-grit sandpaper or a sanding block to refine rough edges and even out cuts. Lightly sanding the front gives you a smooth surface for decorating.
11. Clean the surface
Wipe the piece with a damp rag to remove dust from sanding. A clean base helps Mod Podge adhere better.
12. Apply the first Mod Podge coat
Brush on a thin, even layer of Mod Podge to prepare the surface for your decorative paper or napkin.
13. Add your design
For this project, I used printed tissue paper. Cutting it slightly larger than the plate and lightly wetting it first helped the paper lay flat and smooth over the Mod Podge.
14. Re-open the screw holes
While the Mod Podge is still damp, poke through the screw holes with a toothpick to keep them open for installation.
15. Seal with a final coat
Once the first layer has dried, brush on a second coat of Mod Podge to add durability and shine. Let it dry for about 24 hours.
16. Install your decorative light switch cover
Your polymer clay switch plate is now fully cured, sealed, and ready to install! Screw it into place and enjoy your unique, handmade accent.

Using Polymer clay
One of the best things about working with polymer clay is how pliable and beginner-friendly it is. To start my DIY light switch cover project, I simply cut off a piece of clay from the block, kneaded it for a few minutes until it softened, and rolled it out using a plastic canister I already had at home. (You can also use an acrylic roller if you have one.) I flattened the clay to about ¼-inch thick—perfect for cutting out the base shape of my decorative switch plate.
Once the clay was shaped, it was time to cure it in the oven. Following the package instructions, I baked my pieces at 275°F for 15 minutes. After cooling for 30–60 minutes, the clay felt sturdy enough to handle.
At this stage, you’ll want to check the durability. I began sanding my pieces, but noticed they still felt a little pliable. To fully cure them, I placed them back in the oven for another 15 minutes. This second bake works only if you haven’t glazed or sealed the clay yet. Always make sure your polymer clay is completely baked and cured before applying a finish. Otherwise, underbaked clay may leach oils over time and cause discoloration in your handmade decorative switch cover. Also I found that after a few days that they really found their true hardness.

Decorative light switch covers for the non DIY’ers
Not everyone has the time or desire to dive into a DIY project, and that’s perfectly fine! Even if you don’t want to roll, bake, and sand polymer clay, you can still enjoy the charm of decorative light switch covers in your home. These little details instantly add personality to any room, whether you want something modern and sleek, playful and colorful, or even a unique themed design that matches your décor.
For those of you who would rather buy than make, I’ve rounded up a list of fun, stylish, and affordable decorative light switch covers you can shop right now. From farmhouse-inspired to bold artistic prints, these ready-made options let you enjoy the same eye-catching look,without ever lifting a rolling pin or turning on the oven.
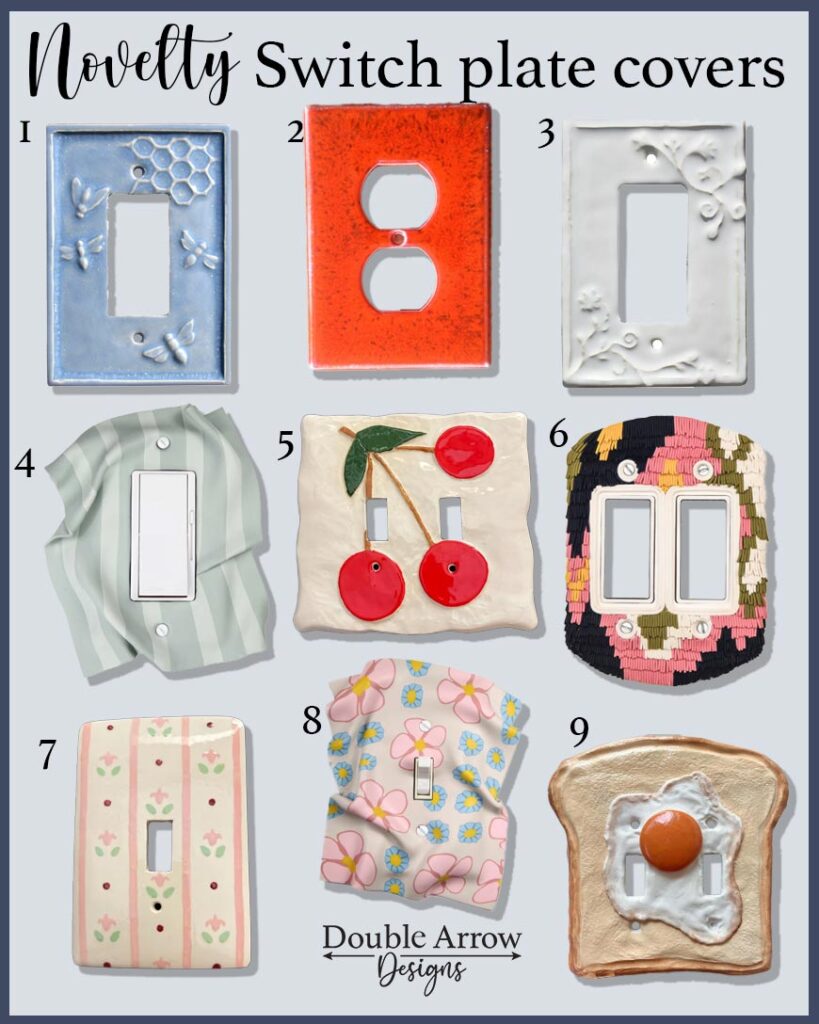
- Bees Ceramic Single Rocker– These are made to order on Etsy
- Orange sunset ceramic switchplate– brushed-on low-fire glaze to create this beautiful look
- Vine Ceramic Single Rocker-Also made to order, larger than standard light switch plates for a bold statement
- Dimensional sculpted stripe Rocker– Handmade, polymer clay, one-of-a-kind, green, gray, striped, windswept looking
- Cherries Switch Cove– handmade and hand-painted switch plate, cherries can be ordered in different configurations
- Bold, bright, shaggy pattern dramatizes a double rocker switch plate– adds dimension with these whimsical shapes
- Fleur de lis Switch Cover-hand-painted switch plate, fire-glazed,and easy to clean
- Flowered pink/blue/yellow toggle switch plate-Plate is completely handmade with 100% polymer clay in custom hand-mixed colors.
- Food Light Switch Cover- For the Foodie! Check out this link; the seller offers a whole line of “food” products.
View my TikTok Video
Here is a short video of me making these fun DIY light switch covers. Hope you enjoy!
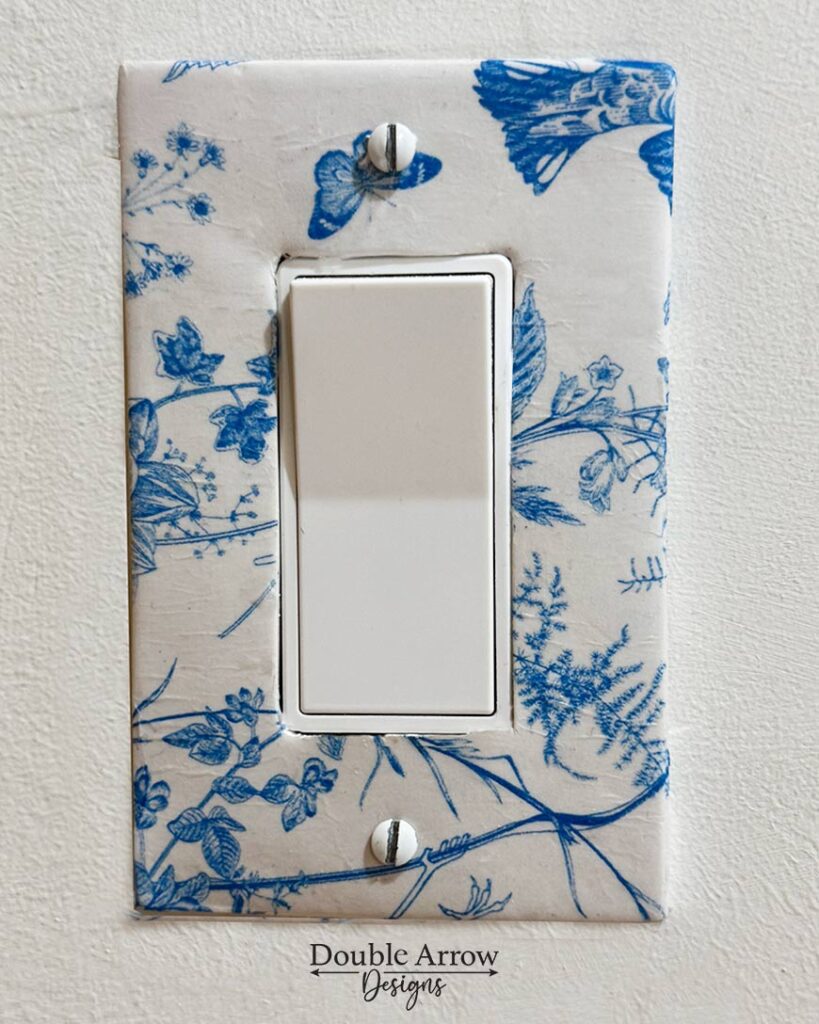
Completed Polymer clay Light Switch cover
Tips I Learned Along the Way
Like with any DIY project, you pick up a few tricks once you actually go through the process. After making my first set of polymer clay light switch covers, I discovered a couple of things that I wish I had known beforehand—and I’m sharing them so your project goes even smoother!
First, the thickness of my plates ended up closer to 3/16″ rather than 1/8″. I actually loved the way this gave the cover a more ceramic-like look, but it did create one small challenge: the screw heads didn’t sit flush. To fix this, I recommend scoring or carving out a recessed spot for the screw heads and making sure the holes are wide enough for the screws to sit properly.
In my case, I’ll be swapping in slightly longer screws to make this plate work—but with this tip, you can plan ahead and avoid that step altogether. It’s a small adjustment that makes a big difference in how professional your finished cover looks.
Creating polymer clay decorative light switch covers is such a fun and rewarding DIY project. With just a few simple tools and some creativity, you can transform an ordinary switch plate into a one-of-a-kind accent that reflects your personal style. Whether you decorate with bold tissue prints, subtle textures, or vibrant colors, the result will always add charm and personality to your space. Try it yourself—you’ll be surprised at how something so small can make such a big impact!
Related posts
Take a look at some of the posts below that are DIY for the home!
- How to Turn Wood Dowel Rods into a Show-Stopping Mirror Frame!
- Disco Letters That Will Make Your Room Dazzle
- Personalized Champagne Bottles That Will Have Everyone Wanting Them!
Thanks for stopping by!
This post is all about DIY Polymer clay light switch covers
Last update on 2026-07-16 / Affiliate links / Images from Amazon Product Advertising API