Painted Desk That Is Perfect For A First Apartment
Painted desk
When my daughter Emma moved into her first off-campus apartment, we knew she needed furniture that was not only functional but also reflected her personality and style. One of our first DIY projects was transforming an old desk/vanity into a colorful, eclectic piece that could serve multiple purposes in her bedroom.
Emma wanted a desk that matched her boho, eclectic aesthetic—something unique and full of personality. We also needed the piece to be multifunctional:
- A study desk where she could focus on coursework and online classes
- A vanity with enough storage for her makeup and personal care items
Maximizing space was key, especially since apartment bedrooms can be pretty tight on space. This painted desk was the perfect solution! Also, at the end of this post, I give 6 unique desk options for the person who isn’t a DIY’er but loves a unique desk!
My blog periodically contains affiliate links, meaning that if you make a purchase, I might make a small commission at no extra charge to you. Purchases made through them are greatly appreciated.
The Transformation Process
We started with a simple, well-used desk that had great bones but needed some love. Here’s what we did:
Added custom touches: Hand-painted drawer fronts, eclectic knobs, and a clear top coat to protect the finish.
Prepped the surface: Sanded it down to remove the old finish and ensure the paint would adhere properly.
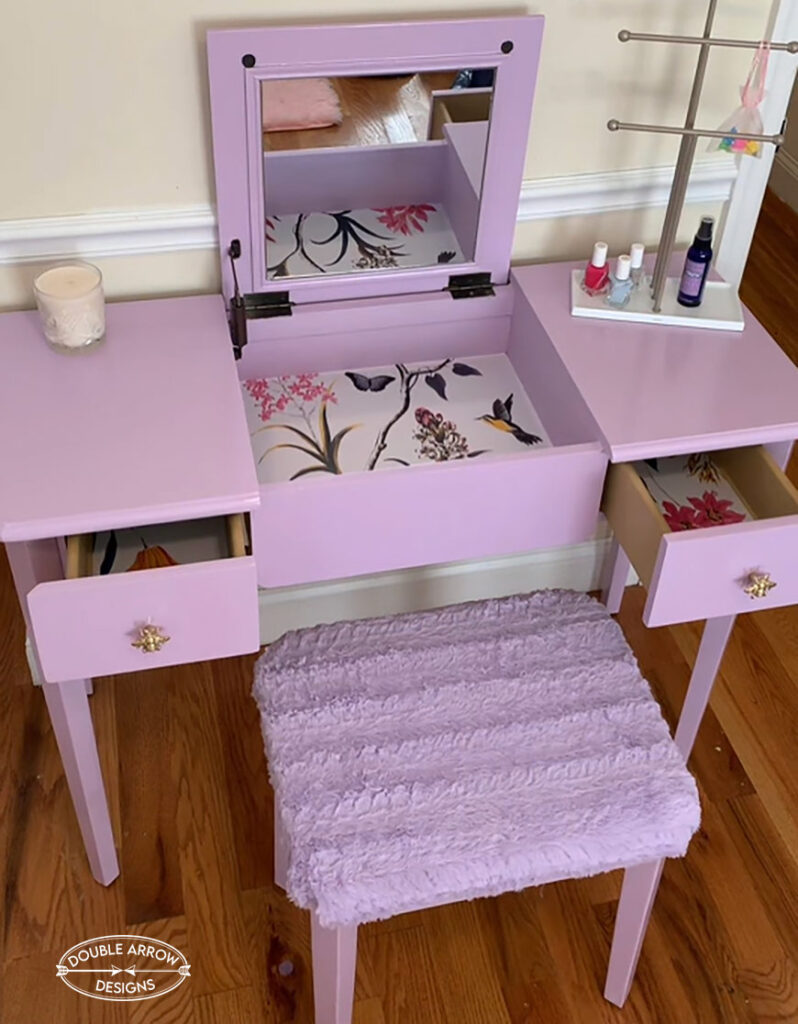
Choosing a color palette: Emma picked vibrant colors that fit her boho style; think terracotta, teal, and gold accents. Of course, she went with this lavender color that just matched her vibe.
Painted with intention: We used a combination of chalk paint for texture and acrylics for detailing.
Painted desk ideas
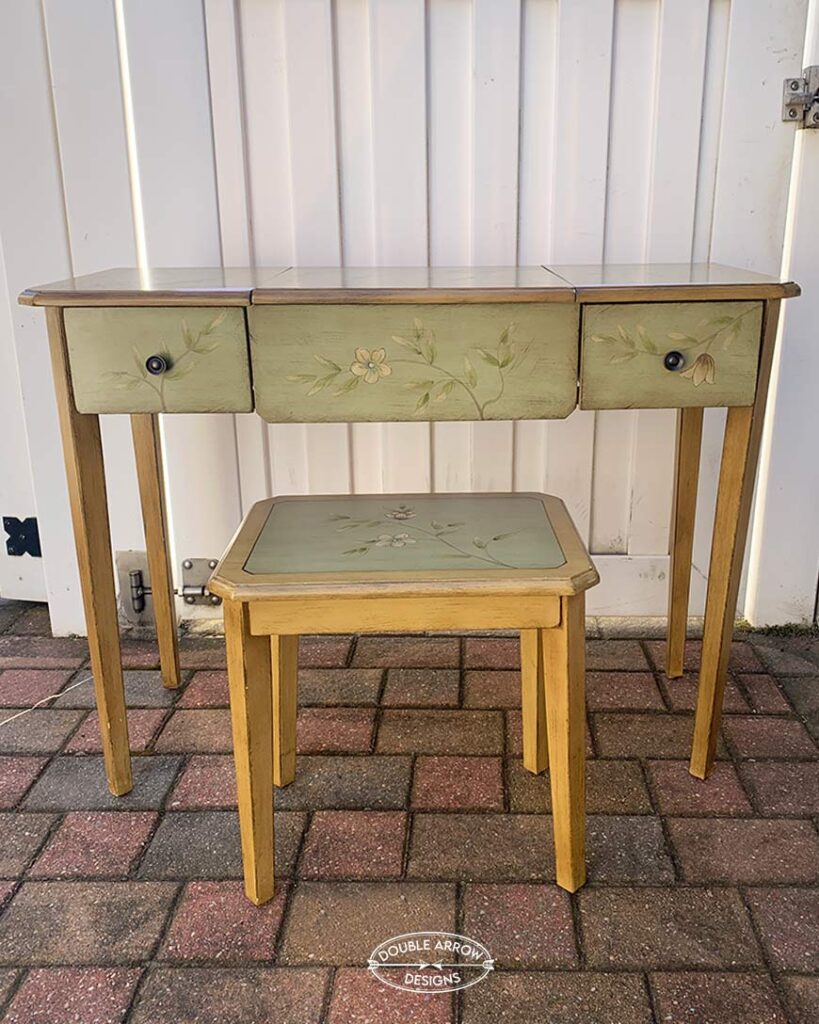
We were given this desk/vanity by Emma’s Aunt. They were going to get rid of this, so we decided to use it for this project. This was not real wood, and the painting was printed on it.
(adsbygoogle = window.adsbygoogle || []).push({});
We went on Pinterest (my favorite place to find ideas!) and scoured for painted desk ideas that would go with this eclectic boho feel.
Make a board and pin all the painted desk ideas that you like. You never know what you may find and it can spark a whole other idea from a combination of Pinterest pins. The ideas are endless!
Painted desk colors
The decision was to paint this desk in a fun but neutral color. We considered a few before we decided on Lavender. We ended up using Wishing Well from Benjamin Moore.
Note* Trial sizes are enough for most furniture painted projects; for larger pieces, a quart will work. Paint goes further than you realize on these painted furniture projects.
We started with a well-loved desk that had plenty of potential—solid structure, classic lines, and just waiting for a fresh new look. Here’s how we brought it back to life:
- Surface Prep: We gave the entire piece a good sanding to smooth out imperfections and remove the old finish. This step was key to making sure our new paint would go on evenly and last. Remember that paint doesn’t cover up imperfections, so the base is very important.
- Color Story: Emma gravitated toward a warm, boho-inspired palette. She chose earthy terracotta, rich teal, and touches of gold—colors that feel both grounded and vibrant.
- Finishing Details: The final touches made all the difference—Peel and stick wallpaper for the inside of the drws for a pop of print, a curated mix of eclectic knobs, and a protective clear top coat to seal in all our hard work.
Prepping our desk for paint

If you have read any of my other furniture DIY posts, you will know the first step is to clean your piece! Get a rag, some warm sudsy water, and clean from top to bottom and underneath; do it twice if it needs it. Painted dust is not a pretty look.
Make sure that you use painters’ tape to protect Mirrors or hardware that cannot be removed. This helps for clean, sharp edges. Easy to peel off and doesn’t leave any marks.
REMOVING HARDWARE
Remove any hardware that can be removed; this helps when painting. Also, if you are going to use the original hardware a chance to clean this as well. I have used Barkeeper’s Friend to clean it. If you want to refinish the hardware, I would suggest using Rub ‘N Buff to revitalize a metallic color. This comes in a variety of metallic finishes.
We decided to replace the hardware. Check below to see what we picked!
PREPPING WOOD FURNITURE FOR PAINT
Proper prep work is key to a smooth, long-lasting paint finish—especially when working with wood furniture. Here’s how to get your piece ready for a flawless transformation:
- Sand or Strip the Surface:
If you’re aiming to show some natural wood tones, start by stripping off any old finish and sanding down to the raw wood. Even if you’re painting over the piece entirely, a light sanding will help your paint adhere much better by roughing up the surface just enough for grip. - Prime When Needed:
If your furniture is made from dark wood or you’re concerned about stain or tannin bleed-through, I highly recommend using BIN Shellac-Based Primer. It seals the wood and acts as a barrier, preventing any discoloration from seeping into your paint layers. - Choose the Right Brush:
Invest in a high-quality brush for a smooth, professional-looking finish. I personally love Purdy brushes—they’re a bit pricier, but with proper care and cleaning, they’ll last for years. There are also brushes designed specifically for furniture paints, though I haven’t used them as much. - Protect Your Workspace:
Lay down a drop cloth to keep your floors paint-free, or use caster wheels under your piece to easily move it around as you paint. This not only protects your space but also saves your back from awkward lifting!


Using peel-and-stick wallpaper
We also had this fun peel-and-stick wallpaper that we would use inside the vanity part of the desk and the inside of the two side drawers. The pattern had a botanical feel and complemented the lavender color called Wishing Well by Benjamin Moore.
How to Cut and Apply Peel-and-Stick Wallpaper
- Lay Out Your Wallpaper:
Start by placing the peel-and-stick wallpaper face down on a self-healing cutting mat. This protects your work surface and makes cutting easier. - Measure and Mark:
Measure the area you need to cover using an acrylic ruler for precision. I like to add an extra ½ inch on all sides to allow for trimming and clean edges. - Apply and Smooth:
Position the wallpaper on your surface. Use a smoothing tool to press it down evenly, working from the center out to eliminate air bubbles. This also helps the adhesive stick more securely. - Secure the Edges:
Once the wallpaper is in place, use a blue squeegee to firmly crease along the corners and edges for a crisp, finished look. - Trim the Excess:
Use a sharp X-Acto knife or utility blade to carefully trim off any extra wallpaper along the edges. Work slowly for clean, straight lines.

I have done a few posts using this fun peel-and-stick wallpaper. It is so versatile and can be used on a variety of projects. Check out the post below for some additional ways to use this product.
How to seal your painted desk

Once we finish painting the desk, we need to seal it. Because the top will have heavy use, it is important to seal your painted desk. My sealant of choice is Minwax polycrylic. This comes in a few finishes; I prefer the clear matte finish.
Once the paint is dry, I usually wait a few hours or overnight. With a sponge brush, I paint in the same direction that I painted the deck in. Two coats will ensure that you seal every surface. Wait for this to dry, and you are all set.
(adsbygoogle = window.adsbygoogle || []).push({});
For the bottom of the legs I use felt tabs to protect your flooring from any scratches. Dab a little wood glue on the adhesive side to give it more holding power.


These are good brushes for using with polycrylic. I will wash and get a few uses out of each ons.

Hardware for the desk
The original desk had nondescript metal round knobs. We decided to add a fun furniture knob that would complement the botanical peel-and-stick wallpaper and found these adorable brass bee knobs on Etsy. I love it when you can find hardware that fits the piece perfectly!

Unique Desks
Like the look but not into DIY? I have created a list of unique desk choices, whether in a bold color or fun lines. Take a look!

- Akiyoshi Desk– A variety of solid hue options makes it a cinch to match your space’s style and color scheme.
- Alana Metal Desk– Powder-coated finishes lend a vibrant pop of color to your space, with fun curves for a modern look.
- Peggy Modern 44– Give your home office a contemporary, glam look!
- Rectangle-shaped study desk- Wavy/curvy with column-style legs
- Asymmetric Desk- Keep the color neutral, but the lines unconventional with this kidney-shaped desk
- Whetzel Desk-This clean-lined writing desk in a variety of fun colors.
You can check out these posts I have done on furniture hardware to help you find the perfect knobs or pulls on your next furniture project. Check out these three posts!
- Dresser Refresh With Novelty Knobs
- Furniture Pulls and Knobs That Can Transform Any Piece
- 24 Acrylic Knobs and Pulls That Will Transform Any Furniture
Upholstered bench

Since we didn’t want to leave this as just a hard bench, we decided to upholster it! I found this lavender faux fur that matched so well to the painted lavender color we had chosen.
These were the steps to upholstering the desk bench; see below.
- Choose a foam- we went with 1″ thick foam so as not to make the chair too high to sit while at the desk
- Measure and cut foam to the size and shape of the bench top.
- Cut faux fur to an approximate shape and size it larger than the foam cut-out so that it will cover both the foam and be able to wrap under the seat ledge. I measured 2 additional inches, which was just enough. I then didn’t have to cut any excess fur off.
- Place fur or fabric upside down, then place foam on top. Turn the bench over and then align with the fabric and foam.
- Cut any additional foam needed. In this case, I used an X-Acto knife and cut the corners off to reflect the shape of the bench seat.
- With a staple gun, gently pull and staple the middle of each side. Then continue this process by stapling on either side of the staples on each side. This will ensure that the fur or fabric will be evenly distributed across the top.
- Cut the excess fur away for a clean finish.
- Always use a home goods fabric when using to upholstering a piece of furniture and not fabric that you would use for apparel. You want this to be durable.
Check out these other upholstered projects I have done below. In each of these posts, I have reupholstered the seats.
- How To Repurpose An Upholstered Bench
- Easy Steps to Repurpose Patio Furniture
- Telephone Chair- DIY That Looks Amazing!
TikTok video
Check out this video, which shows an abbreviated process of how we did this painted desk!
RELATED POSTS
Check out some other fun painted projects below! Also, check out the other categories on my Double Arrow Designs site for additional DIY projects.
- How To Paint A Metallic Dresser
- How To Repurpose A Sewing Machine Base
- Telephone Chair- DIY That Looks Amazing!
Thanks for stopping by!

This post is all about a painted desk