The Ultimate DIY Telephone Chair Makeover: From Vintage Gossip Bench to Modern Treasure
Originally published on [January 11, 2021]. Updated on [March 1, 2026].
Vintage furniture makeovers are one of my favorite things to share, and this telephone chair makeover is no exception! Whether you call it a telephone chair, gossip bench, or telephone bench, these nostalgic pieces have so much charm and potential when given a second life.
I first tackled a telephone chair project back in 2021 with my sister, and now I’m revisiting this classic makeover with clearer steps, updated techniques, and fresh before-and-after photos so you can recreate this transformation with confidence.
This post contains affiliate links. If you make a purchase through one of my links, I may earn a small commission at no extra cost to you. As an Amazon Associate I earn from qualifying purchases.
What Is a Telephone Chair / Gossip Bench?
Before cordless phones and smartphones, telephone chairs were a staple in homes — a tiny seat with a built-in side table for your landline phone and space underneath for phone books or notepads. These pieces are beautiful reminders of another era, and with a little elbow grease, they can become functional accent pieces in today’s homes.
Before You Begin: Finding the Perfect Piece
When looking for a telephone chair to makeover, check thrift stores, Facebook Marketplace, estate sales, or vintage markets. Search for listings tagged as telephone chair, gossip bench, or telephone bench — and pay attention to condition. Most of these pieces have dark wood finishes, built-in table tops, and worn-out upholstery that begs to be refreshed.
How we repurposed this telephone chair
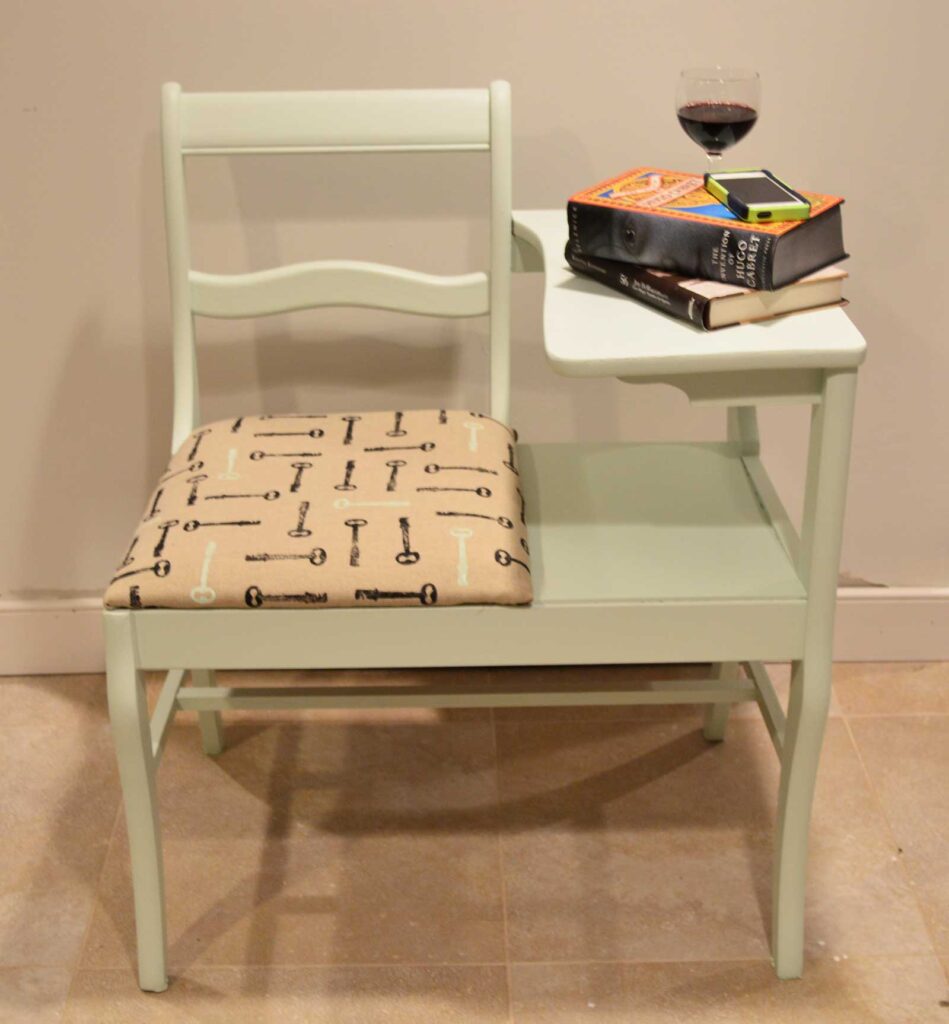
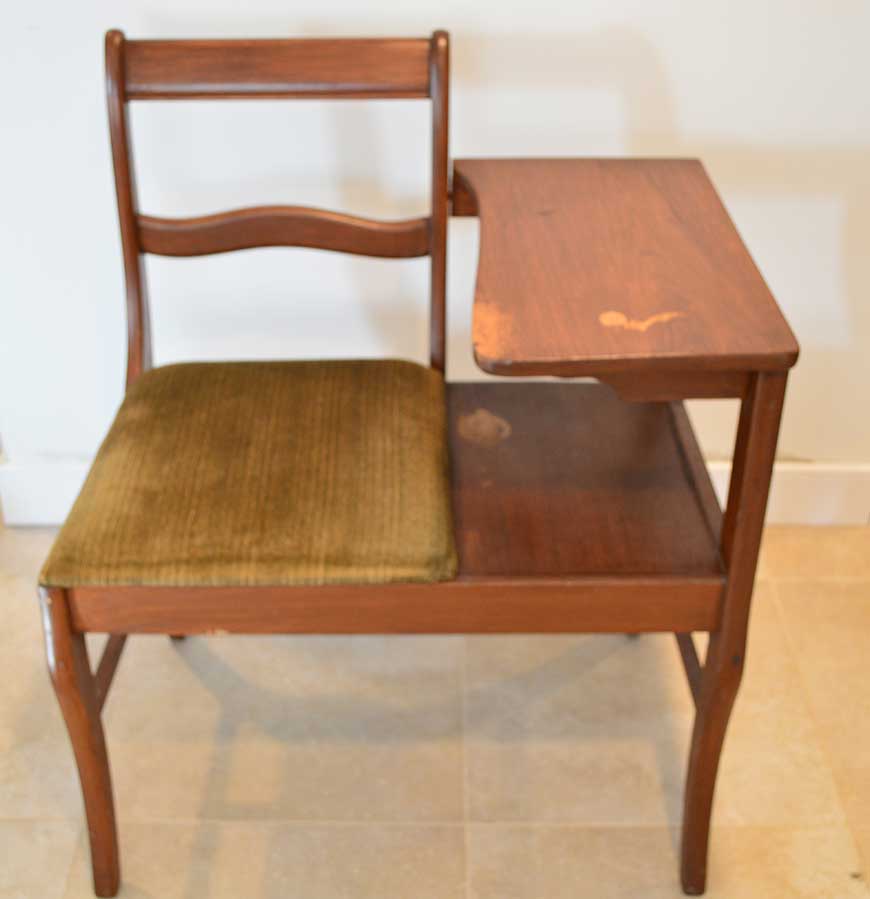
We acquired this chair from a person in Brooklyn. This dejected piece was a rare find! My sister Nicole and I were so excited to get to work on this. We decided, because of the damaged wood, that we would paint this piece. We wanted to give it a neutral look that had a tint of color, so we chose a very light mint color.
Clean & Prepare Your Furniture
Before you start stripping or painting, take time to thoroughly clean the piece. Old chairs can collect dust, grime, and oils that interfere with paint and finish. I use a bucket of warm, soapy water and a sponge or rag to wash it from top to bottom — it makes a huge difference once you start working.
Strip the Old Finish
If the wood has a dark stain or heavy varnish, remove it before moving on:
- Apply a gel-type paint and varnish remover according to package instructions.
- Follow the grain with a scraper to lift off the old finish.
- Use a hand sander or sanding block for stubborn spots.
This opens the wood up so new stain, paint, or bleach can work properly.
Prime Like a Pro
Good priming makes a huge difference — especially on dark wood. I love using a shellac-based primer like Zinsser BIN because it blocks tannin bleed-through that can discolor paint. Apply two thin coats and lightly sand between each for a smooth canvas. When I get ready to paint wood furniture, the one thing I try to avoid at all costs is sanding. This can be a tedious and difficult job. Especially if the furniture has many rounded edges like this piece had. My secret is using a water-based primer. So Sanding isn’t necessary with the primer. Because this is real wood and either the wood grain or the varnish can seep through paint, I use a kill stain primer. Apply 1-2 coats, depending on the piece. This primer will block stains coming from the wood.
Once this is dry, usually in a few hours, I will then apply two coats of paint to my surface. One coat is never enough, and a second coat always finishes it off completely. I use regular Benjamin Moore paint for all my painted furniture projects.
Choose and Apply Paint
Now for the fun part! Here’s how I painted mine:
- Chair Frame: Annie Sloan Chalk Paint in Louis Blue — this tied into the color of my upholstery.
- Table Top or Accents: A contrasting Fusion Mineral Paint color (Champlain on this project).
Whether you use chalk paint, latex paint, or milk paint, picking colors that complement your fabric selection ensures a cohesive look.
The testers are perfect for three reasons. One, there is more than enough to coat a piece like this twice. Two, the testers cost less, and three, all the testers come in an eggshell finish. Once this is dry. I recommend 24 hours. I then seal the painted pieces by using Minwax clear coat in a matte clear finish. This adds a durable finish. I always add felt pads to my finished piece to avoid scratching floors.
Reupholster Like a Pro
Replacing the worn upholstery instantly modernizes a vintage chair:
You’ll Need:
Foam, durable fabric (upholstery weight, not apparel), staple gun, scissors, and a Sharpie.
- Remove the old fabric, foam, and batting.
- Trace the old seat shape onto the new foam and cut to size.
- Wrap fabric over the foam, pulling evenly around all sides.
- Staple from the center out, keeping tension balanced.
- Trim excess fabric and secure corners.
- Screw the seat back to the frame.
Choosing a home-goods fabric over lightweight apparel ensures durability for everyday use.
Optional: Add Decorative Stenciling or Art
One of my favorite touches is adding stenciled designs that echo the upholstery pattern — it brings personality and artistic cohesion to the piece. I design all my own stencils and sell them on my Etsy shop if you want to try this too!
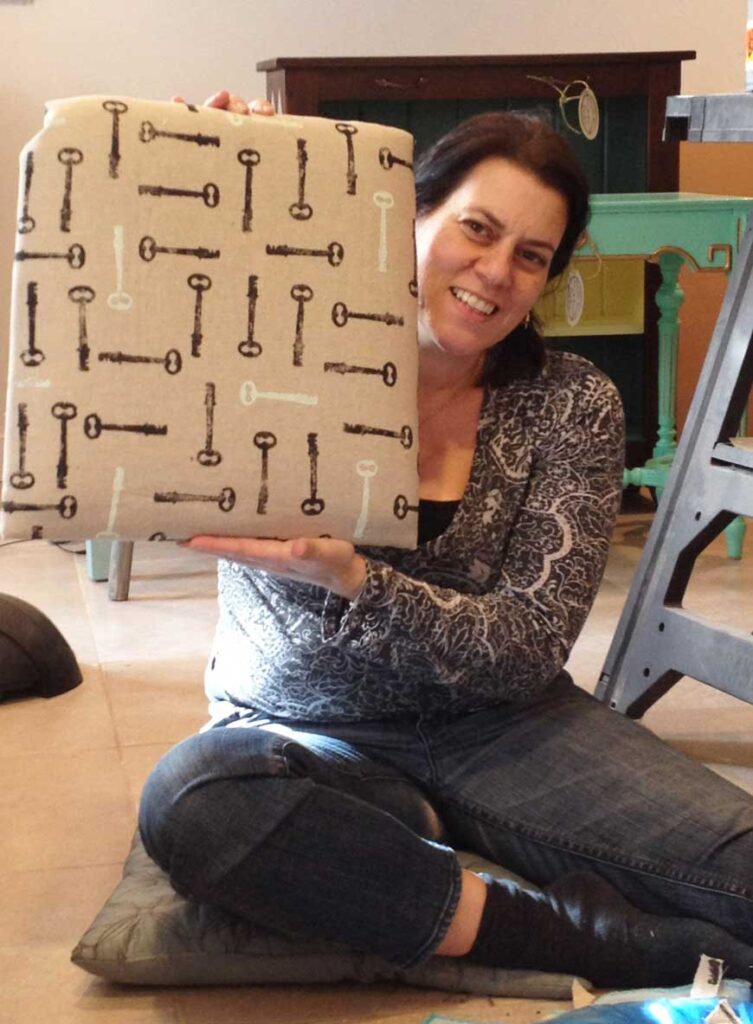
Textile design for the cushion
First, the tattered upholstery and disintegrating foam cushion needed to be removed. A new piece of foam cut to size of seat was prepared. Also used was an upholstered canvas fabric we had bought. With all of these repurposed pieces with textile, a color scheme was decided on.
We had bought these really cool antique keys that sat in a box waiting to find a use for them. Finally, one key found a home as a decorative piece on this ombre chest we did for a South Hampton home. Then I had the idea to use this key and design an all-over repeat design. I dipped the paint into two colors, one black (using fabric paint for the black) & one the same color as mint ( I used the Benjamin Moore paint for this) that was used for the wood frame. This helped to tie back the new upholstered design to the frame of the chair.

Final Finishing Touches
- Seal the Paint: I always use a matte clear polyacrylic for durability without the glossy look some varnishes give.
- Protect Floors: Add felt tabs under the feet so the chair moves without scratching your floors.
- Enjoy: This piece now lives beautifully in an entryway, living room nook, or hallway — ready for mail, coffee, or even a modern phone!
Why This Makeover Matters
Telephone chairs have a rich nostalgia — they connect us to a time before mobile phones, calling us to slow down a bit and appreciate craftsmanship. Upcycling these pieces is not just about paint and fabric; it’s about giving them a new purpose in today’s homes.
Uses for a repurposed Telephone chair
There is no designated place now needed to make these phone calls. We make them on the go, in bed, outside, you name it I am sure no place hasn’t been used to make a phone call!
These beautiful repurposed chairs have found new homes in entryways, in nooks and have become a great sitting area with a table to read a book, put on a pair of shoes, look through mail, among other activities.
Home good Fabric
Important when you do an upholstered project that you use fabric specifically for this! There are many fabrics out there, and if you use an apparel fabric, it may be too thin and can tear more easily. So an upholstered fabric comes in a heavier, sturdier weight. Some of them are also stain-resistant, like the brand Sunbrella.
Amazon has a good selection of upholstery fabrics as well as fabric.com for this specific project, and was happy with this quality as well. I have bought from both places and have found quality at both. Below are some amazing, fun fabrics from Etsy. A lot of fabric places sell their fabric here, so take a look!
Take a look at some of these fun textile selections from Etsy for your next project!
There are so many choices on Etsy for upholstery fabric. I went down a rabbit hole on this. You can find about any design, [atter, and texture here. Keep in mind the look you are going for first!

- Feed Sack Fabric By The Yard
- Udder Madness Milk Brown
- Blue Traditional Woven Upholstery
- Blue Green Block Print– This has such an Anthropologie feel!
- Ballard Designs COCO TWEED MINERAL Blue– This will give any seat an upscale look
- Checkmate – Checkered Design Chenille – This pattern comes in multiple colors to match any interior
- Printed Velvet Fabric– For a bold color and print choice to makeyour upholstered chair stand out
- Vintage Style Oil Painting Yarn-Dyed– This needlepoint-esque pattern is timeless.
- Pink Aqua Velvet Upholstery Fabric– so luxe and pretty with the mix of colors and texture.
Materials used for my upholstered Telephone chair

- Felt tabs
- Upholstery Foam
- Upholstery fabric– (this is not the actual fabric I used on my specific Telephone chair)
- Electric Staple Gun
- wood glue
- Minwax Polycrylic Protective Finish
- Rust-Oleum Zinsser Bulls Eye 1-2-3 Primer
- Chalk Wax Paint Brush 3 pcs- This set will help you not only paint well, but you can use them for multiple applications.
Final Thoughts on This Telephone Chair Makeover
This telephone chair makeover is such a good reminder of why I love upcycling old furniture in the first place. What started out as a tired, forgotten gossip bench turned into a one-of-a-kind piece with fresh paint, lighter wood, and new upholstery—and honestly, that transformation never gets old for me.
Projects like this don’t require perfection, fancy tools, or a massive budget. They just take a little patience, creativity, and a willingness to see potential in something that looks past its prime. If you’ve been on the fence about tackling a furniture makeover, let this be your sign to try it. Thrift stores, curbside finds, and dusty old pieces tucked in garages are full of hidden gems just waiting for a second life.
And the best part? No one else will have a piece exactly like yours. That’s the magic of a DIY telephone chair makeover—it’s not just about creating furniture, it’s about creating something personal that tells a story.
f you decide to try your own gossip bench makeover, I’d love to see it. Tag me or send me a photo—I never get tired of seeing old furniture get a fresh start.
Related posts
If you loved this telephone chair makeover, you’ll probably enjoy a few of my other furniture transformations, too. I’m always experimenting with paint, fabric, and creative ways to breathe new life into old pieces, and these projects use many of the same techniques you saw here—prep work, paint, stenciling, and a little creative problem-solving. Whether you’re into bold color, subtle neutrals, or full-on furniture flips, these related projects should give you plenty of inspiration for your next DIY makeover.
- DIY Telephone Chair Makeover — Upcycle a Gossip Bench That Looks Amazing– I actually did another one!
- The Staircase Makeover That Transformed My Entire Home
- Sewing Machine Cabinet Repurposed Into a Stunning Bar Cart You’ll Love
Thanks for stopping by!

This post is about a DIY telephone chair makeover.