DIY Bedding Sewing Hack: Transform Plain Sheets with Ric Rac Trim
Tired of plain, boring bedding that doesn’t inspire? With just oversized ric rac, a simple tea-dye hack, and a little sewing, you can completely elevate your sheets and pillowcases into boutique-hotel-worthy bedding. This easy DIY bedding sewing hack adds a touch of custom charm to your bedroom, creating a fresh, polished look without spending a fortune.
Materials Needed for Custom Bedding DIY
- Oversized ric rac trim
- Plain sheets and pillowcases
- Tea (for dyeing ric rac)
- Needle and thread
- sewing machine
- Scissors
No products found.
No products found.
Using a sewing Machine for this
Hand-sewing the ric rac onto sheets and pillowcases can be done. but it’s going to be a long, tedious effort, especially with oversized ric rac and large bedding pieces. If you don’t already have a sewing machine, I’ve broken down three sewing machine options below to suit different needs and budgets. The first is a basic/portable or “hand-type” machine. the second is a middle-of-the-road option (this is where I’d personally go, since I’ve used my Brother machine for years for DIY sewing projects and it’s very dependable). The third is for someone more advanced wanting a machine that can handle bigger sewing jobs and more demanding work.

Machine Recommendations by Tier
Basic / Hand-Portable Tier
If you barely sew and only want something very simple for light projects like applying ric rac to bedding, a small, basic, portable sewing machine or a mechanical full-size with limited stitches. This will do the job. It should handle straight stitch and zigzag stitch, have decent stability, and be easy to use without lots of extra features that add complexity and cost. This is good if you’re just dipping your toes into sewing and don’t yet want to invest in something large.
No products found.
Mid-Range Tier (My Recommendation)
This is where I think most DIYers should aim. A solid mid-range sewing machine gives you more power, speed, better build quality, and more stitch options without being overkill. You get better durability, more consistent stitch quality, and the ability to sew thicker seams or heavier fabrics. If you decide to branch out from just ric rac and bedding in the future. My old Brothers machine, purchased for just over $100, has been doing this work for me. It is reliably because it has enough strength, good tension control, and decent stitch options for trims and decorative stitching.
No products found.
Advanced / High-End Tier
If you frequently sew large bedding, thick fabrics, or want advanced features (computerized stitch selection, very high speed, large workspace, maybe quilting features), then a high-end machine makes sense. This is for those who want serious performance, can handle frequent use, and may also want to work on more than just bedding (e.g. quilts, upholstery, etc.). These machines are more expensive but built to last and with more flexibility.
No products found.
Skill Level: This is a beginner-friendly sewing project that’s simple, approachable, and perfect for first-time sewers. Think of it as an easy DIY score you don’t need advanced techniques to get boutique-style results. The difficulty rating is low. But the impact on your bedding is high, making this a quick and rewarding way to customize your sheets and pillowcases.
Prep Your Bedding & Ric Rac
Start by laying out your plain bedding this is your “before” moment, and it really highlights the transformation to come. Measure and cut your oversized ric rac to fit along the edges of your sheets and pillowcases. Leave about ½” extra on each end, fold it over, and hand stitch the ends to prevent fraying. Double-check that each piece is the correct length so it will fit neatly once sewn.
Next, decide where you want to place the ric rac. I measured 3 ¼” from the seam as my guide. Once your placement is decided, iron the ric rac so it’s smooth, then pin it in place. Pinning keeps the trim straight and consistent, which makes the final stitch look polished and professional.

Choosing a color combination
Before you begin, take into consideration your room decor and color palette. I used a cream and white cobination to keep this very neutral; however, you can do some other winning combinations like:
- White and dark trim, such as black
- dark color with light trim, such as white, cream, or a light shade of pink or blue
- bold combination like pink sheets and pop it with a yellow or turquoise
Quick Video on the Whole Process!
I cut my project video down to about 30 seconds so you can see the highlights in one quick scroll, but in real life this was a weekend project. I worked on it across Saturday and Sunday afternoons, taking my time with each step. One of the lengthier parts of the process was dyeing my ric rac. I wanted the color to perfectly match the warm cream tones in my bedding. So I tested a few batches until I reached the exact tint I was going for. It was a bit of trial and error! But that extra effort really paid off — the final look feels seamless and custom-made.my ric rac to exactly the tint I was going for!
Just depends on the look you are going for!

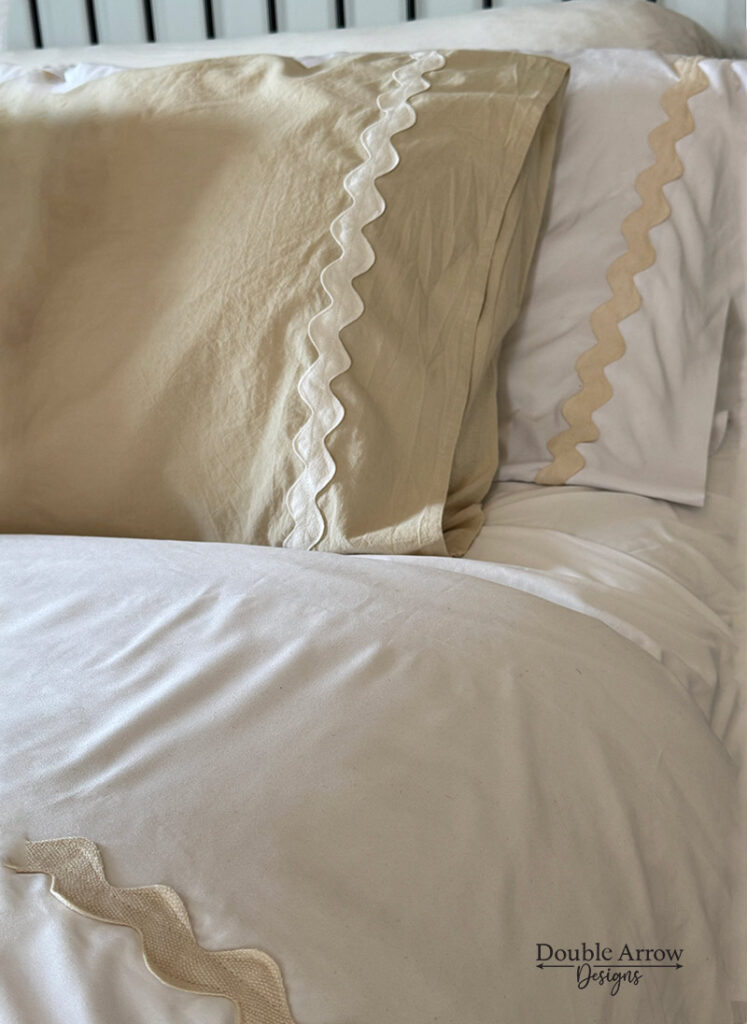
You can see my sewing lines on this close up. Below I explain How I sew a line down the middle to stabilize my trim, then go back and sew a wavy line to matc the shape of my ric rac.
Tea-Dye Hack for a Creamy Color
I ended up buying all white cotton ric rac. However then decided I wanted my white sheet and pillowcases to have cream color ric rac. So instead of going out and buying this, I decided to take a portion of my whole ric rac and do a “tea stain” with this simple method. Dip your ric rac in a tea bath for a few minutes until it reaches your desired shade. I then washed it in soapy water, then let it dry completely before moving on to sewing. This gives your trim a soft, subtle color that complements your bedding perfectly.
However, you can buy ric rac in an assortment of colors and sizes as well, and you can avoid this whole dyeing step!
sewing ric rac trim
Once the ric rac is dry, pin it along the edges of your sheets and pillowcases. Stitch carefully, with a sewing machine. Keep your stitches neat and even for a polished, professional look. I ran a stitch down the center of the ric rac. Then went back to each side and did a wavy contour stitch to follow the ric rac shape. I did this so when washing the bumps on the irc rac stay in place better, with less ironing involved. The oversized ric rac adds texture and style, instantly transforming plain bedding into something special.


Make Your Bed and Enjoy! Once sewn, make your bed and admire the transformation. The ric rac adds texture, color, and a boutique-hotel vibe to your bedding. What started as a simple DIY project instantly elevates your entire bedroom. The plain sheets you began with are now a statement piece a perfect combination of cozy comfort and polished, designer-inspired style. Every time you make your bed, the carefully stitched ric rac serves as a reminder of the effort and creativity you put into your space.
Beyond aesthetics, this DIY gives your room a personal touch that mass-produced bedding can’t replicate. The tea-dyed ric rac creates subtle color variation that complements your sheets and pillows, giving them depth and visual interest. Because you chose the placement, width, and color, your bedding is completely custom a reflection of your taste and style. It’s these small details, like the ripple of scalloped trim along the edge of a sheet, that make a space feel thoughtfully curated and welcoming.
This project also demonstrates how small upgrades can have a big impact. You didn’t need to buy a brand-new bedding set or splurge on expensive designer sheets. With just a few materials, some time, and a bit of patience, you transformed something ordinary into something extraordinary. This sense of accomplishment makes your bedroom feel more like a retreat — a space you truly enjoy being in.
Plus, once you’ve finished, you can use this project as a jumping-off point for future DIY experiments. Maybe next you’ll try adding ric rac to pillow shams, throw blankets, or even table linens for a coordinated look. Each project builds your confidence with sewing and expands your ability to customize your home decor in creative ways.
Finally, every time you slide under your newly-trimmed sheets, you’ll feel that little spark of pride. It’s proof that DIY doesn’t have to be intimidating it can be fun, rewarding, and transformative. Make your bed and enjoy not just the look, but the feeling of having created something uniquely yours.
For the non DIY’ers who are looking for the scalloped look without the work.
If you love the look of scalloped-edge sheets but want to skip the DIY project, I’ve put together a list of options you can buy. These sheets are clean, sophisticated, and feature a beautiful contrast scalloped edging, giving your bedding a boutique-inspired look with zero sewing required.

No products found.
Related Posts
Like this project? Well, I have more where this came from! Check out some of these posts that may interest you!
- Turn Plain Into WOW: DIY Polymer Clay Light Switch Covers
- 5 Easy Peel-and-Stick Accent Walls (No Paint Required!)
- Choosing Furniture Pulls and Knobs That Wow
Thanks for stopping by!

This post is all about a DIY Bedding Sewing Hack, using ric rac trim
Last update on 2026-07-16 / Affiliate links / Images from Amazon Product Advertising API