Bedroom Wallpaper Feature Wall That Looks Amazing!
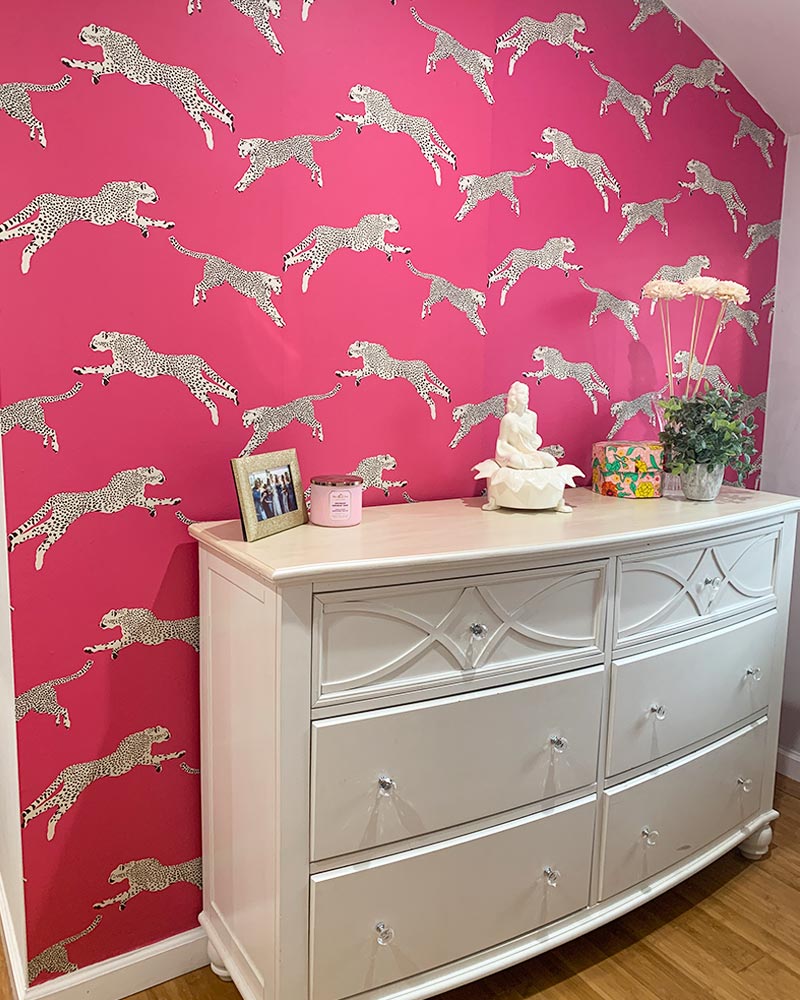
We decided to add a bedroom wallpaper feature wall in Emma’s bedroom. We have this white dresser that has seen better days and a blank wall behind it. So, we plan to use peel-and-stick wallpaper on this one wall and refinish the white dresser to add some style to this space.
Bedroom wallpaper feature wall
My blog periodically contains affiliate links, meaning that if you make a purchase, I might make a small commission at no extra charge to you. Purchases made through them are greatly appreciated.
We recently redid Emma’s room for her first year at college because, unfortunately, her Freshman year was the fall of 2020 in the height of Covid. So she was sent home just three weeks into the semester. Check out the post we did on how to make a dorm room feel like home. We had a few more items that needed to be done, and this was it!
(adsbygoogle = window.adsbygoogle || []).push({});
Which wall should have feature wallpaper?
You should pick a wall that you will see when you enter the room for maximum impact. Don’t pick a wallpaper that is too plain since you want to have that wow factor. Emma chose this paper called “Leeping Cheetahs” Bubblegum Leaping Cheetah. This is a Peel & peel-and-stick wallpaper that can easily be installed, but I recommend that this is a two-person job.

There are so many great choices these days for peel-and-stick wallpaper. Check out my post, 9 Peel And Stick Wallpaper Ideas, for some other fun ways to use peel-and-stick wallpaper. You aren’t just limited to bedroom wallpaper feature walls!
How to apply peel-and-stick wallpaper to a feature wall
Since we are only using wallpaper on one wall, it is important to measure the height and the length to help determine how many rolls of wallpaper you will need. Measure the width, then note the width of your wallpaper. For example. Emma’s bedroom feature wall was 88″, and this specific roll was 22,″ so now I know we needed 4 strips to cover. Also, decide from which direction you will be applying the strips. Since you may not use the full width of a strip on one side, decide on which direction. So that if you have a narrow strip on the wall, it can be used in a corner or the less visible side of the wall.
Next is to line up the pattern. This is called the repeat. (where the pattern repeats itself) First decide which direction you will hang your wallpaper, which will then tell you which side to line up your repeat.
There will be some waste of the wallpaper when lining up our repeat. I start from the top of each strip to make sure that I am starting each strip with the same pattern from the strip before. Having a large table is very helpful to unroll and cut your wallpaper using your self-healing matt, ruler, and either a rotary cutter, and xacto or utility knife. Once each strip is cut, I like to number them in pencil on the back so that I know the order in which the wallpaper strips will be used.
7 Easy Steps to Hang Wallpaper
- Measure First
Measure the height and width of your wall, as well as the length of each wallpaper roll, to determine how much you’ll need. - Cut and Number
Lay out the wallpaper and cut strips to the needed length for your wall. Number each strip in order for easy installation. - Match the Pattern
When cutting your second strip (and the rest), make sure to align the pattern repeat based on how you’ll hang them. - Start Peeling
Gently peel back the paper from each corner of the first strip—just a small section—so you can begin lining it up on the wall. - Stick and Smooth
One person peels while the other aligns and sticks the strip to the wall. Once it’s in place, use a smoothing tool to eliminate air bubbles. - Repeat the Process
Line up the next strip, matching the pattern and edges carefully, and then repeat the peeling and smoothing process. - Trim the Edges
Use the hard edge of your smoothing tool to press the paper into corners, along ceilings, or around moldings. Then, trim any excess paper.
Get this free how-to guide for applying your peel-and-stick wallpaper!
Get our how to guide on applying Peel & Stick wallpaper
Send me the guide
Check out my TikTok Videos on this specific DIY project
Supplies used for this feature wall project
Even though using peel-and-stick wallpaper is easier than regular wallpaper, there are some supplies that I used when installing this as well as the supplies that I used for the dresser.
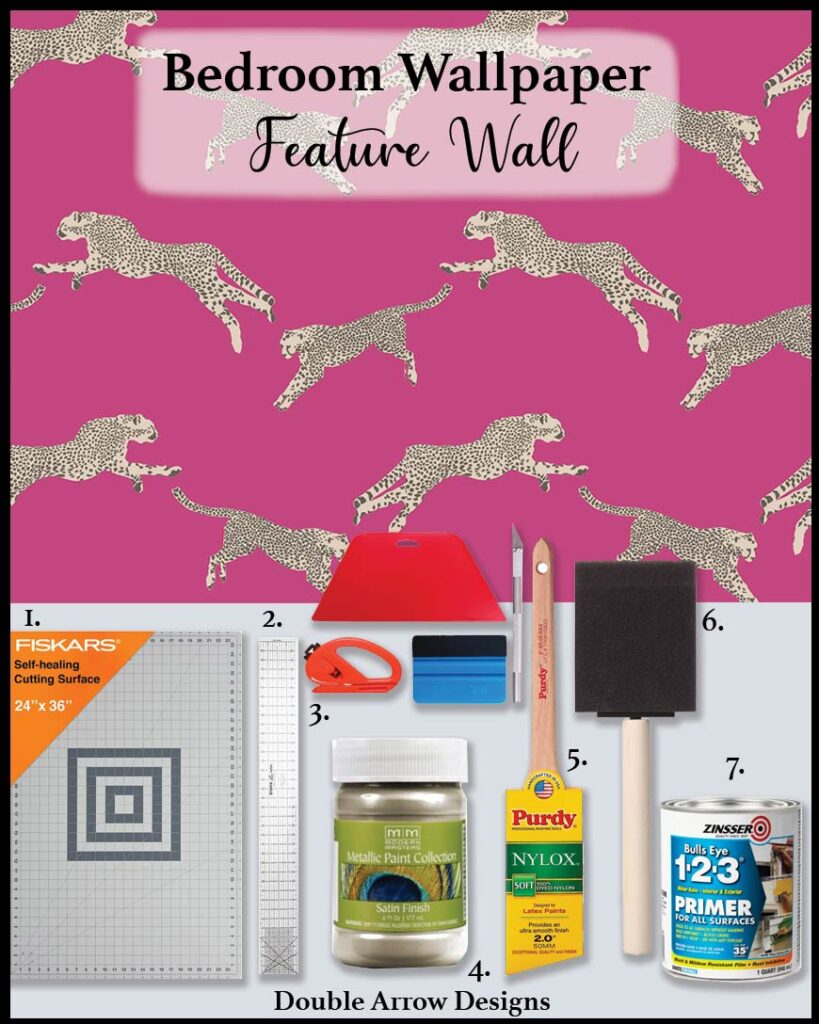
- Self Healing Cutting Mat -Protects your surface while giving you a safe place to cut wallpaper pieces with precision. It’s great for straight, clean cuts and helps preserve your blades.
- Ruler with Lip Edge– Helps guide straight cuts and keeps the ruler from slipping. The lip edge hooks onto the edge of the mat or table, keeping things aligned while you cut.
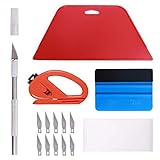
- Wallpaper Smoothing Tool Kit– Essential for removing bubbles and wrinkles when applying peel-and-stick wallpaper. Helps press the wallpaper down firmly for a clean, professional-looking finish.
- Modern Masters Metallic Paint adds a luxe, shimmering finish to furniture. This paint gives the dresser a modern, eye-catching effect that pairs well with the feature wall.
- Purdy paint brush– A high-quality brush known for smooth application and minimal brush strokes. Perfect for applying metallic paints evenly on detailed surfaces.
- Foam Brushes– Ideal for smooth, even coverage in tight spots or edges. They don’t leave brush marks, which is especially helpful when using specialty paints like metallics.
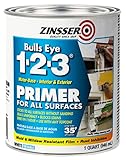
- ZINSSER Water-Based Primer– Prepares the dresser surface for painting. Ensures good adhesion of paint, prevents peeling, and helps cover up any stains or old finishes.
Wallpaper Smoothing Tool Kit This multi-function tool kit is including craft art knife with 10 replaceable blades, a red and blue squeegee, a vinyl cutter, and a sponge, which is perfect for peel-and-stick wallpaper
Self healing mat to cut wallpaper on the printed ruler and grids help you line up your paper for straight cutting.

This acrylic ruler with lip is what I use with my mat. it makes it super easy to line up the grid and use a blade to cut your wallpaper with. I highly suggest the at and ruler for all your projects!
Revamped dresser for the new bedroom feature wall
We took Emma’s plain white dresser and decided to amp this up a bit to match the vibe of the new wallpaper. The top of the dresser was stained and marked. I used a fine grit sander block to smooth out the top. Then using Zinsser primer and a sponge brush applied two coats in one direction. Letting each coat dry thoroughly. The water based primer is perfect for this project.
Modern Masters makes this paint in a variety of colors. However, we decided to use the metallic champagne color to coordinate with the other metals in Emma’s bedroom color scheme.
(adsbygoogle = window.adsbygoogle || []).push({});

The two paintbrushes that I use for all my projects are Purdy and foam brushes. Yes, purdy brushes are more expensive; however, if you clean them after every use and hang them to dr,y they will last you a long time. I use foam brushes when I am applying primer or Minwax polycrylic seal.


An easy way to update a dresser after painting it is to change out the knobs. We decided to paint the knobs in pink to tie back to the background color of the wallpaper, however I have two posts just on knobs! check them out below for some fun ideas for your next project.
Before and after feature wall

Create your own bedroom feature wall
Before creating the actual bedroom wallpaper feature wall, I gathered items to see how it would look overall. Below are some bedroom items if you want to create a similar bedroom wallpaper feature wall in your home!
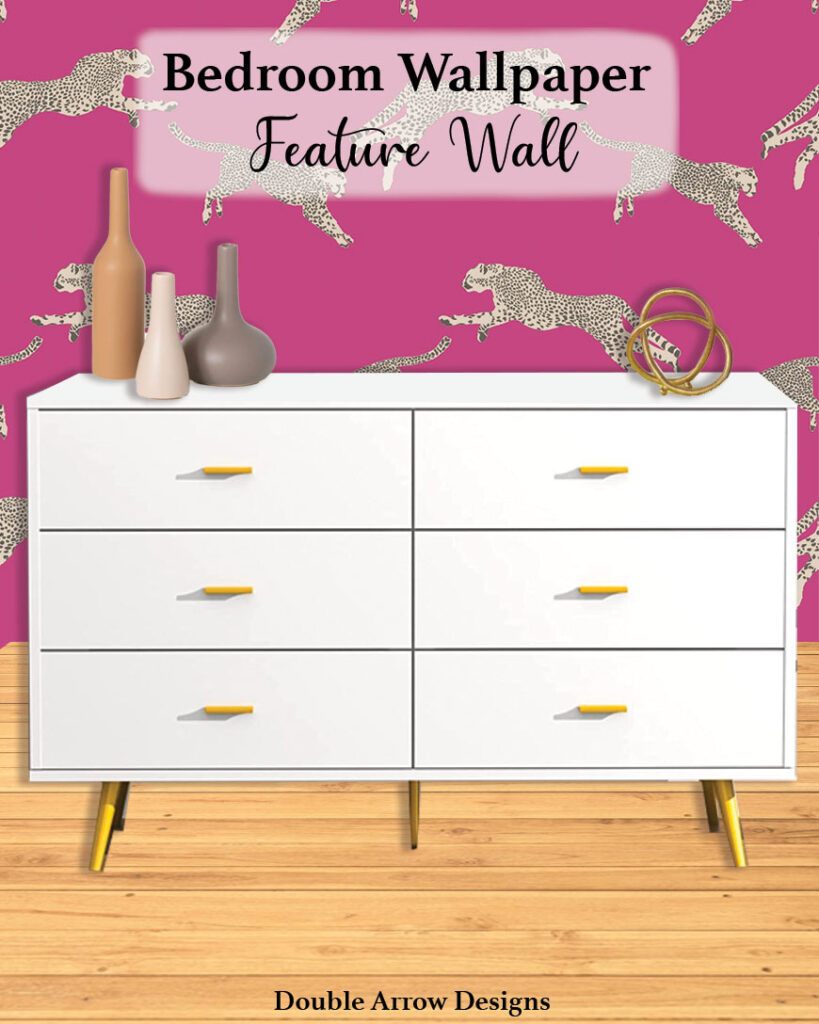
- Luhan Ceramic Table Vase
- Swam Eternal Loop Sculpture
- Bubblegum Leaping Cheetah Peel & Stick Wallpaper
- LYNSOM White Dresser for Bedroom, A modern 6-Drawer Dresser with Gold Handles that [airs perfectly with this fun wallpaper.
Related posts
Check out some additional posts that you may find helpful!
- Staircase Makeover That Is A Game Changer
- How To Decorate Floating Shelves
- Adding Legs To Furniture for a Total Transformation!
Thanks for stopping by!

This post is all about a bedroom wallpaper feature wall