How to Paint Wicker Furniture for a Beautiful DIY Makeover
Originally published on June 27, 2021. Updated on March 13, 2026.
If you’ve ever come across a tired wicker chair at a thrift store or in your own home, you may wonder if it’s worth saving. The good news is that painting wicker furniture is one of the easiest DIY furniture makeovers you can do.
With the right preparation and paint technique, you can transform outdated wicker into a beautiful accent piece that complements modern coastal, cottage, or shabby chic décor.
In this step-by-step tutorial, I’ll show you how to paint wicker furniture so it looks professionally refinished, not clogged with paint or uneven in color. This quick makeover took just a few hours and completely transformed an old wicker chair into a stylish accent piece. If you love DIY furniture projects as I do, this simple project delivers a significant visual impact.

This post contains affiliate links. If you make a purchase through one of my links, I may earn a small commission at no extra cost to you. As an Amazon Associate I earn from qualifying purchases.
Can You Paint Wicker Furniture?
Yes, wicker furniture can absolutely be painted, and it’s one of the best ways to revive old pieces that are faded or outdated. Because wicker has numerous small woven surfaces, spray paint or thin coats of furniture paint provide the best even coverage.
The key is proper preparation. Wicker should always be cleaned thoroughly and lightly sanded before painting so the new finish adheres properly. Applying several thin coats rather than one thick coat helps prevent drips and keeps the woven texture visible.
Check out our TikTok video on our Wicker chair redo!
We did a quick video to show a quick transformation of our painted wicker furniture makeover. Not only is my Emma my model for most of my fashion DIY projects. She is also my social media guru in the house and does most of my videos for me. So a big shout-out to her!
Getting started on our painted wicker chair makeover

Step 1: Clean the Wicker Furniture
Before painting wicker furniture, start by removing dust and debris from the woven surface. Dirt trapped in the weave can prevent paint from sticking properly and create a rough finish.
Use a damp cloth or a vacuum with a brush attachment to clean the entire piece. If the wicker is very dirty, you can wash it with mild soap and water. Just be sure to let the furniture dry completely before moving on to the next step.
Step 2: Lightly Sand the Surface
Light sanding helps paint adhere to wicker and smooths out any rough areas from old finishes. Use a fine sanding block or 220-grit sandpaper and gently sand along the weave.
Because wicker is delicate, avoid heavy sanding. The goal is simply to create a slightly rough surface that helps the new paint bond properly.
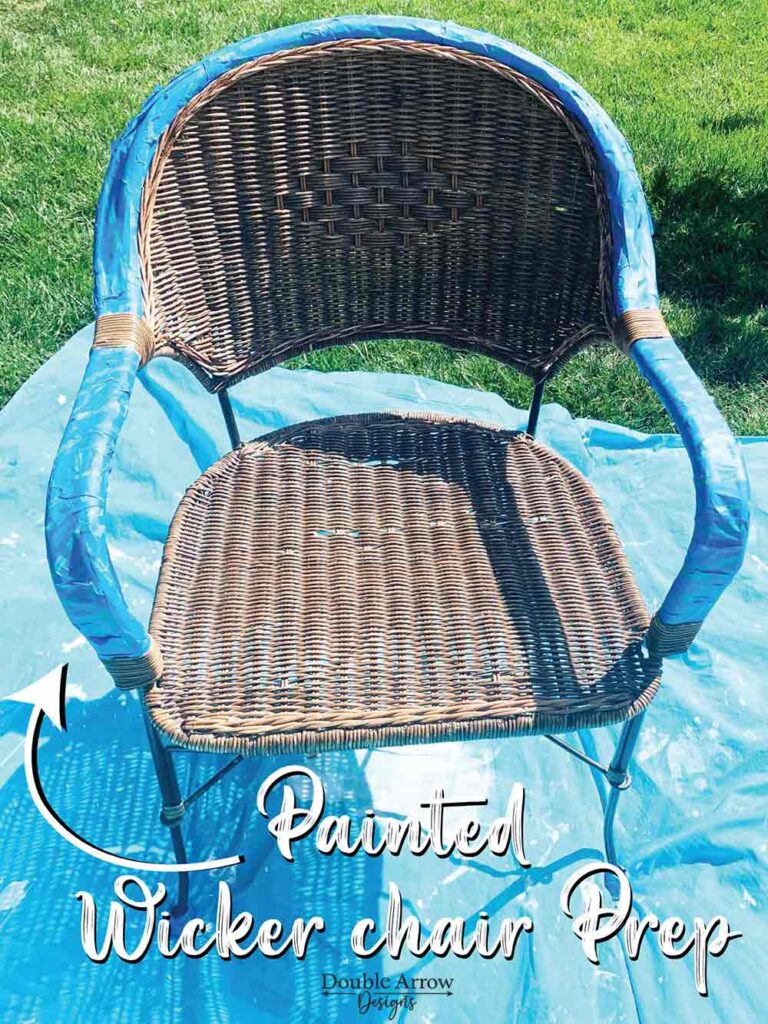
Step 3: Protect Areas You Don’t Want Painted
If your wicker piece has wood arms, metal frames, or decorative details, apply painter’s tape to protect those areas. Lay down a drop cloth or tarp to protect the ground from overspray.
This step makes cleanup easier and helps keep your paint lines crisp and professional.
Best Paint for Wicker Furniture
The original wicker chair was a natural brown. Since we were transforming this into an accent chair for a beach house, we decided to use a blue color story. Painted blue furniture has been trending so we thought this would be the perfect place to try this painted furniture trend out. We also wanted to give is a contrast color and paired it with a creamy neutral. colors we used:
- Krylon Fusion all-in-one paint & primer– Matte Ink Blue
- Fusion Mineral Paint– Champlain
The combo of these two colors came out perfect; we loved the contrast, yet the ink blue was subtle enough to work well as a fun neutral.
Step 4: Paint the Wicker Furniture
Spray paint works especially well for wicker because it reaches all the small crevices in the woven surface.
Hold the spray can about 10–12 inches from the furniture and apply light, even coats while moving continuously. This prevents drips and ensures smooth coverage.
Rotate the furniture as you paint so you reach every angle of the weave. Several thin coats will give you the best finish.
Common Mistakes When Painting Wicker Furniture
One of the biggest mistakes people make is painting wicker without cleaning it first. Dust, dirt, and debris often hide deep within the woven texture. If the surface isn’t cleaned properly, the paint will not adhere well and the finish may look uneven or gritty.
Because wicker has so many grooves and crevices, thick coats of paint can easily clog the weave. This removes the natural texture that makes wicker beautiful. Instead, apply several light coats of paint, allowing each layer to dry before adding the next.
Wicker furniture has many hidden angles, which means it’s easy to miss spots while painting. If the piece isn’t rotated during painting, you may end up with areas that still show the original color. Take your time and spray from different angles to ensure even coverage.
If you are using spray paint outdoors, weather conditions matter. Wind can cause uneven spraying and humidity can slow drying time, which may lead to drips or tacky paint. For best results, paint in mild, dry conditions and work in a well ventilated space.
Rushing the process is another common mistake. Wicker furniture has many layers where paint can settle, so it may take longer to dry than flat surfaces. Allow each coat to fully dry before applying the next to prevent smudging or uneven texture.
Supplies used for the painted wicker furniture makeover

- Krylon Fusion spray paint
- Fusion Mineral Paint
- Minwax polycrylic spray
- 1″ Purdy brush
- Sponge brush– used this for edges next to the sprayed wicker
- Painters tape
- Fine sanding block– 360 grit
Tips for Painting Wicker Without Drips
Using Spray paint – Since we decided to paint all the wicker and metal one color. We used painter’s tape to cover the wood armrest and frame. Once this was done, we started with the wicker chair turned upside down to ensure even coverage for the entire chair. Then we turned the chair right side up side the taped arms, so we wouldn’t smudge any of the paint. We then used a methodical method of back and forth in light layers to spray paint the rest of the wicker chair. This procedure helps inavoiding to heavy a spray, which can result in paint drips and uneven painted surfaces.Pro Tips for Painting Wicker Furniture
Painting with Fusion Paint -This is made for painting on furniture. Primer is not necessary, but you will need to use two coats to fully cover your surface. We ended up doing three coats on this project. In between the second and third coats, we did a light sanding. Use a fine-grit sanding block to even out any brush or wood textures. Make sure that if you sand, you wipe down your surface so that the paint residue is removed. Once dry, it will have a matte finish. I always like to protect my painted surfaces with Minwax polycrylic.
Pro Tips for Painting Wicker Furniture
- Use Spray Paint for the Best Coverage
- Paint from Multiple Angles
- Choose the Right Finish
- Elevate the Furniture While Painting
- Apply Thin, Even Coats
- Let the Paint Cure Completely
These simple professional tips can take a wicker furniture makeover from a quick DIY project to a polished piece that looks beautifully refinished. With the right preparation and technique, painted wicker furniture can last for many years while adding charm and character to your home.
Seal the Painted Wicker
Once the paint is fully dry, sealing the surface helps protect the finish from chips and wear.
A clear matte or satin polycrylic works well for painted wicker furniture. Apply two light coats and allow each coat to dry completely before using the furniture.
This extra step helps your makeover last for years.

Adding a cushion to our wicker furniture chair
Since this chair was going to be used as an accent piece, we decided to sew up our own cushion. Nicole found this textured blue and cream home goods textile fabric at our local fabric store. You can also shop on Amazon for a full range of fabric selections. Check out this printed fabric… If I were to do this again, I would choose this!
We traced the shape and size of the area of the seat we wanted to cover with the cushion using a large piece of paper. Brown craft paper is a perfect option since it comes in a roll. An easy step is to find the center of the chair, place a folded piece of paper with the fold at the center. Then trace the seat, then you can cut, and then unfold the paper for a perfect symmetrical pattern template.
Place this template on a piece of foam, and use a Sharpie to mark your shape. I used this process on my post, Easy Steps to Repurposed Patio Furniture. Then cut your foam. We cut two pieces of foam to double the height of our cushion. You can buy upholstery foam in a range of thicknesses. Then, taking the same template, we used a rotary cutter on a self-healing mat and cut out two pieces of fabric. You can also get this set from Amazon, which includes a mat, a ruler, and a rotary cutter.
Note* Pillow covers should be two inches smaller than the insert to give the pillow an overall plumpness. When cutting fabric for our cushion, we kept it to the size of our foam, since we were doubling our foam.
Match up the two cut fabric pieces, and pin them together. With my brother’s sewing machine, aligning my needle with a 1/4″ sewing allowance and sewed all around the case, leaving a small opening in the back. Then turn your sewn pieces right side out. Make sure that you get into all the corners and push them out to ensure the shape you want. Once we stuffed the foam into place, I folded the edges over of the unsewn portion, pinned them together, and hand sewed them together.


Supplies used to create the cushion:
- Upholstery Foam
- Craft paper
- Upholstery Fabric
- Fiskars rotary cutter
- Self-healing cutting mat
- Brothers sewing machine
- Sewing thread
- Straight pins
Shop painted wicker furniture
Not everyone loves to DIY, so I try to add some already completed options in my DIY posts. Take a look below for some great wicker and Rattan furniture pieces without having to do a makeover!
Finishing touches on our painted wicker chair
I usually finish my piece by adding felt tabs to the bottom of the feet. This chair already had rubber feet, which I covered with painters’ tape before spraying. One less step! Once we placed it in its new corner with the new upholstered pillow, it looked great. This was an easy, quick way on how to paint wicker furniture that can be done on other pieces or a whole set!
Related painted furniture posts
Check out the below painted furniture posts fo some additional projects and ideas that I have worked on.
- Telephone Chair-DIY That Looks Amazing!
- How to Refinish A Secretary Desk
- Painted Side Table Makeover
For all my painted and DIY furniture projects, you can check them out here at Double Arrow Designs furniture posts. Hope you enjoy! I have had so much fun creating every one of these furniture makeovers. Especially How to paint wicker furniture
Let us see what you have created by painting your wicker furniture, or any of your furniture redo projects. Always love seeing a revamp! You can share below in the comments.
Thanks for stopping by!

This post is all about how to paint wicker furniture.