No Sew Halloween Toga Costumes You Can DIY In 5 Easy Steps
No Sew Halloween Toga Costumes
Toga Halloween costume
Are you looking for a last-minute Halloween costume that’s easy and affordable? Look no further! A toga costume is a classic choice that’s timeless and incredibly simple to put together. The best part? You don’t need any sewing skills to make one! Follow these five easy steps to create a no-sew toga costume that will make you the star of any Halloween party. Below, I take you step by step on these easy no no-sew, very cute togas!
My blog periodically contains affiliate links meaning that if you make a purchase, I might make a small commission at no extra charge to you. Purchases made through them are greatly appreciated.
Halloween toga costume DIY
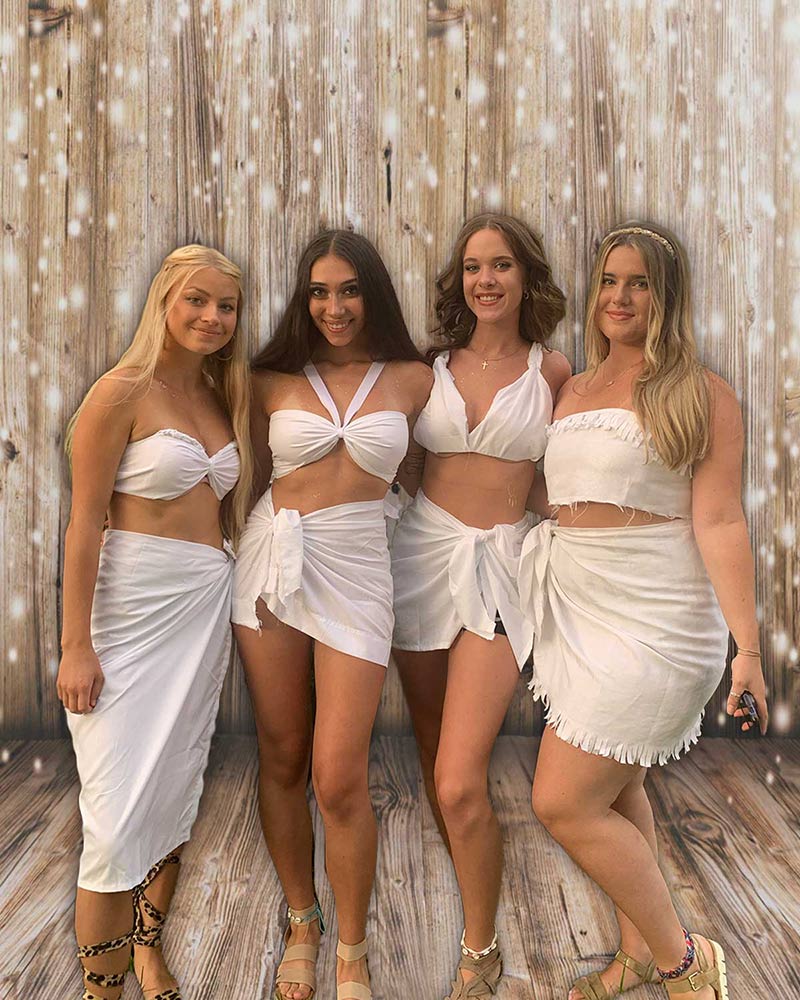
A stylish take on the classic toga. These Halloween Toga costumes feature a two-piece toga outfit.
How to make a two-piece toga costume
Stylish Two-Piece Togas: A Modern Twist on the Classic Toga Costume.
This modern take on the classic toga offers a stylish alternative that’s just as easy to create. Perfect for anyone who wants to make a fashion statement while still enjoying the comfort and ease of a DIY costume, the two-piece toga is sure to turn heads.
Easy toga costume steps are below. My daughter, Emma, asked me to design these no-sew Halloween toga outfit ideas for all her friends. Making Halloween toga costumes is a perfect example of how to design apparel without having to use a sewing machine. These toga girls were transformed into Greek goddesses with these two-piece toga party costumes. In the end, it was a big success!
How to make a No-Sew Halloween Toga Costume
Each girl had their style that they wanted for their no-sew Halloween diy toga costumes. We decided that even though each girl wanted a two-piece toga outfit, we would construct all the toga skirts the same, using a variety of skirt lengths. Then did a variation for each toga top. But ultimately, they would make cute no-sew Halloween toga costumes for them all!
Sign up to be in the know! Keep updated on all my DIY projects and more!
Toga costume using a sheet
What size bed sheet for a toga? Below, I used an inexpensive twin top sheet to make this toga costume DIY. I used the finished edge for the bottom of the skirt to give the skirt on this two-piece toga outfit an instant hem.
I placed the sheet on my cutting board and used a big plastic ruler and fabric cutter to cut the desired stripes I needed for each toga outfit piece. If you do not have these tools, then I would suggest using a large flat surface and a pencil to mark off desired measurements.
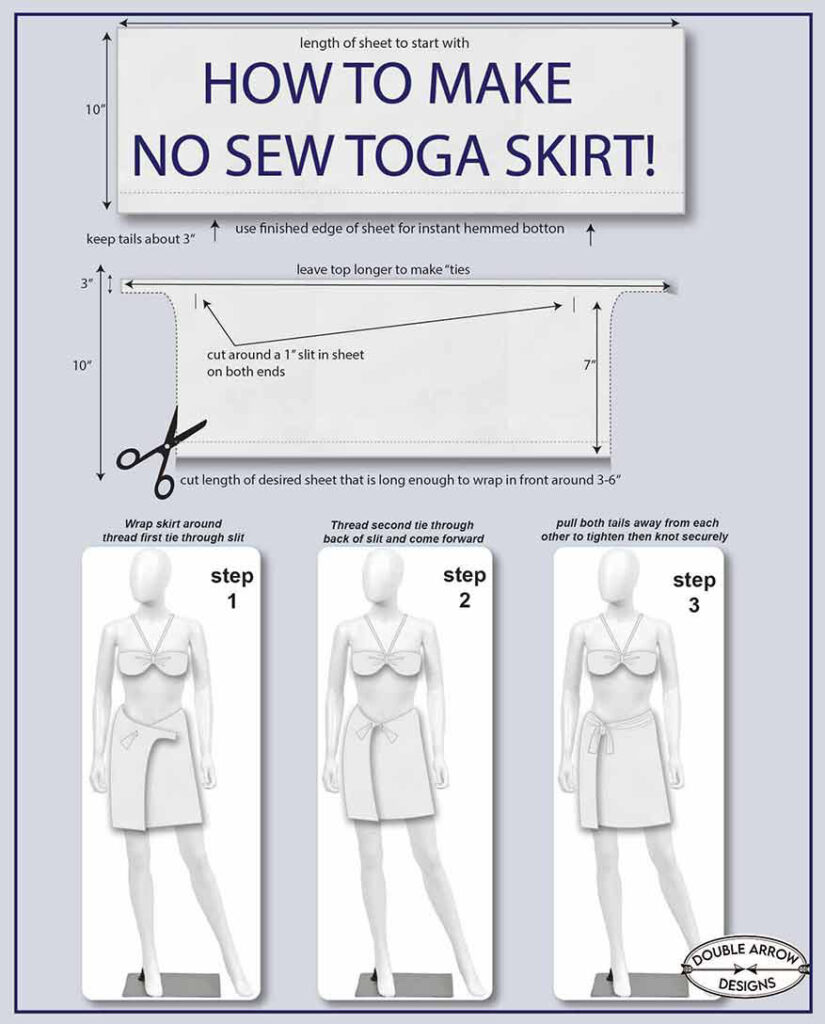
How to make a toga skirt in 5 easy steps
I used a 10″ length for most of the girls (most wanted short skirts). I determined this by taking a measuring tape from the waist to the length they wanted (remember to add around 2 extra inches because when you wrap the skirt, it will gather at the top and naturally become shorter). You can always change this measurement depending on the height of the individual.
- Determine the length of the skirt. We started with using 10″, however, you can adjust this measurement to the desired length for the toga skirt.
- Wrap 10″ length around the back and overlap slightly in front of the person’s waist to determine width, then cut the desired overall width.
- Make sure you use the finished edge of the piece for the “hem” of your skirt if you have this available.
- Before cutting the width, leave extra at the top to form “ties” (see diagrams below)
- Make a slit on either side to thread the ties through and pull for a snug half knot. Once snug, finish the knot in front. (Fringe edge of toga skirt for an extra detail!)
How to achieve a perfect wrap toga skirt every time with a cute side knot. You can then fringe, add trim, add ribbon, etc. This stayed very secure for all the girls using this method. It was tested out with all the dancing that they did. These toga party costumes, even though they were no-sew, had a nice finished look. For extra modesty, you can add a bike short or bikini bottom underneath. Use safety pins to secure any pieces that you feel may come apart as well.
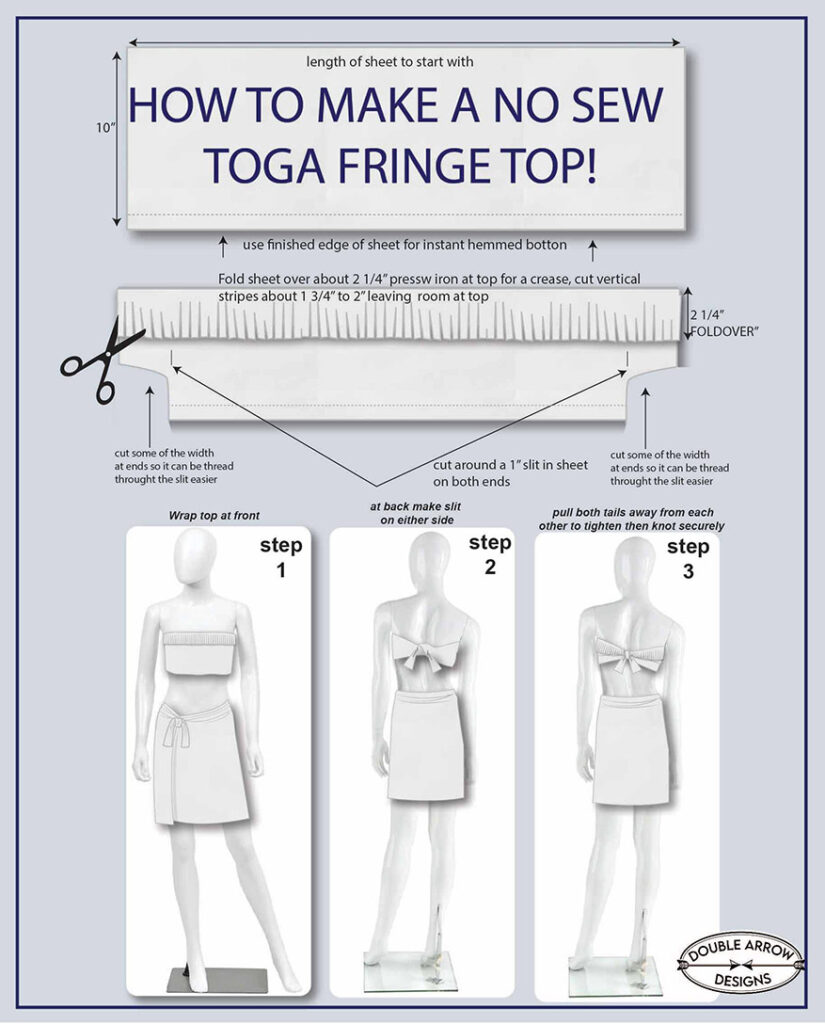
How to make a Toga top with fringe
- Cut a piece of sheet full length. We made the height 12″ with a 2 1/2″ fold over.
- Press with a hot iron at the fold over to create a crisp crease. You can also add a few small safety pins if you want.
- Cut vertical strips around 1″ each to create fringe with the fold over.
- Make a slit on either side at the back to thread the ties through, then pull snugly at a half knot, then finish the knot in in back to secure. Same concept as a skirt
- We used the same detail from the toga skirt by leaving extra length and fringed the bottom with 1″ vertical cuts on her skirt for a complete fringed look!
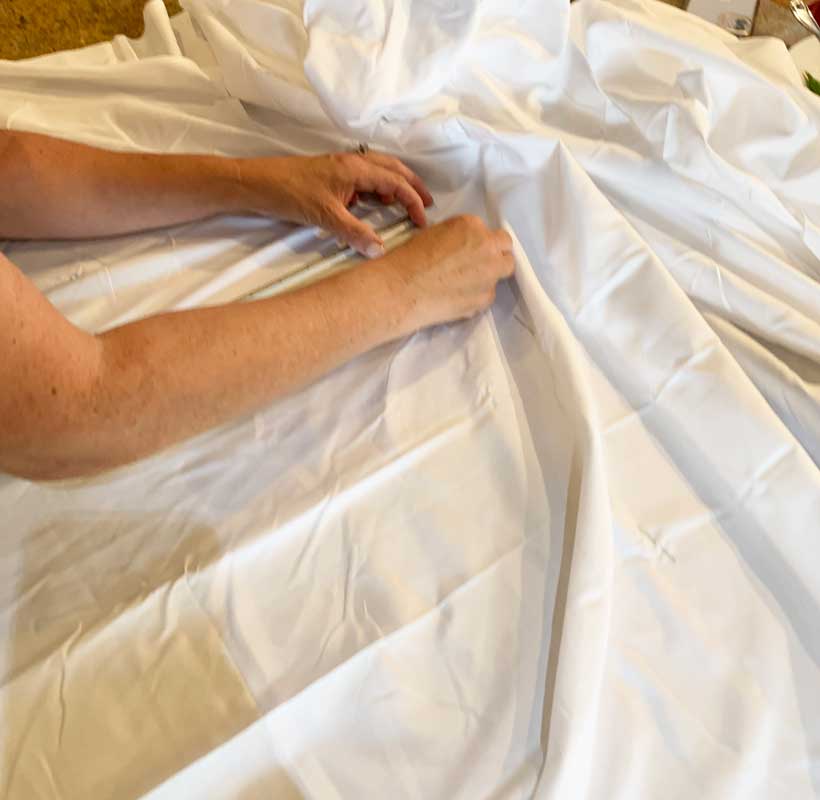
Work on a flat surface to spread your sheet out. Use a tape measure and ruler to mark off desired measurements. Important to use a sharp fabric scissor or rotary cutter and mat, so that you can cut clean, crisp pieces and strips from your sheet.
To add the fringe, I measured an additional 5 inches or so, folded it over, ironed for a good crease, then with a scissors cut the fringe.
This self-healing mat, paired with the rotary cutter and ruler, makes it super easy when making your toga costume. If you are a DIY’er like me, these tools will become invaluable.
No products found.This rotary cutter makes cutting straight lines super easy.
No products found.Using this acrylic ruler with the matt is super helpful since it has a lip on one side that helps to make straight lines.
No products found. No products found.Scissor sharpening hack – Take a piece of Aluminum foil fold a few times into a square. Cut this with your scissors repeatedly to help sharpen the blade. I used this method when I cut the yarn for my pom poms, read about that here, when I made a pom pom mobile. This helped in sharpening my scissors.
Cinched bandeau toga top with straps.
Check out these easy diagrams for step-by-step instructions! Pin or save these diagrams for the toga top and toga skirt for easy how to make a two-piece toga. So simple!
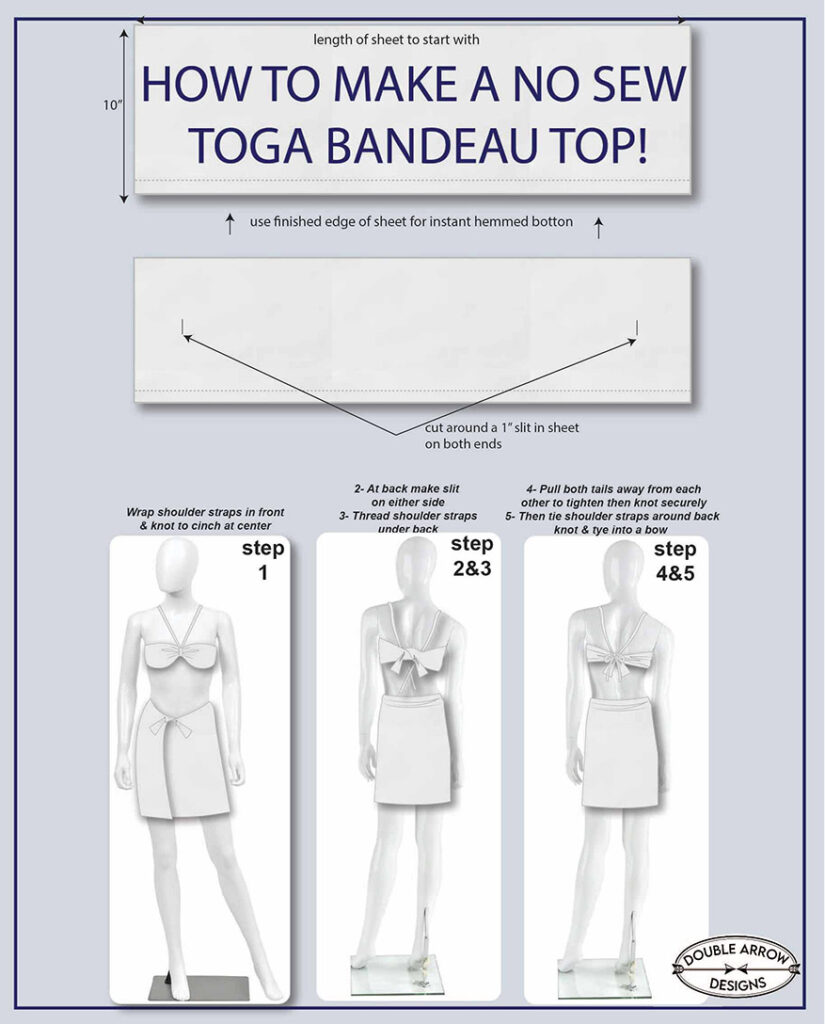
- Cut a straight piece and double it, cinched center with a ribbon (you can also use a strip of a finished edge of a sheet).
- We looped the ribbon (or you can use a strip of finished edge of the sheet) around the center, made a knot at center to cinch the front
- Bring the straps up over the shoulders and tie them securely to the back strap. (important! Do not tie around the neck, this will not keep the top secure.)
- We used the same method as the toga skirt. Made two slits at the back of the band and threaded ends through, pulled snugly at a half knot, and then finished the knot securely at the back.
- You can take three strips of sheet and braid a length. This can be used for straps, or pinned at the edge of the top for a braided, detailed look.
Quick No-Sew Toga Option
If you want the fastest version, start with a lightweight sheet or fabric panel and create a two-piece look with a wrapped skirt and simple bandeau-style top. This keeps the costume easy to adjust and makes it more comfortable than trying to wrap one large piece of fabric around the whole body.
For the skirt, wrap the fabric around your waist, overlap the front, and secure it with fabric tape, safety pins, or a hidden stitch if you want extra hold. For the top, fold a long strip of fabric into a bandeau shape and add fringe or trim if you want the costume to feel more finished.
The best part of this style is that it can be customized with gold trim, sandals, jewelry, ribbon, or a belt, so the costume feels cute instead of thrown together.
Supplies for No-Sew Halloween Toga Costumes
Here is a list of all recommended supplies and materials I used to make these easy toga costumes. These supplies helped to make these toga costumes easier and quicker, especially since I had multiple to make in one day.
- Self-healing mat– perfect to cut on!
- Flat white sheet – instead of buying a whole set
- Rotary cutter– use with ruler and mat for perfect straight cuts
- Large ruler– helps in measuring your fabric
- Sharp scissors– you can use this if you don’t have a rotary cutter
- Grosgrain ribbon– we used this on some of our toga tops
- Safety pins– Since this a no-sew toga, we need to secure our toga costumes together! This is a quick and easy way!
You can also buy the mat, rotary cutter, and ruler in a 3-piece set. These tools are used for all my diy apparel projects and come in handy. You will be able to use this for multiple projects going forward.
Accessories for your No Sew Halloween Toga Costumes
Add gold accessories to complete the look! Accessories can finish off these two-piece togas. Below are some great options. One of the best accessories was the gold temporary tattoos (Shown on one of Emma’s friends, second to right in the photo)

- Gold hoop earrings
- Decorative arm cuffs
- Leaf headband
- Gold cinch belt (for a one-piece look)
- Gold coin necklace
- Chunky statement necklace
- Gold metallic temporary tattoos
- Gold Leaves Hair Barrettes
Footwear for Togas
Yes, you can use a sandal in your closet; however, if you have time, here are some fun sandal ideas to complete your toga outfit

Toga party costume
We achieved no-sew Halloween toga costumes for all the girls. We accomplished this in just one afternoon! All the girls came supplied with an inexpensive pair of full-size sheets to make their toga diy. I supplied a fun lunch, and we all supplied the laughs and ideas. In some cases, I was able to cut three or more pieces from one single flat sheet for these diy togas. I have leftover pillowcases in white that are perfect to use as extras on any bed. So much fun seeing their visions come to life!
Variations on toga outfits
You can use the instructions above or use them as a guide, or come up with your designs! We had so much fun coming up with each toga outfit, figuring out what would work for each person. These toga Halloween costumes are not serious and are very forgiving, since they are no-sew Halloween costumes. It’s easy to tie a knot tighter or adjust a length simply by cutting. Most importantly, just have fun making these! Below are some additional ideas on Toga looks:
- Greek Goddess: Use flowy fabrics like chiffon and add gold accents. Drape the toga asymmetrically and accessorize with a laurel wreath, arm cuffs, and sandals.
- Roman Emperor: Opt for deep colors like burgundy or royal purple. Add a gold belt and pair it with a laurel wreath and sandals. Consider carrying a prop like a scroll or chalice.
- Modern Chic: Experiment with bold colors, patterns, or even animal prints. Create a two-piece toga and accessorize with contemporary jewelry and a fashionable belt.
Ready-made Toga costumes!
Not everyone wants to DIY, so below are some ready-made Toga costumes that can be purchased.
Hope that you found this post helpful for how to make a two-piece toga for Halloween. These are such easy toga costumes that can be made quickly, especially since they are no-sew!
Togas for Halloween
Creating a no-sew toga costume is one of the easiest and quickest ways to get ready for Halloween. With just a few basic materials and some creativity, you can have a stylish and comfortable costume that stands out from the crowd. Whether you’re attending a Halloween party, participating in a costume contest, or just handing out candy at home, this DIY toga costume is sure to impress.
RELATED DIY POSTS!
Like my Toga party DIY post? Check out my related diy posts below for some fun additional apparel DIY projects that I have created. Keep checking back or subscribe because I add new diy projects weekly to Double Arrow Designs!
- Patchwork Jeans DIY- Free People Hack for way less!
- How To Fix Ripped Pant Knees – That Look Amazing!
- How to easily hem a pair of pants
Thanks for stopping by!

This post is all about no-sew Halloween costumes
Last update on 2026-07-30 / Affiliate links / Images from Amazon Product Advertising API