

DIY Furniture Makeover Ideas: Stunning Before and After Transformations You’ll Love!
Originally published on January 29, 2021. Updated on March 14, 2026.
There is something incredibly satisfying about giving an old piece of furniture a brand new life. A DIY furniture makeover is one of the easiest and most budget-friendly ways to update your home while adding personality and character.
Instead of replacing furniture, many DIYers and interior designers are choosing to refinish, repaint, and repurpose pieces they already own. DIY furniture makeovers. Whether it is a thrift store find, a family heirloom, or a forgotten piece sitting in the garage, a simple makeover can completely transform it into a beautiful focal point.
In this post, I am sharing one of my favorite DIY furniture makeovers and the simple techniques that can turn outdated furniture into something truly special.
If you love budget-friendly decorating, creative DIY projects, and stunning before-and-after transformations, this makeover will inspire you to look at old furniture in a completely new way.
This post contains affiliate links. If you make a purchase through one of my links, I may earn a small commission at no extra cost to you. As an Amazon Associate I earn from qualifying purchases.
There are so many great pieces of furniture just waiting to be transformed. Many pieces can be in your own home, on craig’s list, or at a garage sale. All you need is an eye for possibilities. Diy furniture makeovers you will love are easier than you think.
Take a look at my furniture category here, where I transformed an upholstered stool, or where I did a diy furniture redo on this dresser. This is definitely my passion, and I love the endless possibilities for these diy furniture makeovers.
Why DIY Furniture Makeovers Are So Popular
DIY furniture makeovers have exploded in popularity over the past few years, and for good reason. Refinishing old furniture allows you to:
Save money on expensive new furniture
Customize pieces to match your style
Reduce waste and give furniture a second life
Create one-of-a-kind pieces that cannot be bought in stores, furniture flip ideas
In fact, furniture flipping and refinishing projects are one of the most searched DIY categories online because they combine creativity, sustainability, and affordability.
Choosing the Right Piece for a Furniture Makeover
Not every piece of furniture needs to be brand new to be beautiful. In fact, some of the best DIY makeovers start with older furniture that has solid construction. Painted furniture makeovers can be done with the right piece.
Look for pieces with:
- Solid wood construction
- Interesting legs or shape
- Good structural condition
- Drawers or hardware that can be updated
Often, the most outdated pieces simply need paint, new hardware, or a modern finish to completely transform their look.
Step-by-Step DIY Furniture Makeover Process
1. Clean the Furniture Thoroughly
Before starting any furniture makeover, it is essential to clean the piece thoroughly. Over time, furniture collects dust, oils from hands, household residue, and sometimes wax or furniture polish. If these contaminants are left on the surface, they can prevent paint or primer from adhering properly and may cause peeling, bubbling, or uneven coverage later.
Start by wiping down the entire piece with a damp cloth to remove loose dust and debris. For deeper cleaning, use a gentle degreasing cleaner or a mixture of warm water and mild dish soap. Pay special attention to areas that are handled frequently, such as drawer pulls, table edges, and cabinet fronts, where oils tend to build up the most.
If the furniture has been stored in a garage, basement, or attic, it may also have accumulated grime that requires a stronger cleaner. Many furniture painters prefer using a degreasing cleaner specifically designed for prepping furniture surfaces. These cleaners break down waxes and oils without damaging the wood.
After cleaning, allow the furniture to dry completely before moving on to the next step. A clean surface is one of the most important factors in achieving a smooth and durable painted finish. Taking the time to properly prep the piece will make the entire makeover process easier and will greatly improve the final result.
2. Lightly Sand the Surface
Once the furniture is clean and dry, lightly sanding the surface helps prepare it for paint or primer. Sanding creates a slightly rough texture that allows the new finish to grip the surface more effectively. This step is especially important if the furniture has an existing glossy finish or protective topcoat.
You do not need to remove all of the previous finish unless it is peeling or damaged. Instead, focus on lightly scuffing the surface using fine or medium grit sandpaper. The goal is simply to dull the shine and create a surface that paint can adhere to more easily.
Sanding also helps smooth out small imperfections such as minor scratches, rough spots, or uneven areas in the wood. If you are working with detailed furniture, carved edges, or decorative trim, sanding sponges can be helpful because they flex and reach into tight areas more easily than traditional sandpaper.
After sanding, wipe the furniture down again with a clean cloth or tack cloth to remove any sanding dust. Even a small amount of dust left on the surface can interfere with paint adhesion and affect the smoothness of the finish. Proper sanding and dust removal create the ideal foundation for a professional-looking furniture makeover.
3. Prime When Necessary
Primer is an important step in many furniture painting projects and can make a significant difference in the durability of the finish. While not every piece requires primer, it is especially helpful when painting laminate furniture, glossy surfaces, or darker wood tones.
One of the primary benefits of primer is that it improves paint adhesion and provides a more uniform base color. Without primer, darker wood finishes may show through lighter paint colors, requiring additional coats of paint to achieve full coverage.
Primer also plays an important role in blocking wood tannins. Some types of wood contain natural oils that can bleed through paint and create yellow or brown discoloration over time. Applying a quality primer helps seal the surface and prevents these stains from appearing in the finished paint job.
When working with furniture that has a very slick or sealed surface, primer helps ensure that the paint bonds properly and remains durable over time. It creates a stable base that allows the paint to adhere evenly and prevents chipping or peeling with everyday use.
4. Apply Paint or Finish
Once the furniture has been properly cleaned, sanded, and primed if necessary, it is time for the most exciting part of the process, applying the paint or finish. This is where the transformation truly begins, and the personality of the piece starts to come through.
Paint is one of the easiest and most effective ways to completely change the look of a piece of furniture. The color you choose can instantly shift the style of the piece, making it feel modern, farmhouse-inspired, coastal, or classic.
Several types of furniture paint work well, depending on the desired finish and the level of prep you prefer.
Chalk paint is popular because it typically requires minimal sanding and provides a soft, matte finish that works beautifully for vintage or distressed styles.
Milk paint is another favorite among furniture painters. It offers a natural, slightly textured finish and is often used for creating an authentic antique look.
Latex furniture paint provides excellent durability and is available in a wide range of colors. Many modern furniture paints are self-leveling, which helps minimize brush strokes and creates a smoother finish.
Furniture wax finishes can be used as a protective topcoat or to add depth and softness to painted surfaces. Wax also helps seal the paint and adds a subtle dimension to the finish.
Applying thin, even coats of paint and allowing proper drying time between coats will help achieve the best results. Taking your time during this stage ensures that the finished piece looks polished, professional, and beautifully transformed.
- Chalk paint
- Milk paint
- Latex furniture paint
- Furniture wax finishes
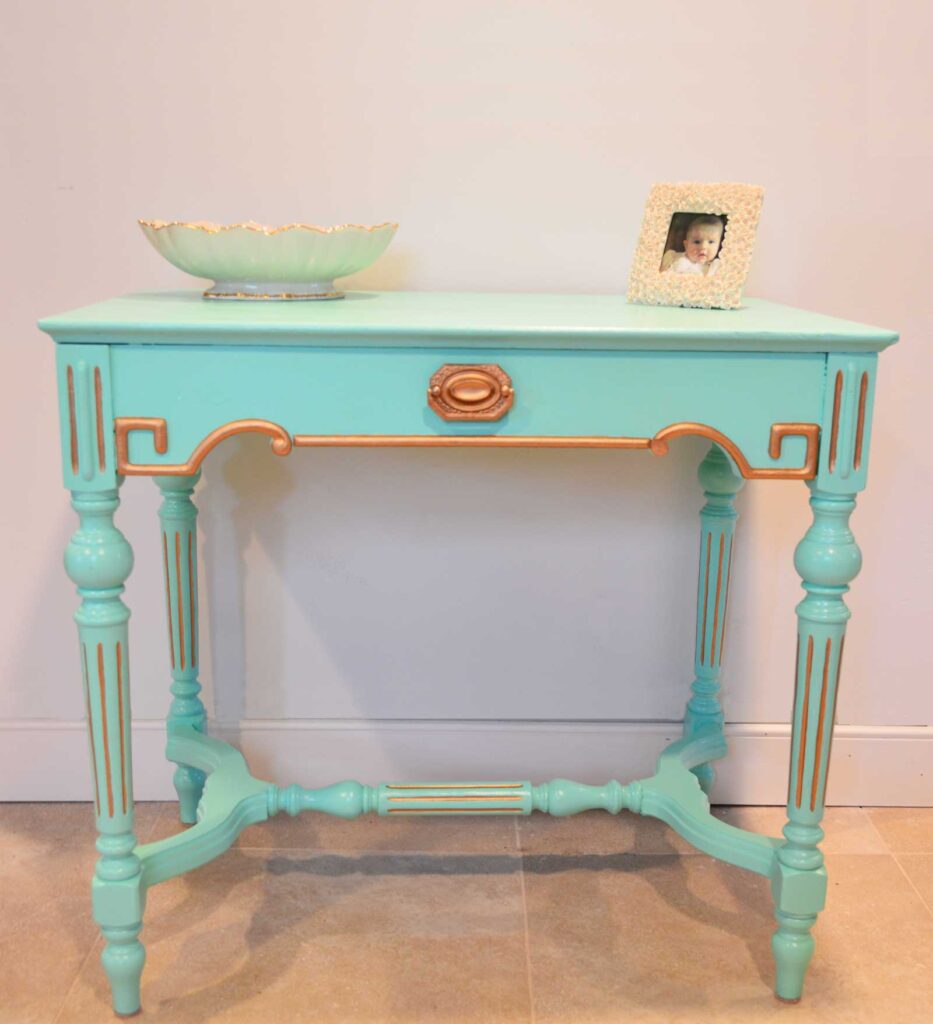
DIY furniture before and after. Choosing the right color can completely change the feel of a piece.
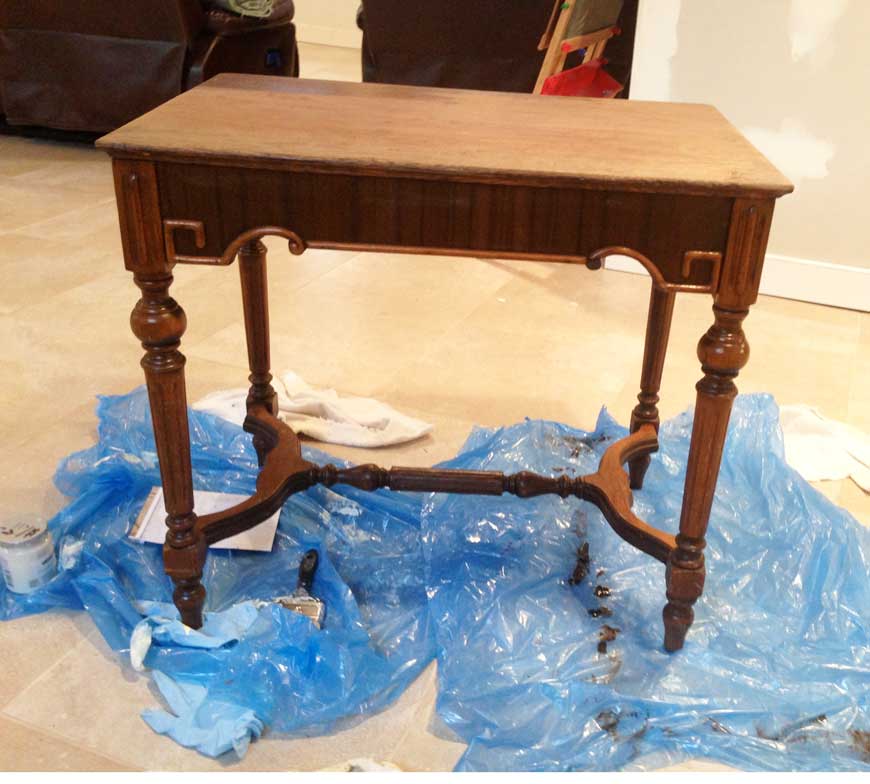
Wow! Yep! This is the piece of furniture that I started with before it got its makeover. My first step is always to figure out my color scheme. Because of the lines on this, we wanted to accent the molding. The idea of an aqua and gold metallic combo was the perfect match!
Steps to diy painted furniture makeover
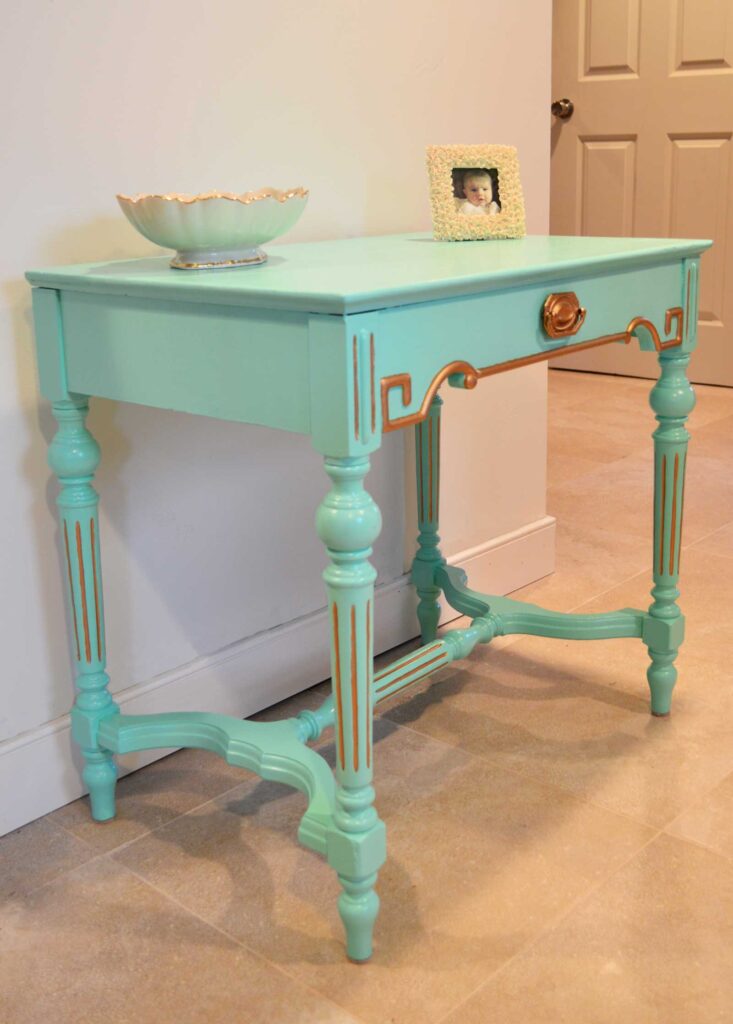
- Clean the entire piece, lightly sand if necessary
- Make sure a tarp is placed under the piece to protect the floor
- Use Rust-Oleum Zinsser Bulls Eye 1-2-3 Primer . Paint 2 coats, let fully dry between coats, and after the last coat
- Choose your color of choice. I like regular house paint for all my projects. Testers are the best because there is usually enough paint in these containers for a paint project. I usually use Benjamin Moore
- Use good paint brushes. I use Purdy brand, they are a little more expensive, however, if you clean them properly, you will have them for years.
- Paint one coat, let it dry, then paint a second coat.
- Once the second coat of paint is dry, I wait about 24 hours and add a finishing protective coat of Minwax Polycrylic Protective Finish. This will help the paint not chip.
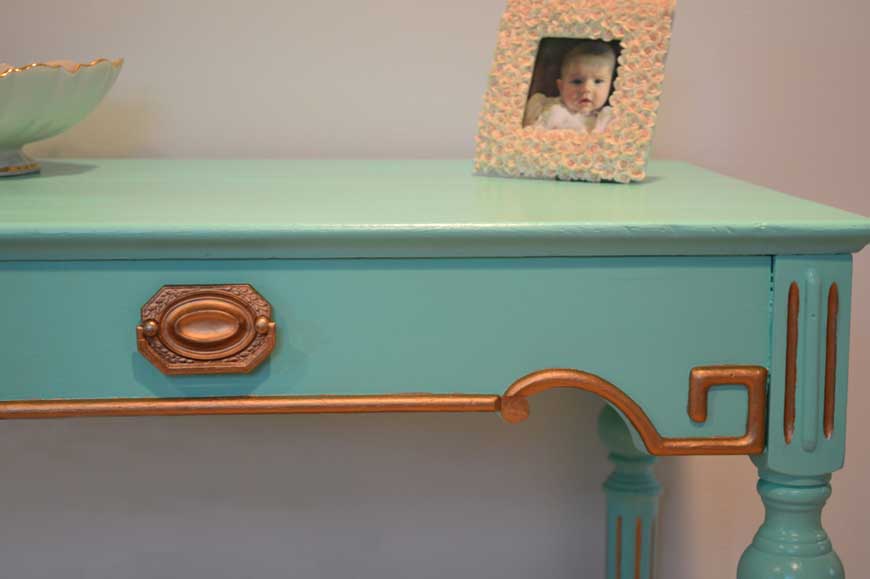
- In this case, I added a metallic gold accent to my moldings. I used Rust-Oleum 253537 Metallic Accents Paint, Quart, Soft Gold
- I added a decorative gold pull with a backplate. Check out this similar one here from Amazon.
- My final touch is adding Felt tabs to the bottom of all the legs. This helps to protect your flooring under your new painted furniture transformation
5. Update Hardware and Details
One of the easiest ways to elevate a furniture makeover is by updating hardware. New knobs, pulls, or decorative accents instantly give a piece a more custom look. Take a look at this blog for a variety of knobs. Choosing Furniture Pulls and Knobs That Wow.
Take a look at some of these Novelty knobs that can really make your DIY furniture makeover idea really shine!
Final use for this furniture makeover
We ended up selling this piece to a woman in Brooklyn. She gifted this to her daughter, and it made for a beautiful vanity piece!
DIY Furniture Makeover Design Ideas
If you are looking for inspiration for your next project, here are some creative furniture makeover ideas.
Paint a dresser in a bold color
Add decorative stenciling to drawer fronts
Create a weathered farmhouse finish
Use metallic paint for a modern glam look
Replace hardware for a designer feel
Even small updates can dramatically change the appearance of a piece.
Tips for a Professional Looking Furniture Makeover
Over the years of working on DIY projects, I have learned a few tricks that make furniture makeovers look more polished and professional.
Use high-quality paint brushes or rollers
Allow proper drying time between coats
Seal painted furniture with wax or topcoat
Replace outdated hardware
Take your time with prep work
These small steps make a huge difference in the final result.
Final Thoughts on DIY Furniture Makeovers
A DIY furniture makeover is one of the most rewarding home projects you can do. With a little creativity and some simple supplies, an outdated piece can become a beautiful statement in your home.
The best part is that every makeover is unique. Whether you prefer a farmhouse style, modern finish, or vintage inspired look, refinishing furniture allows you to create something that perfectly reflects your style.
If you love before-and-after transformations as much as I do, furniture makeovers are a wonderful way to refresh your home without spending a fortune.
Related Posts
If you enjoy seeing creative furniture transformations, be sure to explore some of my other DIY furniture makeover projects as well. One of my favorite things about refinishing furniture is that every piece has the potential to become something completely new with just a little creativity and the right techniques.
Over the years, I have worked on a variety of furniture makeovers, from simple painted updates to more detailed transformations that completely change the style and purpose of a piece. Whether it is giving a tired side table a fresh new look, repurposing a vintage furniture base, or adding a unique finish to a dresser, each project shows how older furniture can be updated to fit beautifully into today’s homes.
These additional tutorials walk you through the full process step by step so you can confidently tackle your own furniture makeover projects. You will find helpful tips on prepping furniture, choosing the right paint and finishes, and adding those small design details that make a piece truly stand out.
If this DIY furniture makeover inspired you, I think you will love exploring these other projects. They are full of creative ideas, before and after transformations, and practical techniques that will help you turn outdated furniture into something stylish and unique for your home.
More Furniture Makeover Guides
Keep going with these related Double Arrow Designs guides:
- How to paint wood furniture like a pro
- How to paint outdoor metal furniture
- How to paint wicker furniture
- Old dresser makeover ideas
- DIY telephone chair makeover
- Adding legs to furniture
- Must-have DIY tools for furniture makeovers
Thanks for stopping by!

This post is all about DIY furniture makeover ideas