Transform Your Home: Stunning Furniture Stencil Ideas You’ll Love!
Furniture Stencil Ideas
I’ve put together my beautiful furniture stencil ideas that are perfect for giving any piece a fresh new look! Check out some of my projects below to see how easy and fun stenciling can be. Grab these free furniture stencils and create something amazing for your next DIY project!
My blog periodically contains affiliate links meaning that if you make a purchase, I might make a small commission at no extra charge to you. Purchases made through them are greatly appreciated.
Furniture stencils
These are great for furniture stencil ideas! Use one or a few, change the sizes, and create your own layout. Download the below and use them for your own personal use.
Easy to download and use on your next furniture project! Below you can download for free 5 of my 9 stencils; the other ones you can find on my Etsy store.
How to get crisp lines when stenciling?
Use a minimal amount of paint. Dip your brush or roller, then blot most of the paint off onto a paper towel — a “dry brush” technique prevents bleeding.
Secure your stencil well. Use painter’s tape or stencil adhesive spray to hold it tight against the surface.
Apply paint in light layers. Tap or swirl the brush gently in an up-and-down motion rather than brushing side-to-side.
Lift the stencil carefully. Peel it off slowly while the paint is still slightly wet to avoid tearing the edges.
Seal it afterward (optional). For a professional finish, lightly seal your stencil work once it’s dry.
NOTE* Don’t have a Cricut or Silhouette to create your own stencil from these downloads? No problem! Use the files and upload to a stencil-on-demand website, and have them deliver your stencil to you!
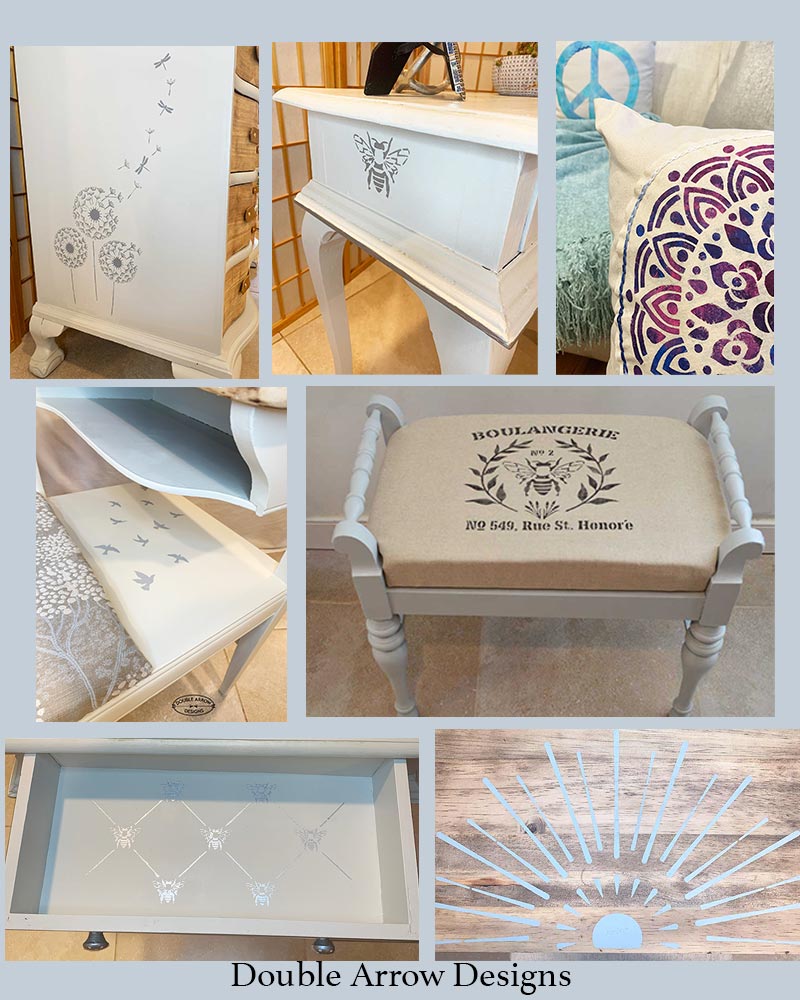
1. Furniture stencil idea used on a desk makeover
Take a look at some of the finished results using the custom furniture stencil designs I’ve created! One of my favorite examples is from my latest project, the Old Desk Makeover — Bland to Boho! This transformation, I designed a large circle stencil featuring a bold starburst pattern. I used the full starburst on each side panel of the desk, adding a dramatic, eye-catching detail that instantly gave the piece new life. On the top surface, I used half of the same sunburst stencil, creating a gorgeous focal point that ties the whole design together. This simple yet striking stencil technique completely changed the look of the desk, giving it a fresh, boho-inspired vibe that’s full of personality.

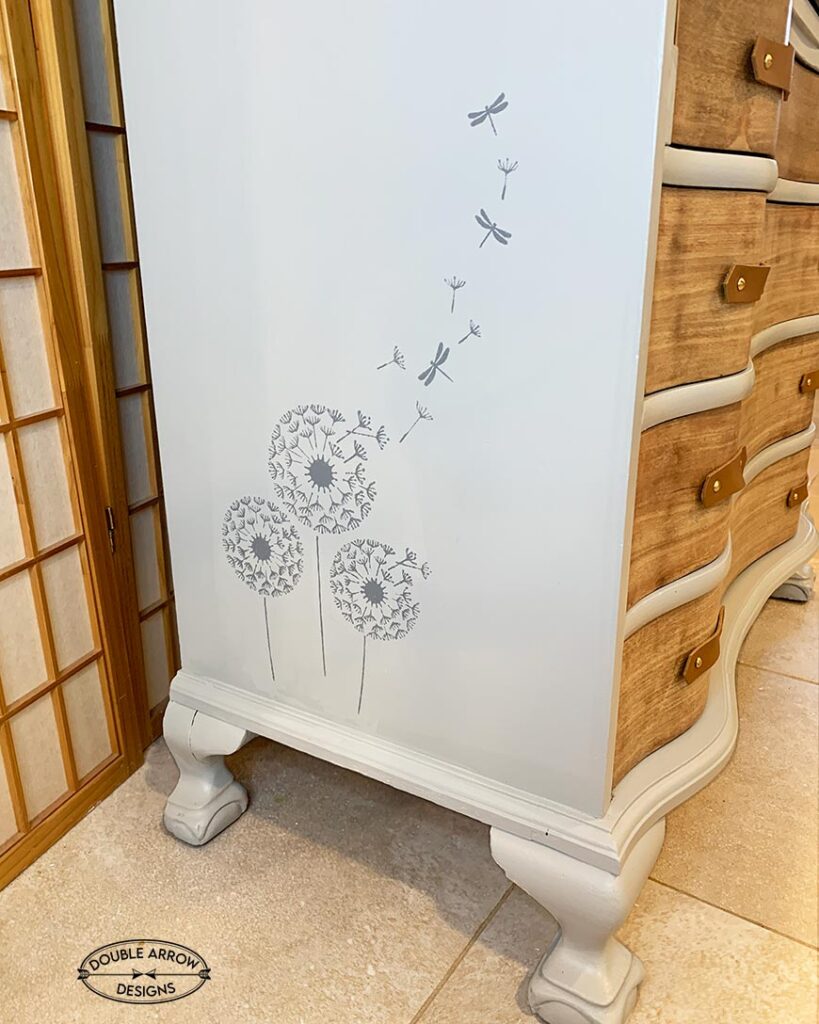
2. Dandelion furniture stencil
This whimsical dandelion stencil was used on a vintage secretary desk makeover. You can see all the details in my post here: How to Refinish a Secretary Desk. I designed this custom dandelion pattern with a special twist — as the seeds float away, they gradually transform into delicate dragonflies, symbolizing freedom, transformation, and new beginnings. It’s a subtle yet powerful design that brought a meaningful and artistic touch to the piece. The soft, flowing motion of the stencil gave the desk a fresh, airy feel, making it not just a functional piece of furniture but a true conversation starter.
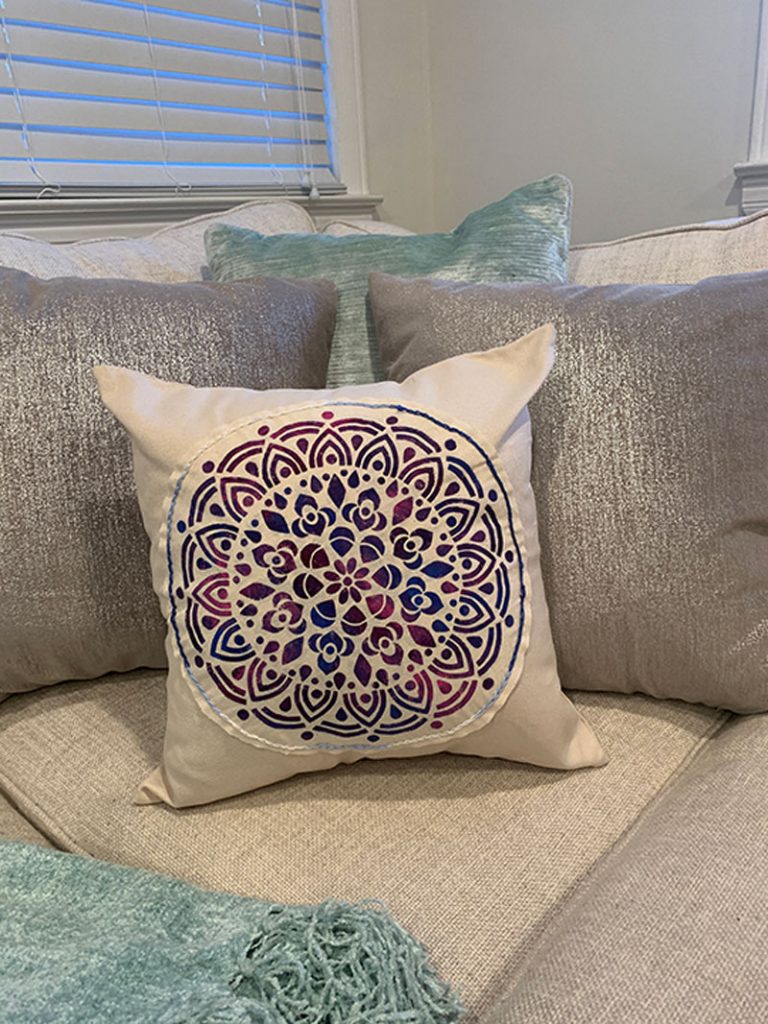
3. Medallion Stencil
This was one of my first stencils that I designed, and I used it on fabric for a pillow. Stencils for Pillows. The ombre paint gave this stencil a whole new look. Other furniture stencil ideas for this would be for a painted furniture project or even on wood stairs!
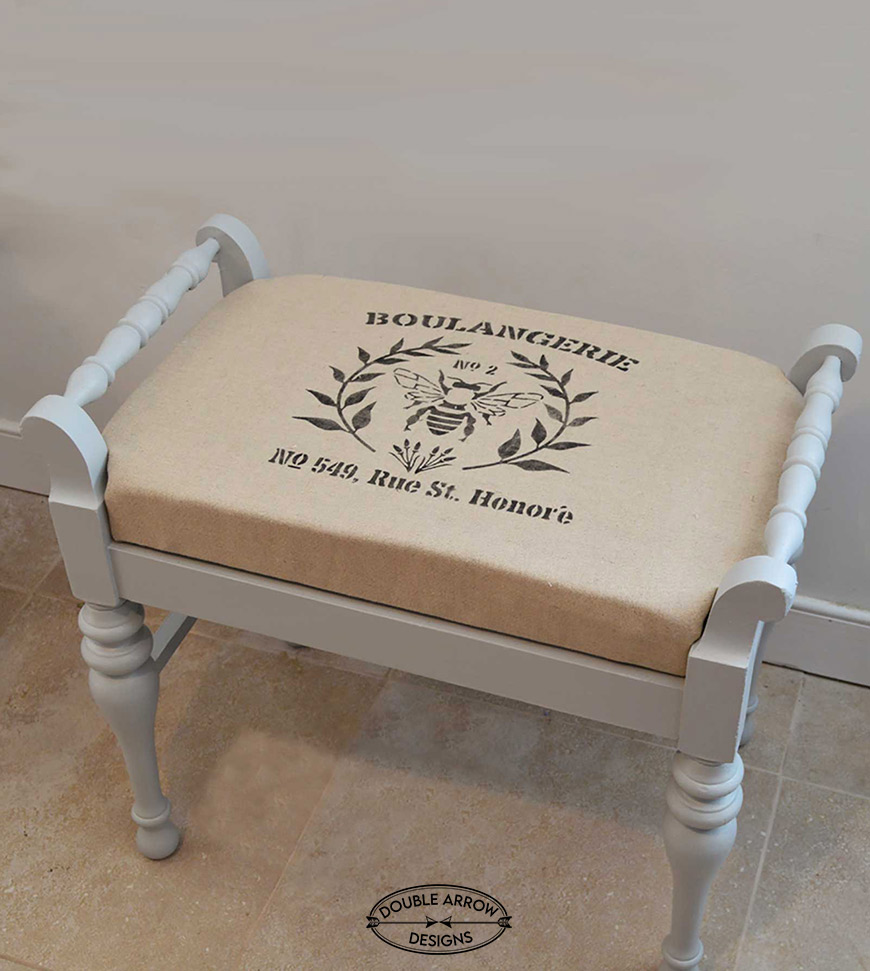
4. French-Inspired Stencil
I created this one on How to Repurpose an Upholstered Bench. This versatile stencil can also be used on wood furniture for a different look, making it perfect for so many DIY projects. Imagine using this design on the front of a drawer for a bold, decorative statement, or even as a stunning accent on a desktop. It would also work beautifully on a stool, adding a touch of personality and charm to an otherwise simple piece. If you’re interested in bringing this design into your own home, you can find it available for purchase in my Etsy shop, where I offer various stencils to suit all your furniture makeover needs.
5. Bee Inspired stencil

Had so much fun creating this unique design with my niece, Taylor. You can check out the full process in the post linked here. For this project, I designed a stencil that, when repeated, forms a charming all-over bee print. We used this design to add a subtle yet whimsical touch to the inside of the drawer, creating a little surprise every time it’s opened. To add a bit of sparkle, I took a single bee stencil and applied it to the side of the table, using Modern Masters metallic paint to give it a beautiful, eye-catching shine. The contrast between the soft all-over pattern inside and the metallic accent on the outside made for a stunning, personalized finish that’s truly one of a kind!
No products found.Is spray paint better for stencils?
Spray paint can be a great choice for stenciling, but it depends on the project and the effect you’re going for. Here are the pros and cons of using spray paint for stencils:
Pros:
- Smooth Coverage: Spray paint provides even coverage, helping to avoid brush marks and creating a crisp, clean finish, which is especially important for stencils.
- Time-Saving: It’s quicker than using a brush, especially when covering large areas or intricate designs.
- Less Bleeding: When used correctly, spray paint can prevent the paint from bleeding under the stencil, as it tends to be more controlled in terms of coverage and application.
- Variety of Finishes: You can find spray paint in a variety of finishes, from matte to glossy to metallic, allowing for a range of different looks.
Cons:
- Over-Spray Risk: It can be tricky to control, especially in indoor spaces, leading to unwanted over-spray on surrounding areas.
- Difficult to Layer: If you’re doing multi-color stenciling, it can be harder to layer spray paint without disturbing previous layers.
- More Preparation: You’ll need to make sure you’re working in a well-ventilated area, cover nearby surfaces, and use a drop cloth to avoid overspray.
Tips for Using Spray Paint with Stencils:
- Use Light, Even Coats: Hold the spray can at least 6-12 inches from the stencil and apply light, even coats. It’s better to do several thin layers than one heavy one.
- Test First: Always test your spray paint on a scrap piece of material before using it on your final project to ensure the spray pattern is right.
- Use a Stencil Adhesive or Painter’s Tape: Secure the stencil tightly to avoid any shifting that could cause bleeding.
When stenciling on wood, the best paint depends on the look you want and the level of durability needed. Here are some top options:
1. Acrylic Paint:
- Best For: Most wood stencil projects.
- Why: Acrylic paint is versatile, dries quickly, and is available in a wide range of colors and finishes (matte, satin, gloss). It adheres well to wood and gives a smooth, even finish. Acrylics are also easy to clean up with water.
- Tip: Use a matte finish if you want to avoid any unwanted sheen and for a more natural wood look.
2. Chalk Paint:
- Best For: Vintage, shabby chic, or distressed finishes.
- Why: Chalk paint has a thick texture that provides excellent coverage on wood surfaces. It works well for creating a textured, worn look, and it can be easily distressed with sanding for a more rustic feel. Chalk paint often doesn’t require a primer, making it a time-saver.
- Tip: While chalk paint is fantastic for decorative projects, it may need a topcoat (like wax or polyurethane) to seal and protect your stencil work.
3. Milk Paint:
- Best For: An authentic, antique look.
- Why: Milk paint is a natural, eco-friendly option that works beautifully on wood. It gives a matte, slightly rustic finish and is ideal for creating a vintage effect. You can mix it yourself in powder form for custom color blends.
- Tip: Milk paint can sometimes chip and peel naturally, so it’s perfect if you want an aged or distressed look.
4. Oil-Based Paint:
- Best For: Durability and high-traffic areas.
- Why: Oil-based paints offer a strong, long-lasting finish and are great for furniture or other wood pieces that will see frequent use. They take longer to dry but result in a smooth, durable surface.
- Tip: Use oil-based paints in areas that need extra durability (like tables or countertops), but be aware they take longer to cure and require solvents for cleanup.
5. Spray Paint (for Large Areas):
- Best For: Stenciling large surfaces quickly and evenly.
- Why: Spray paint is great for achieving an even, smooth coat over large areas. It’s fast and can work well on wood if used carefully.
- Tip: Use in well-ventilated areas, and be sure to test it on scrap wood first to ensure the spray paint doesn’t bleed under your stencil.
Key Tips for Stenciling on Wood:
- Prime the Wood First: If the wood is raw or unfinished, it’s a good idea to apply a primer first to ensure even paint adhesion.
- Use Light Layers: Apply thin coats of paint to prevent it from bleeding under the stencil.
- Seal the Finish: After stenciling, seal your design with a clear coat to protect it and make it more durable, especially for high-use furniture.
Material used to make furniture stencils
There are three go-to materials that I have used for my furniture stencils when working on a project.
First of all, clear contact paper works terrific and is easy to cut through, and isn’t expensive. The downside to contact paper is that it’s pretty thin, and you have to be mindful when applying it to your surface. I usually start with a corner and peel the backing away as I smooth it on.
No products found.clear acetate sheets- heavier so make sure that your settings on your machine are appropriately set. Once cut, I use a light coating of spray adhesive to give it a sticky backing to adhere to my surface. However these are reusable so once you cut a stencil you can use it over and over again.
No products found.Vinyl, which can be cut and then peel the backing off as you adhere to your surface.
No products found.Free Furniture stencils below!
Sign up and you can download these 5 stencils for free! Just subscribe, then download the zip file and expand. These PNG files. They are ready to be used for your cutting machine or stencil-on-demand site.
How do you stencil on wood furniture?
Once you choose the material for your stencil, place it on the desired area. It’s not always possible, but when it is, turn your piece so that your stenciled surface is facing up. This is a much better way to see and apply paint.
Place a portion of your paint into a container. I like to do this so I am not dipping my brush into my full jar of paint, which may contaminate it. By using smaller amounts, your paint goes a long way.
Once you dip your brush into the paint, I use a cloth or paper towel and wipe excess paint until the brush has minimal paint.
Then, in a downward motion, I apply the paint. Avoid back-and-forth strokes, which may cause paint to bleed under the stencil. I usually apply 2-3 coats before I achieve my desired coverage.
No products found.How do you stencil on wood without bleeding?
Bleeding occurs when too much paint is placed on the surface and has nowhere to go but under the stencil surface. Believe me! This has happened to me. A few pointers to avoid this happening are as follows:
- As I have said above, wipe any excess paint off the brush before starting to apply on the stencil, keep strokes in a downward motion to avoid pushing paint under the stencil
- Another technique is brushing on Mod Podge around stencil edges to create a barrier stencil and to surface, then painting the stenciled areas.
- If a bleed occurs, then go back with furniture color and clean up edges with a small pointed brush, not ideal, but a good way if a small bleed has occurred. This happened in my dandelion stencil and by using the paint color I used on the secretary desk, I achieved the sharp edges I wanted.
Related posts
Take a look at some additional posts where I have used stencils on my projects. Not only can you use these stencils on furniture, but they have also been so useful on additional projects. Take a look below.
Thanks for stopping by!

This post is all about Furniture stencil ideas
Last update on 2026-07-04 / Affiliate links / Images from Amazon Product Advertising API